
Doyusha | 1/32 N1K2 George
Reviewed by Rato Marczak
A KIT WITH "FAMILY LINEAGE"
Well, this is a kit with a true family history, and probably most of you know why. This kit was originally released by Tomy models a long time ago. Then it was reissued by Swallow for some years more. Currently it is part of Doyusha catalogue, and can be found in many hobby shops. As a matter of fact, the entire original line of Tomy 1/32 models followed this path. This includes the N1K2 George, the A6M2 Zero, the Ki-84 Frank and the P-51 Mustang. I guess that the longevity of the Doyusha 1/32 kits is due to their unique subjects or versions of a subject.
All these kits have something in common: recessed panel lines and countersunk rivets, so they are good options for you looking for a 1/32 project without rescribing. However, many modelers still discuss about the "heaviness" of their rivets . More on that later.
Now, let's open the box...
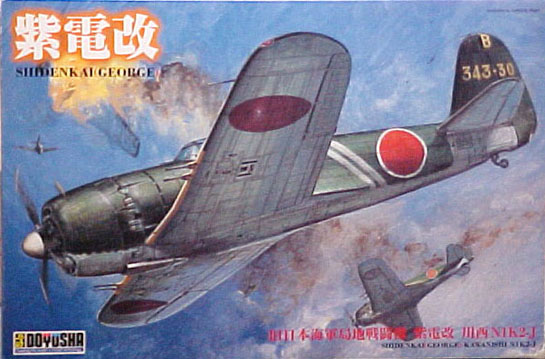
The box art.
OPENING THE BOX
The kit comes in big box with a terrific artwork. The instructions come in the form of a booklet with 8 pages, covering 7 major assembly steps, camouflage/decal application and parts layout. Like the Revell Ki-61 Tony review, don't ask me what is written in there. Color references are for Gunze Sangyo Aqueous paints.
The kit comprises 89 parts in light gray parts in four sprues individually bagged, plus 3 clear pieces for the canopy. 26 of these are parts not for use. They seem to belong to another variant of the N1K family that never became reality as a kit, as far as I know. The plastic is soft, pretty much like most Revell kits. No visible warping was detected in my sample. There are almost no flash and I've found no ejection pin marks on any exterior surface of the model.
However, after inspecting the kit contents you will easily see the two major points of deception in the kit: the useless (or should I say lack of?) cockpit and a really bad engine.
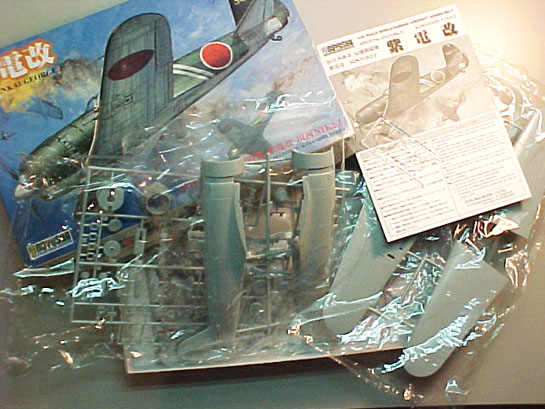
This is what you get once you open the box (Woops, forgot the decals...)
The molds of this kit stood well all those years. Contrary to most old 1/32 offerings, the best thing about the Doyusha George are the recessed panel lines and rivets. As I will try to show herein, the basic airframe is there, but the detail parts leave a lot to be up for today standards.
I won't bother you with numbers, but let me tell you this: I've checked several dimensions, not only overall span and length, but also ailerons, rudder, propeller diameter and many other things. The rivets line stations and access panels were checked, too. Now let me tell you this: or the original Tomy research team used the same drawings I have, or this is one of the most dimensionally accurate 1/32 kit on the market. However, only linear dimensions were measured, so I can't claim the same accuracy level as long as shape is concerned. But all those measurements couldn't be on spot if any significant error in shape exist...
Anyway, with almost 40 cm of wingspan and about 30 cm in length, this is a big model. Bigger than Zeros and Oscars we get used to see in this scale. The basic breakdown of the airframe is shown in the pictures below, along with the other sprues.
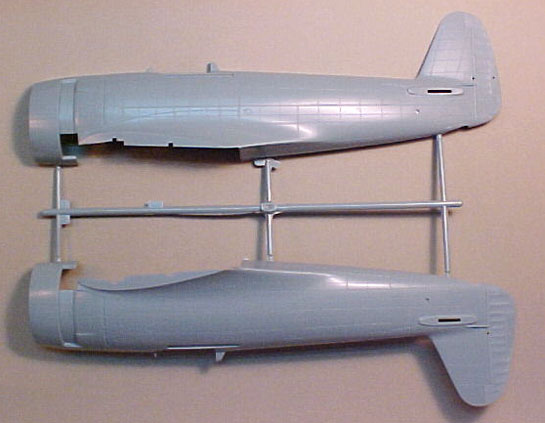
Sprue 1: Fuselage main parts.

Sprue 2: Wings main parts.
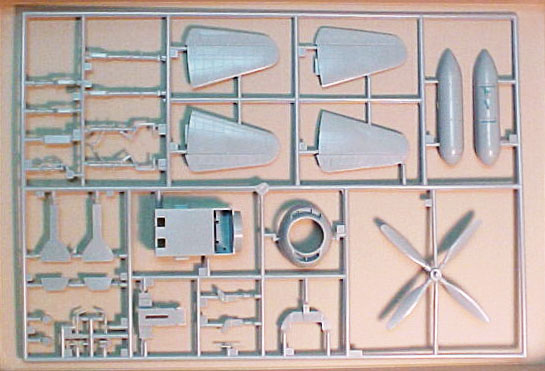
Sprue 3: Smaller parts.
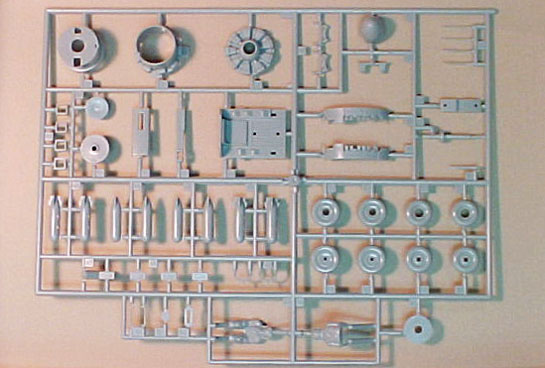
Sprue 4: More smaller parts.
MAIN PARTS
The basic airframe is split in a classical nine parts assembly, as you can see from the sprues. I found no significant warping on any of them. As I said, panel lines, access panels and rivets are all made in a countersunk, consistent fashion. This has been a matter of discussion among some fellow modelers. Many of them claim that the rivets are too much on the heavy side. These rivets are not subtle like in the Revell Ki-61 Tony, but personally I think that if you are going to prime, paint cammo, apply gloss clear, then decal and a final coat of flat clear, the effect will be naturally lightened. If you want, use the old recipe to alleviate this: hand brush Mr. Surfacer along all rivet lines and remove the excess using a tissue paper wet with Mr. Thinner. This will remove the filler from all raised areas, partially filling the rivets holes. Another option is to spray a good coat of Future Floor over the main parts before starting the assembly. However, this procedure will obviously reduce the depth of all recessed features.
The control surfaces have a convincing, although a bit overdone fabric texture. You should sand them slightly. The George had huge fairing blending the wing roots to the fuselage. This effect is captured on the model, but there is no representation of the overlapping panels. You can simulate this during the weathering step.
The fit of the main parts is very good. With careful cement application only a small amount of filler may be necessary. The lower wing areas that meet the fuselage will require some filling/sanding. Doyusha upper wing halves typically comes with a pair of hooks which fit tightly in the corresponding fuselage slots. This design eliminates any need of filling wing root gaps.
For the detail fanatics, the control surfaces can be removed for repositioning without much effort. Just a few passes with a scribing tool. But they will have a hard time working on the openings left. Even if you are not going to remove them, it is a good idea to deepen the grooves around the control surfaces, because in some areas they are not very convincing.
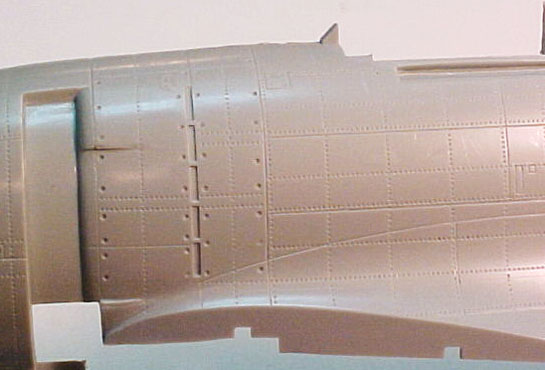
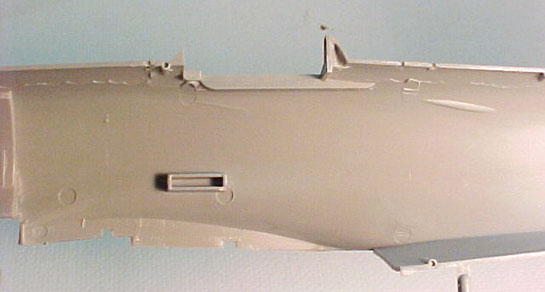
The recessed panel lines and rivets at a glance (left fuselage).
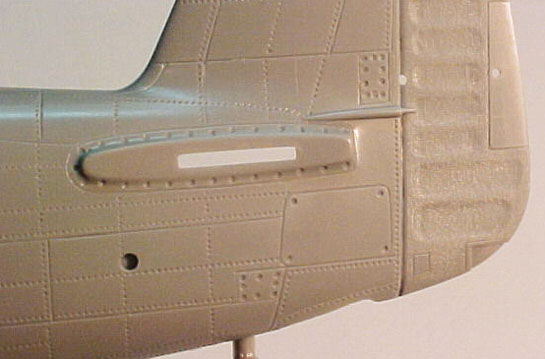
Detail shot of the tail area. Note the fabric covered rudder.

The recessed panel lines and rivets at a glance (upper right wing)
COCKPIT
Now let's see the easiest area (for this review): the cockpit. Easiest? Yes. Comprising only four parts (not counting the pilot), the cockpit is an easy match for many 1/72 models. Even if it was accurate, it is not deep enough. To give you an idea of what we are talking, the pilot is cut at the knees, and that's where the cockpit floor goes. There's an explanation for that, though: the original Tomy kits were designed to be motorized, and then the cockpit and engine areas were sacrificed to provide room for the electrical stuffs.
So, if you are thinking in a detailed model, forget about the cockpit. You'd better throw it away or put the parts in your spare box. Nothing there is even marginally accurate. Neither the fuselage inner sides have any sidewalls detail.
For you who really cares of a detailed cockpit, I'd recommend to scratchbuild everything there. I really mean everything. In view of the (way too) wrong depth of the floor there's no other choice, I'm afraid to say. And don't forget to remove the crude gun sight representation molded with the fuselage halves, because you will need a new one too.
I know, we need lots of references on a not really popular aircraft. Maybe a detail manufacturer will come to help here, giving us a full resin cockpit for this bird. And hurry, please.
You want to assemble the kit OOB? Ok, but cement the canopy in closed position and cross your fingers! With luck, no rivet counter will look inside to check how detailed is the cockpit.
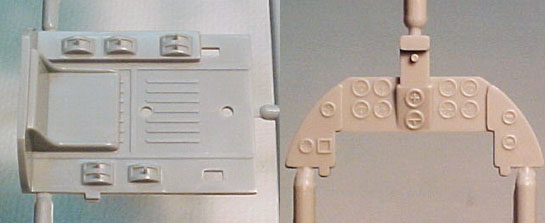
This is half of the cockpit parts (the others are the stick and the rudder pedals).
Inside the fuselage. Pretty well detailed, huh?
ENGINE
This is the other poor area of the model. The kit provides only a very crude representation of the front row cylinders. The second row is in fact a slot for the electrical motor for which the kit was once designed. There's no push rods, no wiring, no magnetos. Nothing.
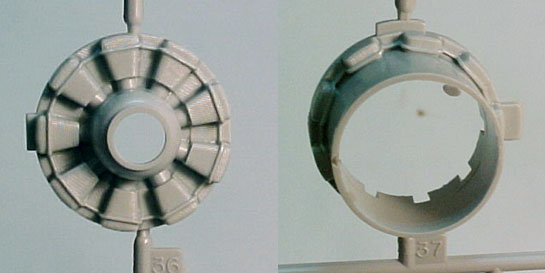
This is all about the engine.
The front cowling ring is quite good, fits well to the fuselage, and includes a decent representation of the grilles inside the air intakes. Consider using a black wash instead of dry brushing because these are narrow areas. The cowling flaps are molded altogether along with the exhaust stacks in a separate part. Some of you will open the stacks ends to improve the appearance, and this approach is probably easier than replacing them for scratch. Think twice if you are going to replace the cooling flaps for new ones in open position, because the stacks must be removed and replaced.

Front cowling and cooling flaps / exhaust stacks.
The propeller comes in a single part. I can't tell you much about the shape of the blades, but the diameter is accurate. It is sandwiched between the front and the back spinner parts.
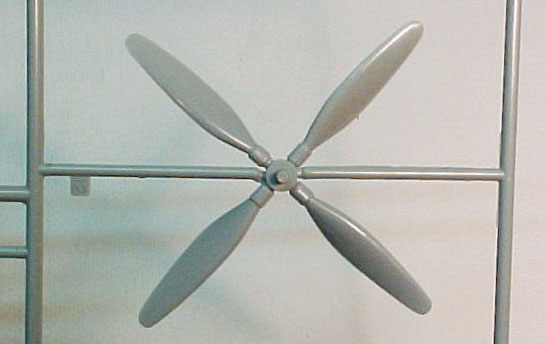
The propeller comes in a single part.
The actual aircraft was engined by a Nakajima HA-45, a radial 18 cylinder beast delivering up to 1900 hp. One could argue that most of the engine won't be visible, so we can stick with the kit parts. Ok, considering the small (for a 18 cylinder engine) cowling aperture, it may be bit hidden behind the spinner. You know, we can easily hide an inline engine. But personally I think that most radial engines in 1/32 scale is a major point of interest
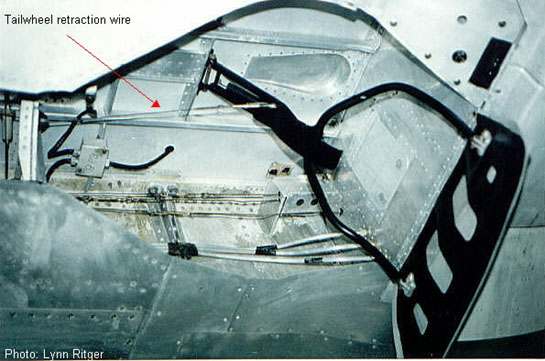
Not convinced? The picture below is of a N1K-2J at the National Museum of Naval Aviation, NAS Pensacola, Florida, US. See all that plumbing and stuff? If this picture convinced you to replace the kit engine, here is the best shortcut: Engine & Things produces a nice resin replacement for this kit, product no.32041: "Nakajima HA-45 (NK-9) Homare 18 cyl. for Ki-84 (Frank), N1K1,1-J,2-J (George)".
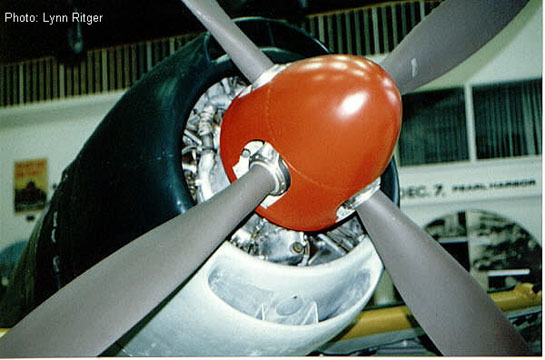
The nose area of the N1K-2J at NMNA. Courtesy of Lynn Ritger from DetailSite.
LANDING GEAR
Landing gear parts are quite simple, the main struts being fairly detailed. Just clean any seams and add the break lines. You can easily open the typical small holes through the torque links to improve their look. However, the retraction arm should be replaced for some better looking plastic rods. On the actual aircraft, there was an auxiliary spring which is quite visible, and can be added too. I included herein another picture of the N1K-2J at NMNA for comparison. Hope this helps you to detail this area.
The wheel covers look thin enough, and can be used throughout. There is no detail on the inner side, except for a large pin mark that must be sanded. The wheels are also simple but usable. The tail wheel comes in a nice single part, and captures the spoked hub style.
The wheel bays are not deep enough but perfectly acceptable. The details inside are only speculative, but the addition of a few wires here and there will do the job. I included one more picture of the N1K-2J at NMNA to help on this area.
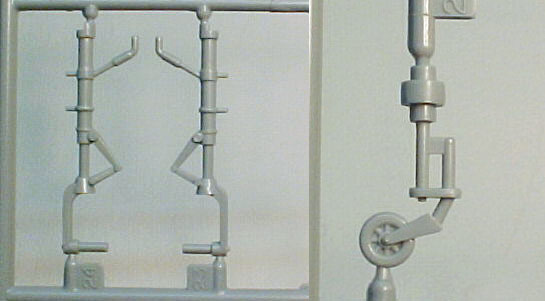
Landing gear parts and tail wheel.
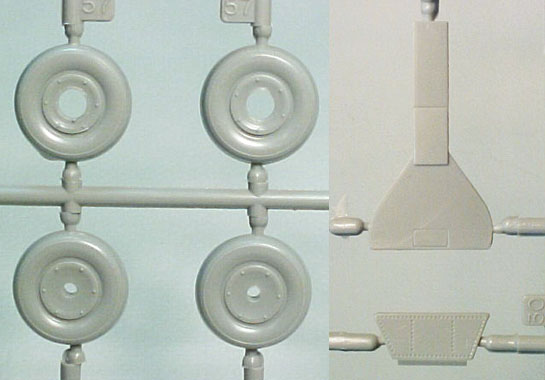
The main wheels and wheel bay doors.
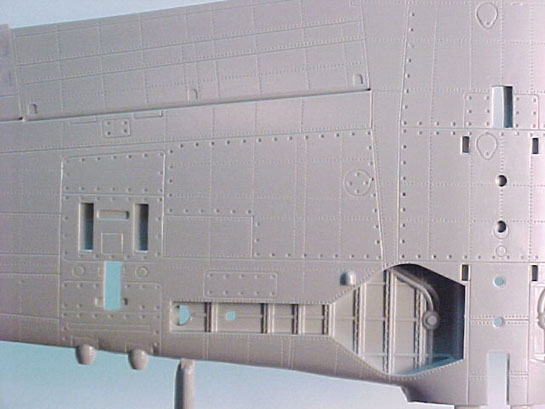
Detail shot of the lower wing showing the wheel bay area.
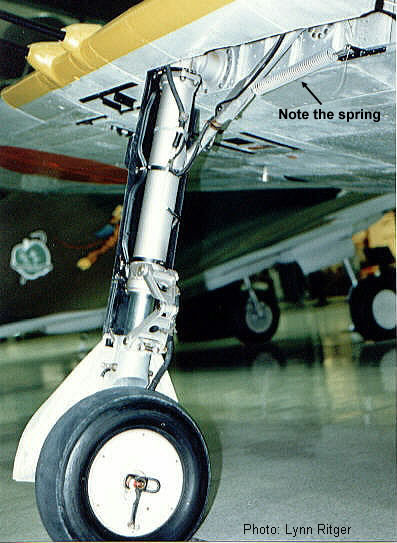
Starboard landing gear strut of the N1K-2J at NMNA. Courtesy of Lynn Ritger from DetailSite.
Starboard wheel well of the N1K-2J at NMNA. Note the inner door retraction mechanism. Courtesy of Lynn Ritger from DetailSite.
CLEAR PARTS
There are 3 clear parts for the canopy, with subtle frame lines (a bonus in a kit of this age). These parts are somewhat opaque, and the usual bath in Future Floor will improve them. The fit of the front and rear sections with the fuselage is not very good, and may need some filling. The center section slides on rails molded on the fuselage halves. The rails are a bit heavy, and seems difficult to correct. Better to leave the center section in open position to dissimulate the problem.
There is no clear parts for the wing tip lights, but this can be added with the popular colored acrylic rod method.
Clear parts.
ORDNANCE
Not much here. Just two pairs of underwing bombs and the belly tank. I didn't like the bombs - they seem a bit crude. They are very similar to the 50 Kg type 100 phosphorous incendiary bombs used by IJAAF, but I failed to locate a good photo. As a matter of fact, this type of armament was not a common view with the N1K-2 during the last year of the war. I can't tell you more, check your references. By the way, the George had spring loaded anti-sway braces installed in the wings along the sides of the bomb pylons. If you are going to use the bombs, add the braces from plastic strip. The belly tank is good, though, and a N1K-2 without it sounds like a Hellcat without one.
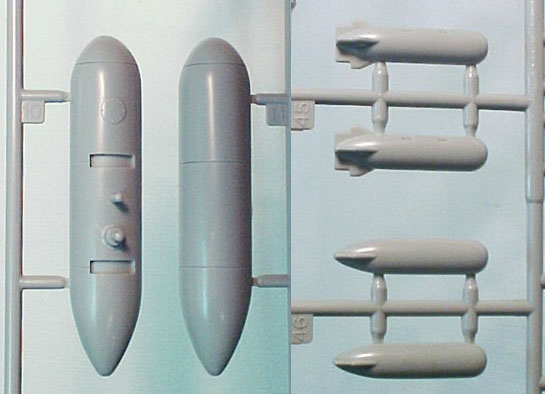
The belly tank and underwing ordnance.
DECALS
Because this model is a reissue, you will not find any problems like yellowing, cracking or incompatibility with setting solutions. They are very well printed and in perfect register.
The decals allow you to built one from four versions, all from the 343rd Naval Fighter Group (circa March-April, 1945), as indicated by their yellow tail codes:
- 343-30: aircraft from the 407th Fighter Squadron (hence the B code on the tail). Pilot: Lt. Hayashi. The aircraft wears double white diagonal stripes on the fuselage.
- 343-45: aircraft from the 701st Fighter Squadron (hence the C code on the tail). Pilot: squadron leader Lt. Takashi Oshibuchi. The aircraft wears double red diagonal stripes on the fuselage.
- 343-15: aircraft from the 301st Fighter Squadron (hence the A code on the tail). Pilot: squadron leader Lt. Naoshi Kanno. The aircraft wears double yellow diagonal stripes on the fuselage. The number 15 painted inside the meatball was temporary for training and maintenance purposes, and was never used in combat missions.
- 343-35: another aircraft from the 301st Fighter Squadron (unknown pilot).
All these options are in standard IJN dark green with natural aluminum undersides. The fuselage meatballs have a separated circle to provide the white outline, but the wings don't. So you may expect some color differences.
The first three versions above belong to squadron leaders, judging by the stripes across the fuselage. These stripes were reportedly hand painted and should not be as perfect as depicted in the decals.
If you don't want to use the kit's decals, you are by your own, since I've found just one after market decal sheet for this bird: Yellowhammer Models product no.32009 - "Hellcat Killers". Unfortunately, this sheet brings only two versions, one of them being the 343-15 described above. The other is the 343-27, another bird from the 407th Fighter Squadron. Be aware that there are decals enough to decorate only one model.

The decal sheet.
As I mentioned in the text above, Lt. Kanno's aircraft depicted in the decal sheet didn't saw combat, in spite of this particular aircraft being relatively well documented. The actual cammo used in combat missions is a bit controversial, and the closest agreement I've found for the aircraft assigned to him is depicted below. This scheme is more inspiring, showing his tally on the fuselage and an aluminum stripe between the yellow ones.
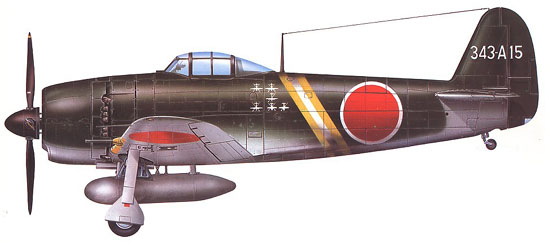
Lt. Kanno aircraft, circa April, 1945.
FINAL COMMENTS
Many publications refers to the George as the "Hellcat killer". It is a perfect nickname. There are many tales about Hellcat and Corsair pilots having a tough time against this bird. What seems to impress aviation fans about this aircraft is the fact that, in some sense, it represents an abandonment of the Japanese tradition in designing light, highly maneuverable fighters. The George had everything a heavy weight struggler must have: a powerful engine, armor protection, and respectable armament. When the IJN pilots learned that it was not a Zero, and they could not turn on a dime with it, new tactics were devised. As a result, the American fighters found a fabulous opponent. But in those final months of the war the Japanese industry was barely functioning, and the cream of IJN pilots was long gone.
This kit has the potential to be built into a real show stopper. If you are going to the detailing arena, you can't escape from scratchbuilding a new cockpit. The Engines & Things resin replacement for the engine is another point to be seriously considered.
There are a few other options to paint this kit, mostly about aircraft used in Japan's homeland during the last months of the war, generally in green/aluminum (a few of them were left in natural metal with anti-glare black over the nose). So, there's not much to say about the painting schemes. Stock some IJN green and your favorite aluminum metalizer for this project. Oh, and a good dead flat clear. Regardless the version you choose, chip the paint. Wait 24 hours and chip more. After more 12 hours chip it once again. Then scuff the paint on the wing root area. In the end you will get close to what we see in wartime photos. I'm not joking. Priming was not priority of Japan aircraft industry in those days. And don't forget a heavy weathering. Another interesting idea are those Georges with original cammo stripped off and wearing American markings. I mean those used by TAIC (Technical Air Intelligence Corps) for testing purposes after the end of the war. This is an interesting idea, too. Let alone a diorama...
And a last word of caution for the unaware: this kit is of a N1K-2J model 21. Don't try to convert this kit in a N1K-1. The dashes 1 and 2 are completely different aircraft: the wings, tail, landing gear, tail wheel and nose of the Shinden (N1K-1) have nothing to do with the counterparts of the Shinden-Kai (N1K-2). Just in case you are thinking about that.
My main references for this review were:
1.) The Maru Mechanic No. 21/43: Nakajima J2M-3 / Kawanishi N1K1-J & N1K2-J, 1983.
2.) Famous Airplanes of the World, No. 53: Kyofu, Shinden, Shindenkai, Burindo, 1995.
3.) Sakaida, H.: Imperial Japanese Navy Aces 1937-1945, Osprey Aircraft of the Aces #22, Osprey Publ., 1998.
The first two are highly recommended if you are going to make a new cockpit. In fact, I recommend both for any kit of the George.
SUMMARY
I've ranked this model three stars. It cannot be ranked better without a cockpit and a decent engine. Otherwise (and taking into account its excellent dimensional accuracy), it would probably be a four stars model.
As usual, I was a bit too critical on those areas requiring some work. However, except for the cockpit, nothing in this kit is beyond the skills of an average modeler. This is an impressive model, and a superdetailed replica will be perfect on your shelf alongside the Hasegawa Hellcat. And yes, of course it can be built out of the box and still be a great model. To prove that I'm not lying, here is a model built by Claus Gustafsen of Strandby, Denmark. All he added was the seat belts and ignition wiring:
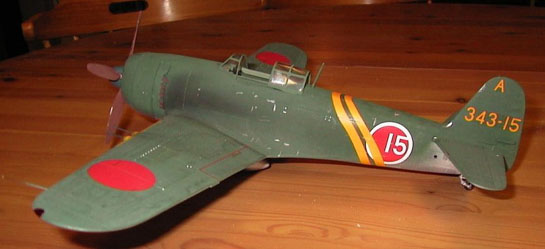
Doyusha 1/32 George by Claus Gustafsen from Denmark. Courtesy of Dave Pluth from j-aircraft.
ACKNOWLEDGMENTS
I'd like to thank our fellow modeler Lynn Ritger, who created and maintains DetailSite, a good source of walkarounds, for allowing the use of some pictures of the N1K-2 at NMNA. Also, Dave Pluth from j-aircraft.com, for consenting the use of the photo of Claus Gustafsen's George.
© Rato Marczak; photos by Lynn Ritger
This review was published on Saturday, July 02 2011; Last modified on Wednesday, May 18 2016