
One Man Model | 1/32 P-3C Orion
Reviewed by Thierry Laurent
THE LOCKHEED P-3C ORION
The P-3 Orion has gained the status of a mythical plane. Finally used by 19 armies, she not only covered the sea patrol and antisubmarine role but was also changed into ELINT/Jamming platforms, an AWACS system, a transport plane, a meteorological air laboratory and even a civilian fire fighter! It is not obvious to realize that such a commonly seen airframe is a derivative of a Fifties airliner design: the Lockheed L-188 Electra. The four turboprops plane replaced quite quickly the piston-engine P-2 Neptune in the US inventory. However, thanks to regular upgrades, she had a far longer service as she went through the second half of the cold war and considerably further without any serious consideration for a replacement before decades. Even Germany who used the Atlantic competitor finally replaced the European design with the Orion and has no immediate plan for retirement. The change only arrived with the 21st century as new platforms such as the P-8 Poseidon will progressively replace the old soldier.
THE P-3 IN MODEL FORM
From a model perspective, the P-3 is not really a lucky plane. This is alas the fate of many multi-engine post-1945 planes. Typically, they were released in 1/72nd and possibly in 1/48th scale. As a modeller, the only P-3 kits I regularly saw for the last forty years were the LS 1/144, the Revell 1/115(?) and the very common Hasegawa 1/72 releases.
Vacuform was for long the only option for modellers willing to get 1/32 four engine planes but even this basic option did not extent to post-war topics. Hopefully the situation changed some years ago when some US and British bombers arrived on the market. However, this welcomed change stayed again limited to World War Two airframes to ensure the minimum business profitability of such projects. Indeed, the number of potential buyers is limited to the need to have a free square meter to host each of such assembled models and even if the Orion is popular, this is not a Flying Fortress or a Lancaster.
I never considered the release of a large-scale P-3 Orion as a probability, even a very low one! Hence, when such a release in 3D printing was considered, I could not believe my eyes. The combination of CAD design and 3D printing-based production has the benefit that a huge amount of the research and design work can easily be used to release models in different scales and production on demand is now a reality. So the Orion is surely not the last of such releases and we can start dreaming of some other flying monsters.
THE OMM P-3C
The kit is made by a Japanese company named One Man Model. As the name says it the company is actually the labour of love of a single man, Toshihiko Shimizu. The kit was originally designed with the L-188 Electra as both planes share many external components. Toshihiko San did not initially consider 1/32 in his range but with the increase of requests generated from large scale modellers, he kindly agreed on tuning his files to produce some 1/32 Andover & HS 748 variants, then a 1/32 Electra and a 1/32 Orion. His kit depicts the most common variant: the US NAVY P-3C. Note there is no more detailed mention of the ‘update’ type whereas at least a dozen of P-3C sub-versions existed.
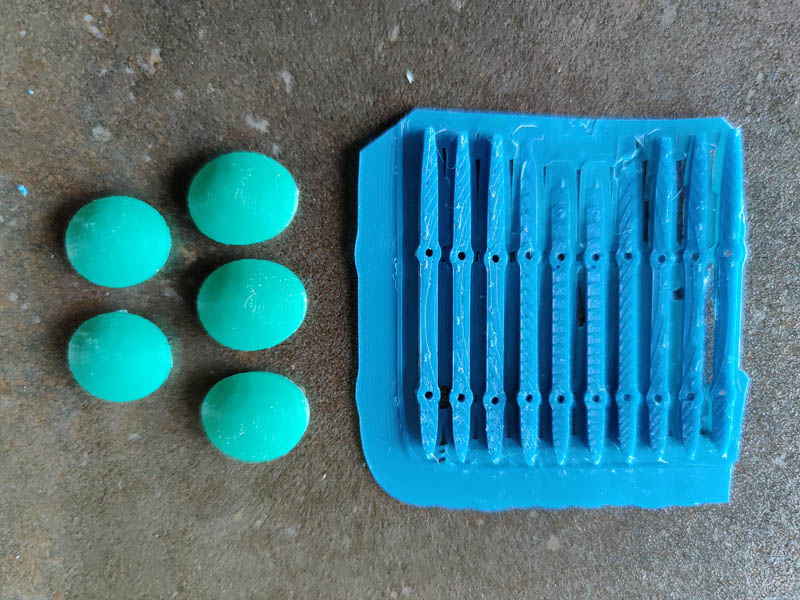
As the OMM kits are multi-media models. Here is what you can find in a kit:
- Most parts are based on 3D prints made of ABS, HIPS, PS or PLA thermoplastics;
- Some vinyl sheets are also given to help in detailing some areas (essentially internal ones and windows frames);
- A thin clear plastic sheet is added to recreate the plane windows;
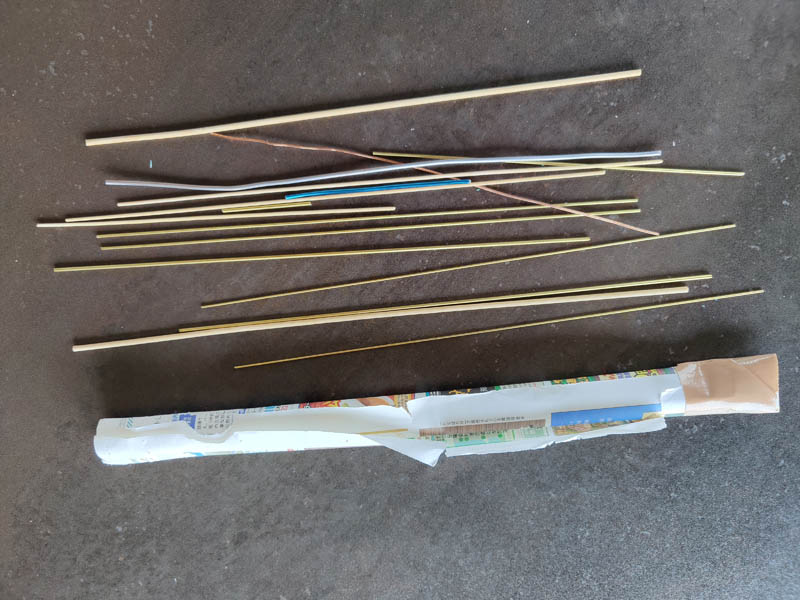
- Different thicknesses of wood and metal rods are also included to reinforce the seam between the parts or detail the cabin;
- Some other vinyl sheets are given to reproduce the standard basic markings;
- Some masking paper is included;
- And, finally, the kit has an envelope containing an assortment of good quality sand paper sheets.
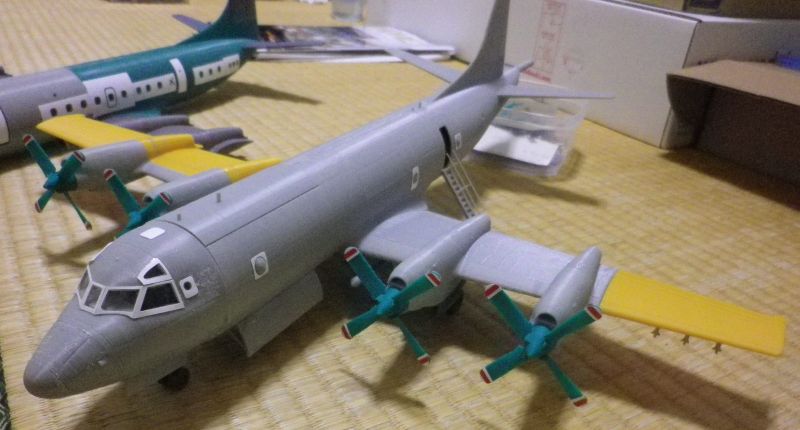
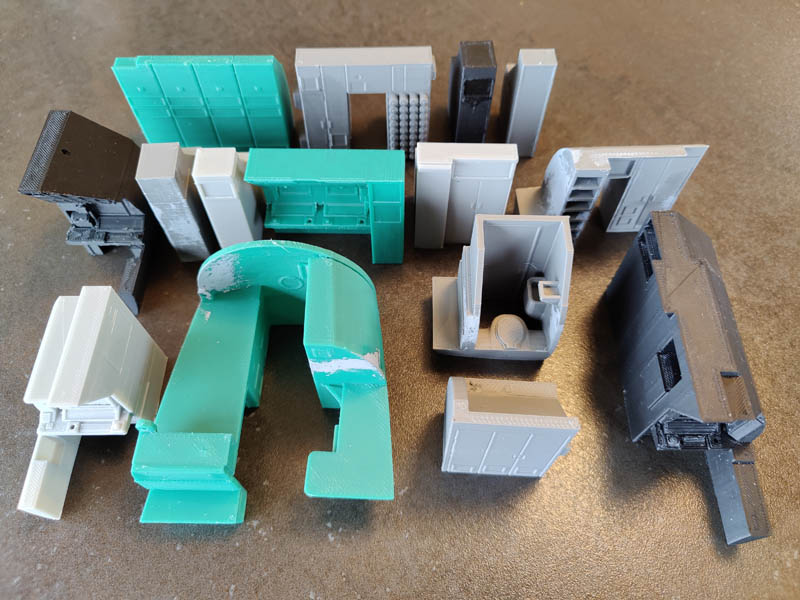
There is no kit box as such (kits are made on demand) and no paper instructions. Parts were cautiously packed in two different boxes to decrease the P&P cost (keep in mind the parts are huge). The attached pictures will give you an overview of all the components.
THE 3D PRINTED COMPONENTS
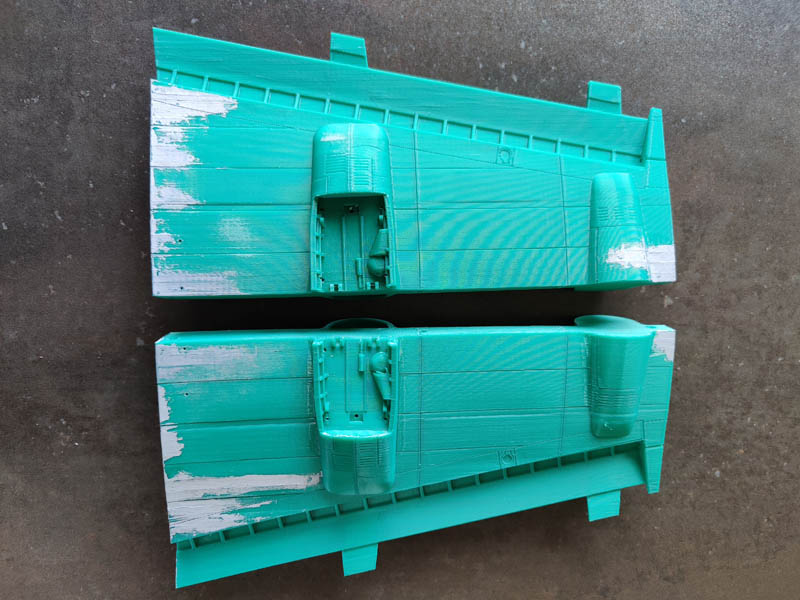
Be prepared to be surprised as the parts are printed with different colours of monofilament plastics: green, grey and black. This gives a strange flavour somewhat similar to the one of the Matchbox kits of my childhood; but the parts are now tailored for grown-up modellers!
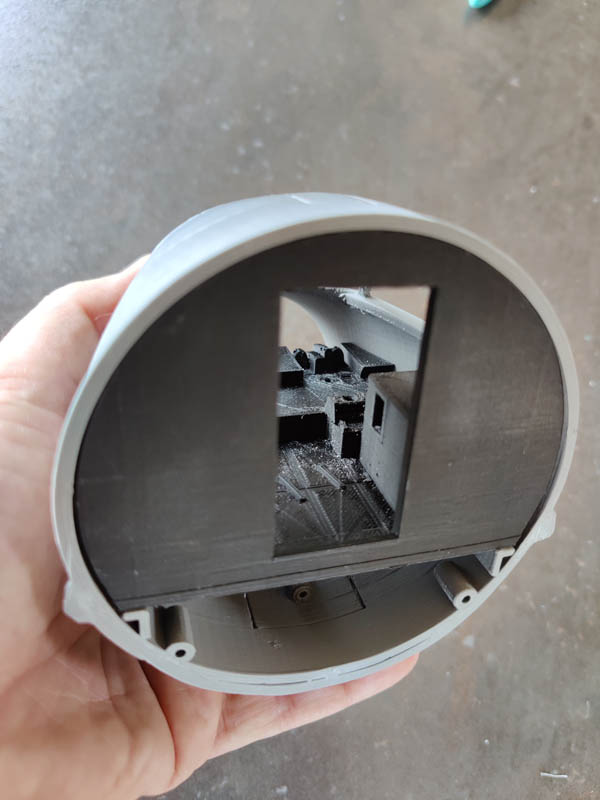
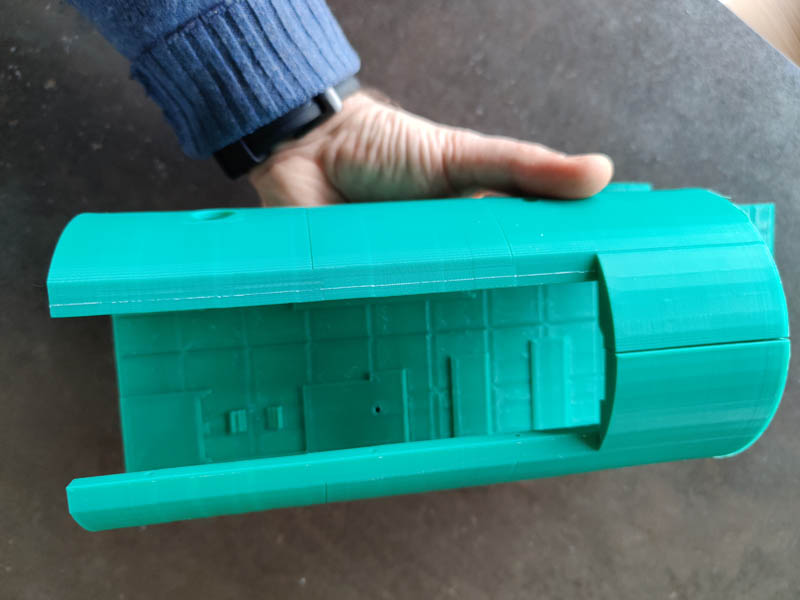
The model is actually lightweight (more or less 2.5 kgs) when you consider the enormous size of that assembled kit. This is because some large parts such as the wings, stabs, tail and internal closets are hollow. This also means that the kit may also be assembled in flight mode. In such a perspective, parts are included to give you the possibility to close everything (access door, bomb bay and landing gear wells).
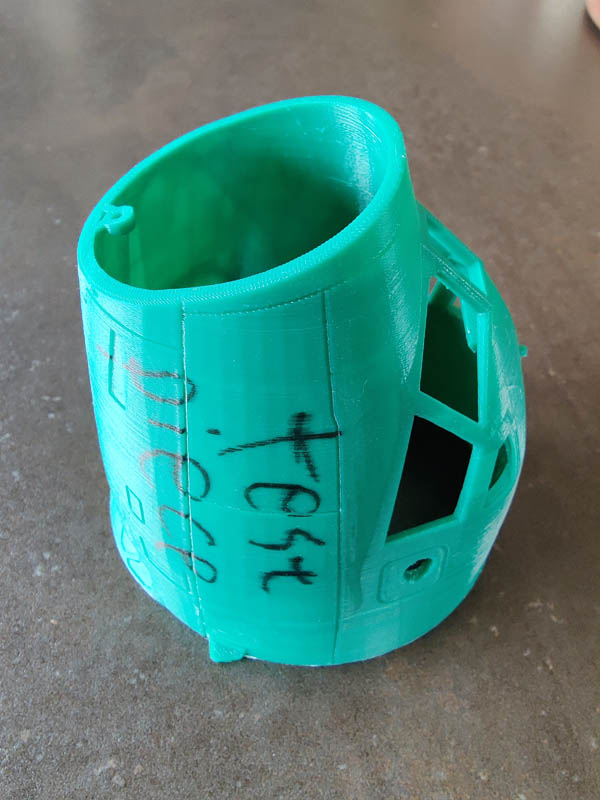
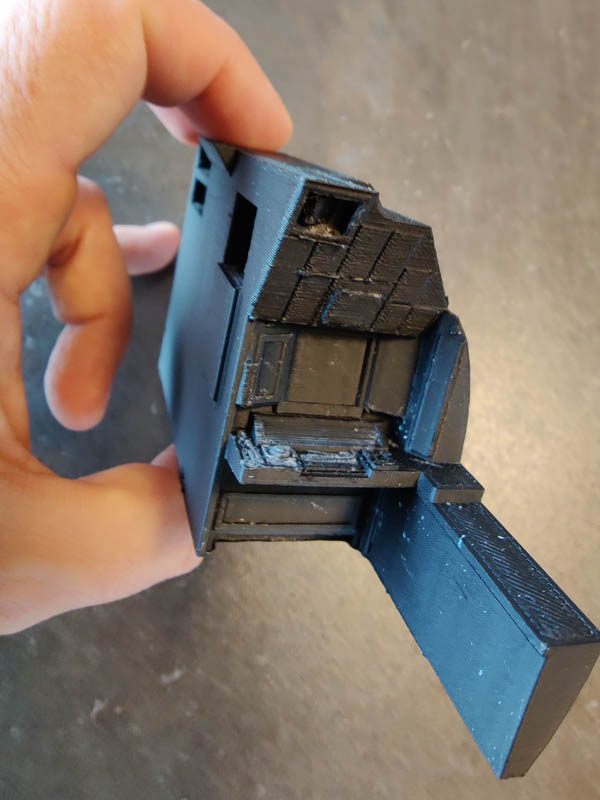
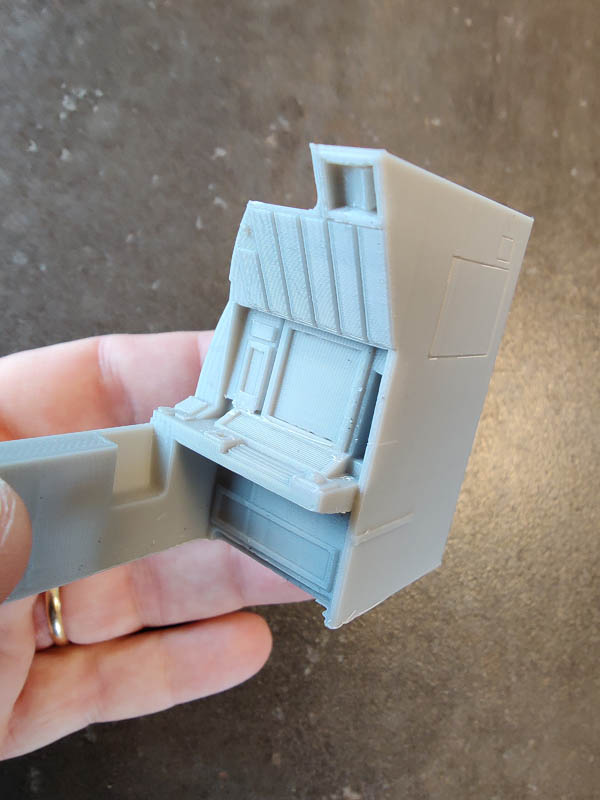
If you decide to open everything, two stairs are included, a folded one and a fully deployed one. The shapes and dimensions of the model look generally OK. To say it short, the model really looks like a P-3. Many elements look very simplified for the scale but improving them is left to the individual choice. One example is the air intakes on the fuselage. They are globally correct but too shallow. My kit included a second nose fuselage section labelled as a ‘test piece’. This is a clever idea as most modellers are not really used to work with such parts whereas a noticeable work of preparation is required. Personally, as the parts will need a considerable amount of handling before being fully usable, I do not see the need to clean them beforehand. There is also no ejection or moulding release agent to eliminate as this is commonly the case for polystyrene or resin parts. However, I will clean them with isopropyl alcohol before spraying the initial coat of primer.
A major warning needs to be given at that level. If they are well designed (and hopefully this is the case), the assembly is quite simple. There is somewhat some distortion linked to the curing process but it is limited to some parts (such as the nose cone) and is not that dreadful to solve. It is obvious a lot of thought was put in the parts design as they were created and oriented to get the best of the printing technology.
Finally, the main challenge is upstream: the preparation of the parts.
THE PARTS PREPARATION
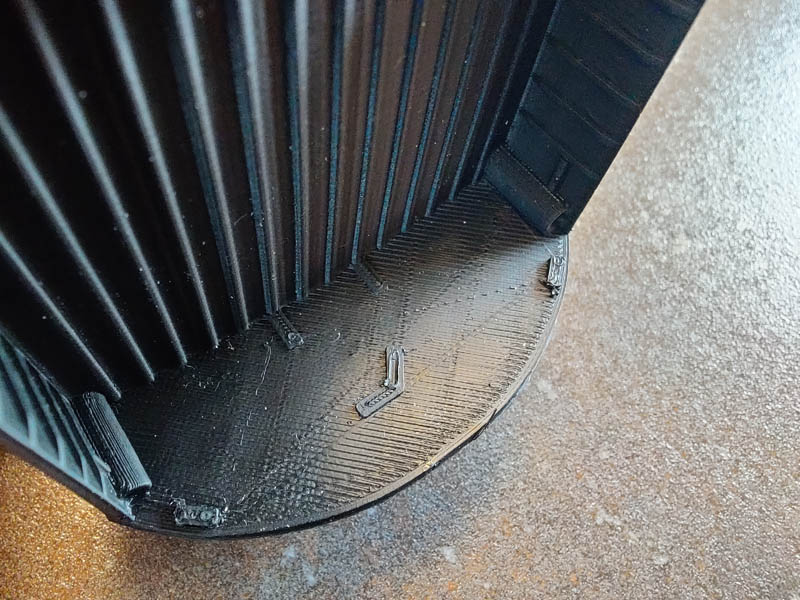
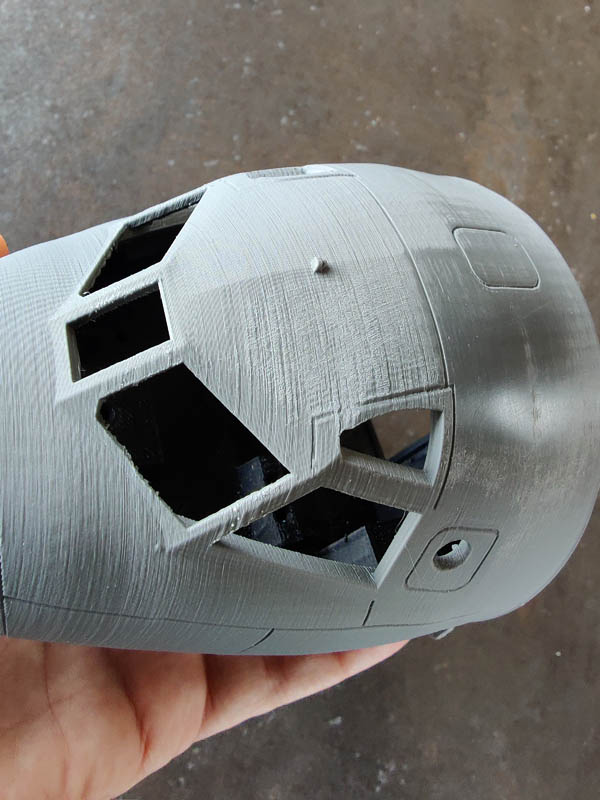
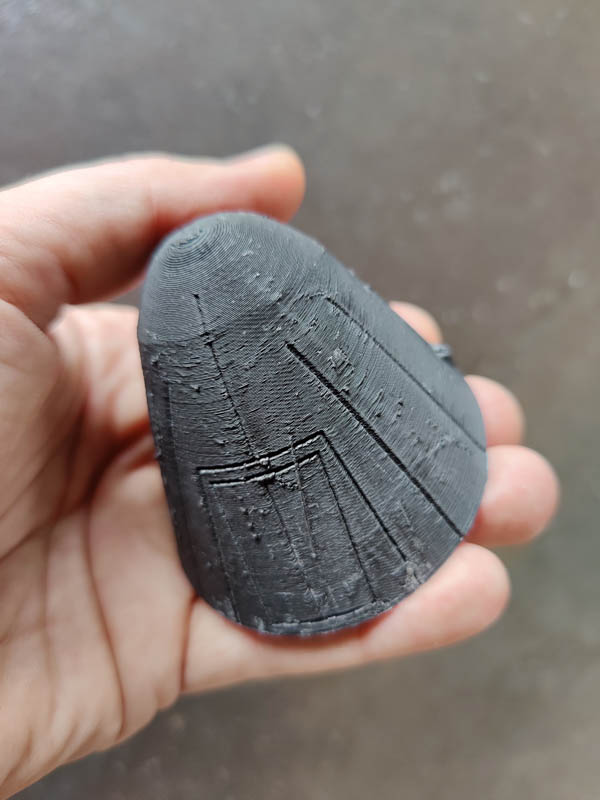
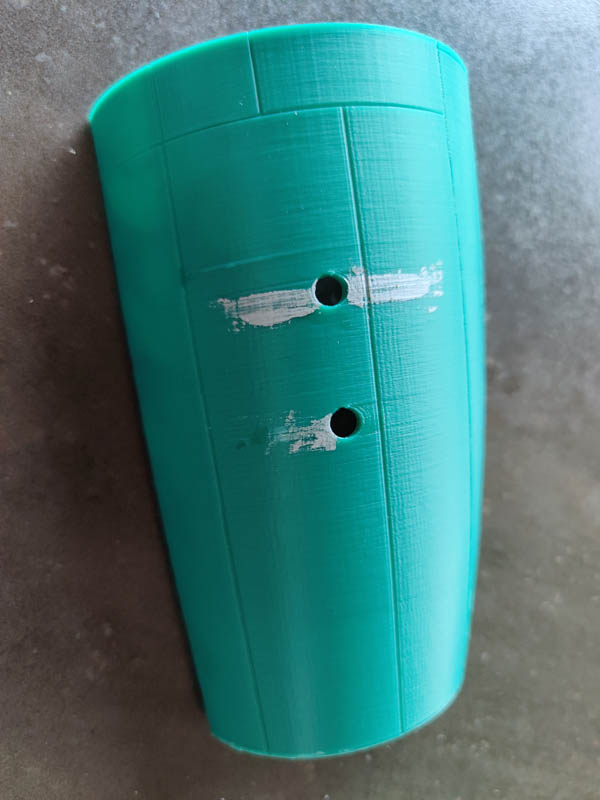
3D printed parts are layer-based. This means that, according to the resolution of the printer, you have close to invisible, acceptable or large gaps between the layers. This needs to be solved as the actual surfaces to reproduce are generally smooth. Sometimes, a larger gap may also appear here and there when the print is ended. This explains why some parts show traces of putty. Toshihiko San took care of that issue and filled such small gaps before cleaning the surface with solvent. For most of the parts, the gaps between the layers are acceptable but very few parts will not need sanding. Some work is still required to get a smooth result as this is not based on stereolithography resin printing that gives far cleaner outputs. Some of the parts (such as the nose) will need some heavy work. Everything is delivered without any printing gate. So, at least this part will not need work.
The creation process has also a limitation: CAD and curves! Digitally creating a curve actually asks for cutting it into a lot of small facets. So, parts such as the fuselage sections are not perfectly round. They are reproducing a round cross section with many small facets and sanding is required to delete them and get a smooth and round fuselage. Fortunately, this issue is essentially limited to the external surface of the larger parts: the fuselage sections. And as such parts are not hollow, they will sustain a lot of handling without any issue. One picture is showing the grey nose part with a sanding test. This will definitely be easier with a coat of primer!
Using the nose test part is recommended to assess what is the best sanding approach for you. Toshihiko San explains that using a coat of primer decreases the sanding time. I also tested surface sanding on the MAD extension and confirms such plastic is less easy to sand than classical polystyrene or resin. So, using a body car primer spray is recommended as this is designed to be sanded.
The kit has quite large panels lines. Actually, as the fuselage is based on an airliner design, the full scale on does not really have ‘panel’ lines. Sections of the fuselage external shell overlaps on each other. So, personally, I will fill all the fuselage panel lines as from some meters, the surface look very smooth. For the other parts such as the tail, wings or stabs, I will assess what will be the final result after some sprays of primer but I’m afraid some work will also be required for the ones who do not like large panel lines. Some other parts such as the war load pylons have also far too large panel lines. Some other elements should also be mentioned with regard to parts preparation.
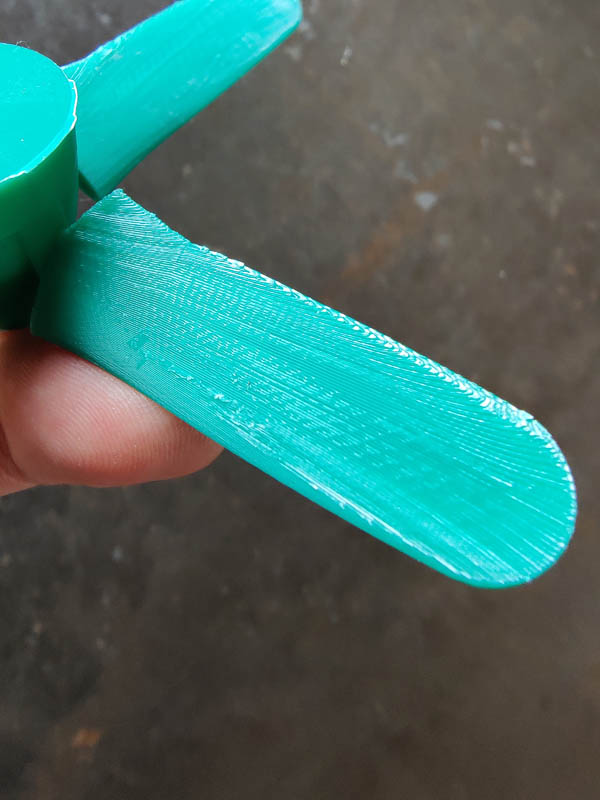
- Some full-scale components are proportionally finer in comparison with the kit parts. This is normal as that 3D printing process has also limitations to get straight parts. In such a case, even if you want to use primer/putty, you need to sand a lot to get thinner parts. This typically applies to propeller blades. So, in that case, you may possibly step the primer layer. Note it is also possible to replace some thick components by thin plasticard rather than sanding for hours; the Harpoon wings jumping to my mind in that regard.
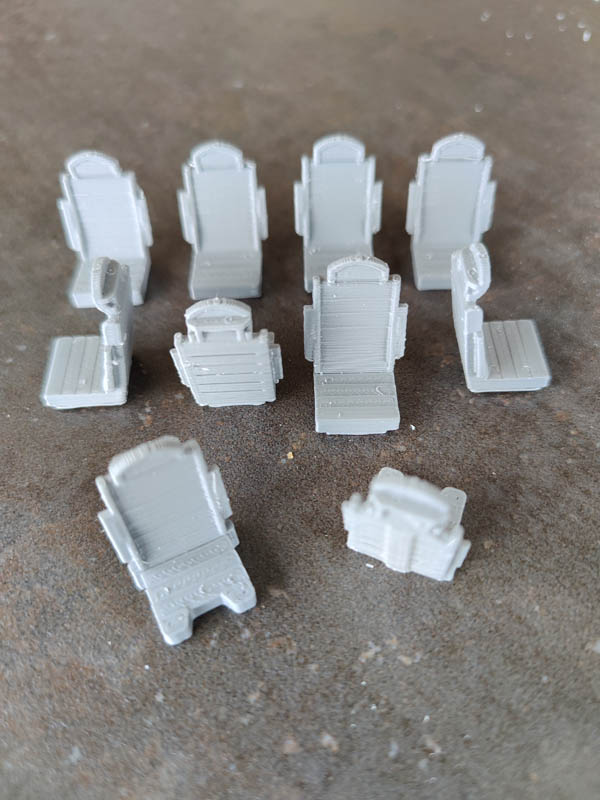
- Some full-scale components are not smooth! A good example is the surface of the crew seats. In that specific case, the layered surface is a good rendition of the seat synthetic fabric surface.
- Some internal components will be barely visible. As one of the pictures shows it, the kit gives the possibility to leave the front upper fuselage part removable. However, if you do not want to use that option behind the cockpit, painting and assembling the components as they are will give the silhouettes you will barely distinguish through the windows and rear door.
- The kit includes vinyl finishing parts to stick on some 3D printed parts. This mainly applies to internal components and windows frames. Personally, I will very probably use them as templates to rebuild such most parts in thin polystyrene. This will be stiffer and easier to glue with CA glue.
The conclusion is that an examination of the full-scale components is really required to assess what should be the final result.
THE PRINTED PARTS


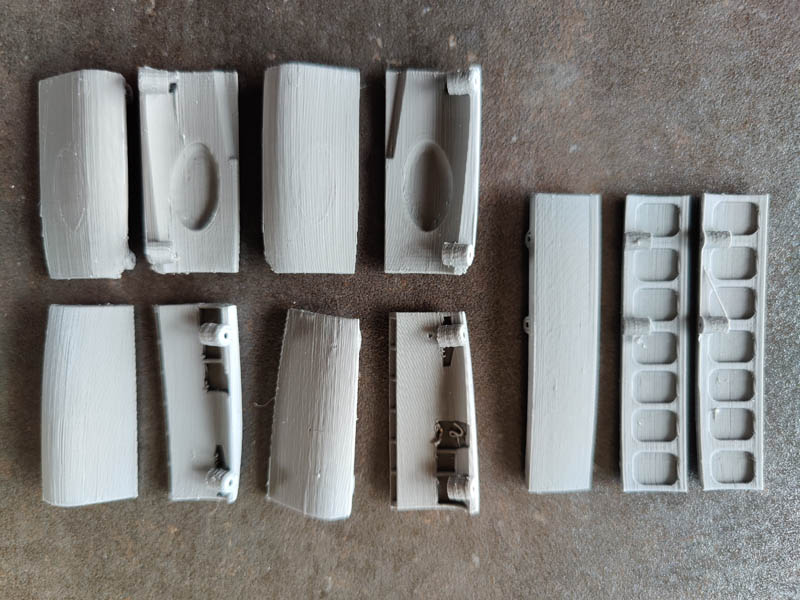


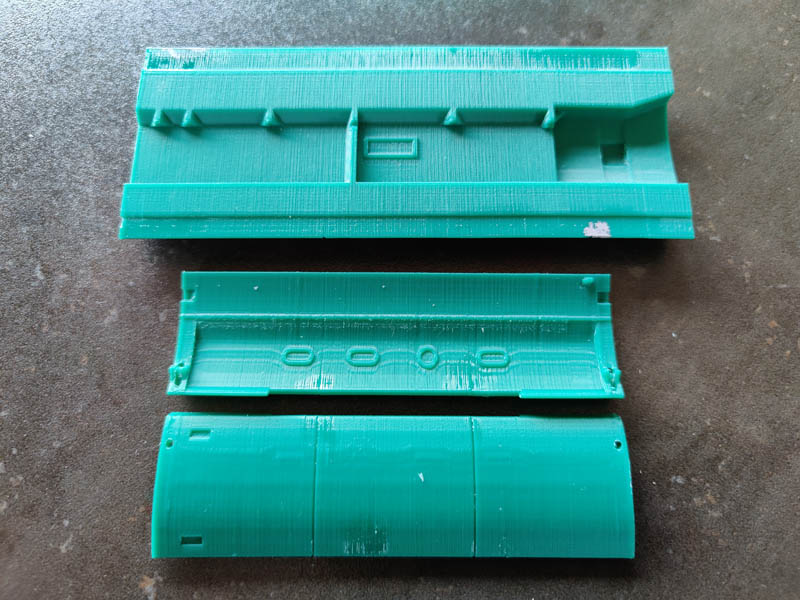


The fuselage is cut into multiple sections:
- The nose tip (radar cover)
- The cockpit area fuselage
- The front fuselage section in two halves with the top given as a separate part that can be left open.
- The middle fuselage section in two halves
- The rear section in two halves (with the access door)
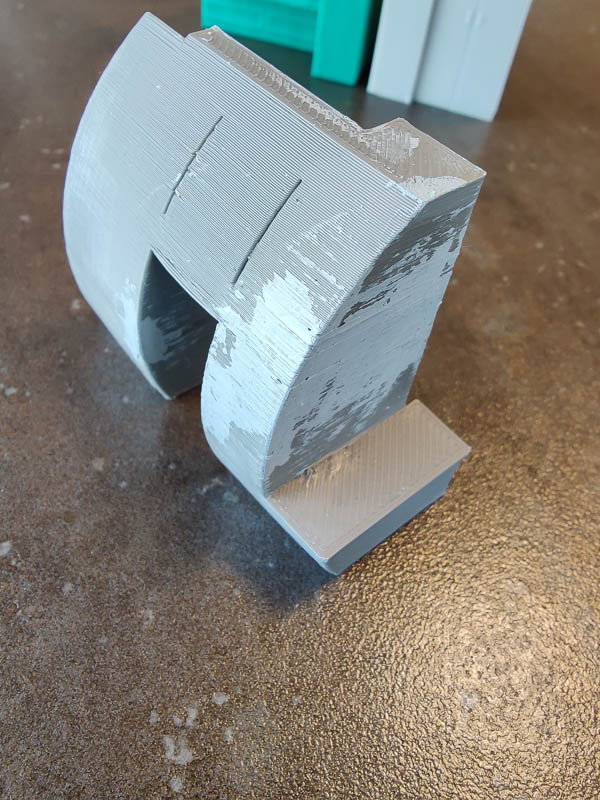
- The tail section (with a separate tail/rudder hollow part)
- The MAD detector tip
This gives you a full length of more than one meter!
The nose is printed in black resin and will ask for more clean-up than the other parts. For whatever reason, the prints made out of the black plastic are clearly less crisply printed than the other ones. Fortunately, there are not many of them.
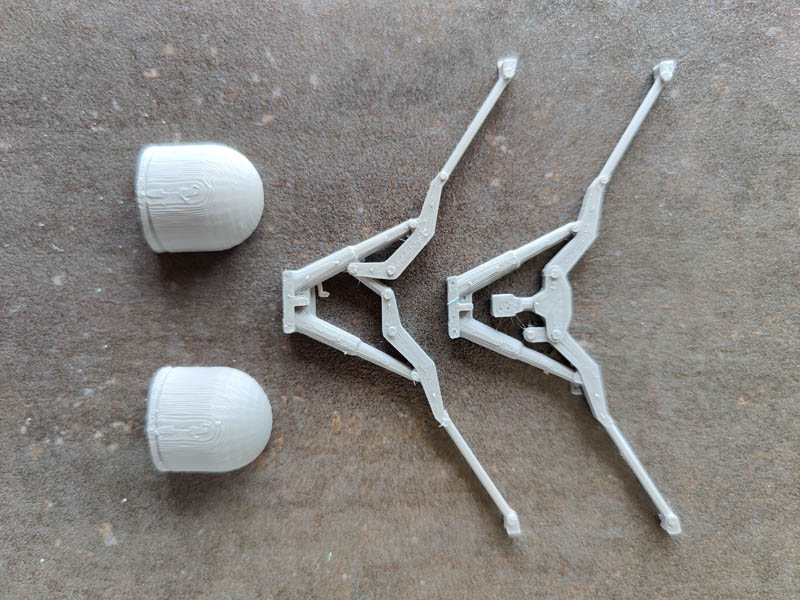
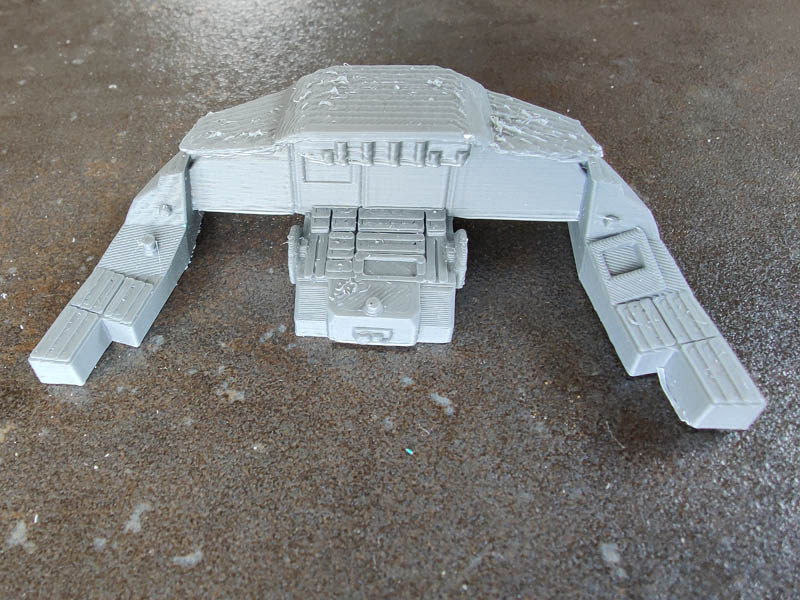
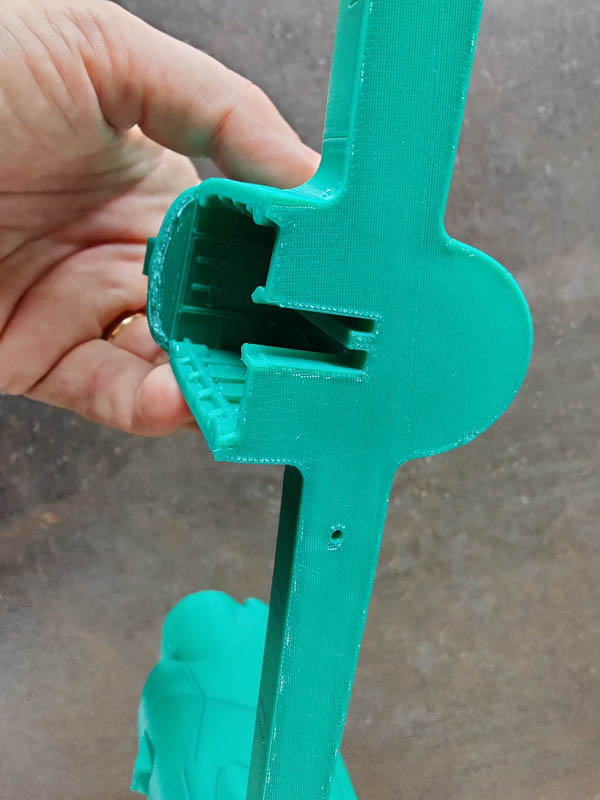
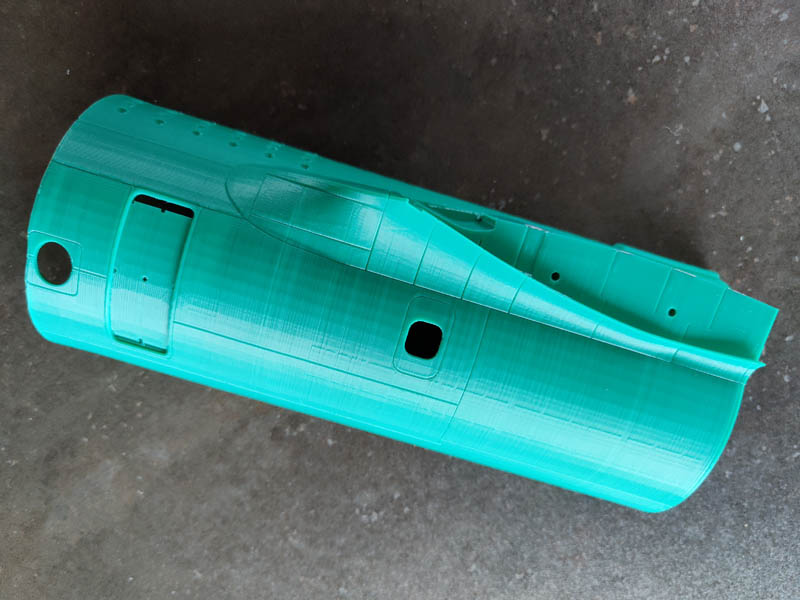
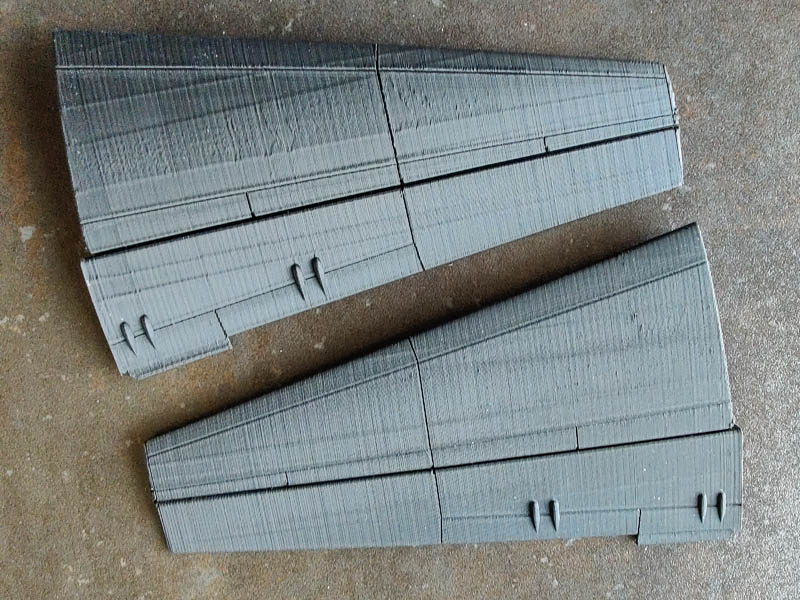
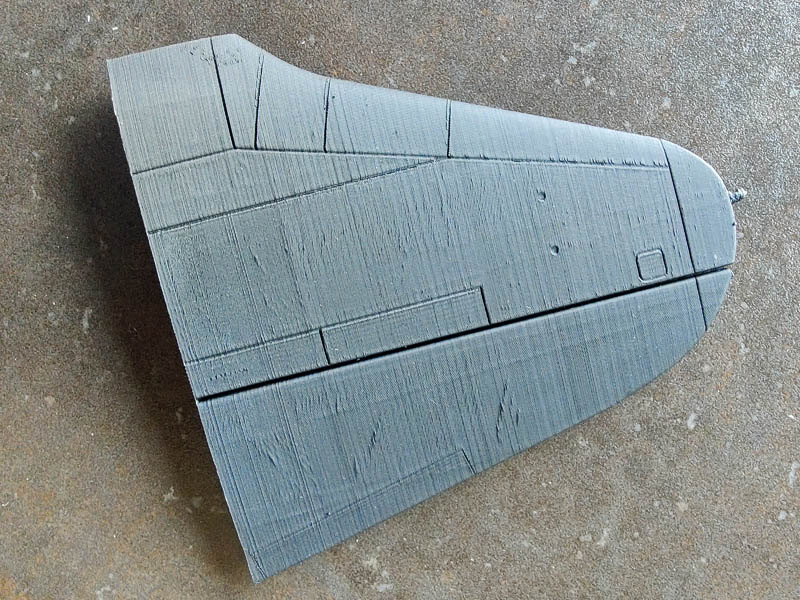
Each wing is very simple as it is only made of four main hollowed parts:
- The wing itself
- The wing leading edge with the two turboprop engine nacelles
- The wing tip section
- The flap part
Two single parts are included for the stabilators/elevators.
Note that no movable surface is separate except the flaps. However, when parked, they always look secured in the neutral position. So, this is not a problem as such as they clearly look separate from the airframe thanks to the 3D printing process. All hollowed parts are reinforced internally with bulkheads but it looks there are some more fragile areas. So, sand them more cautiously.
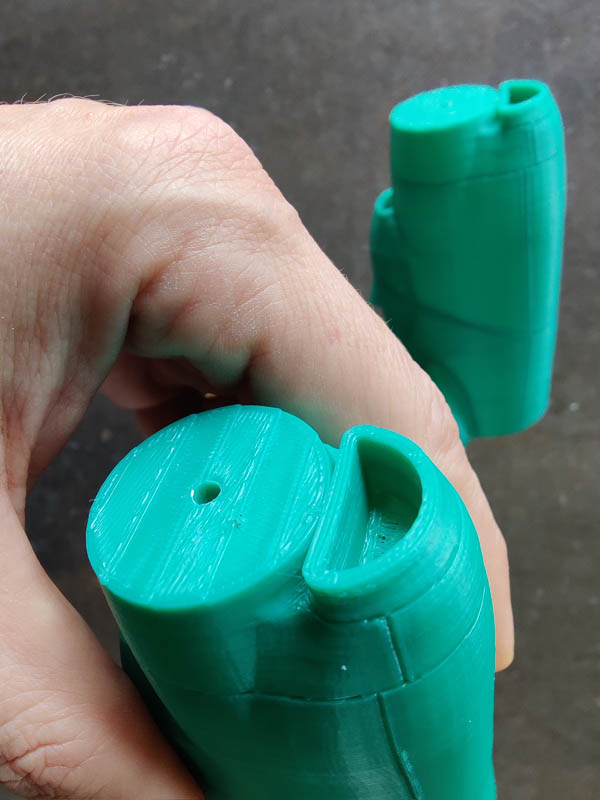
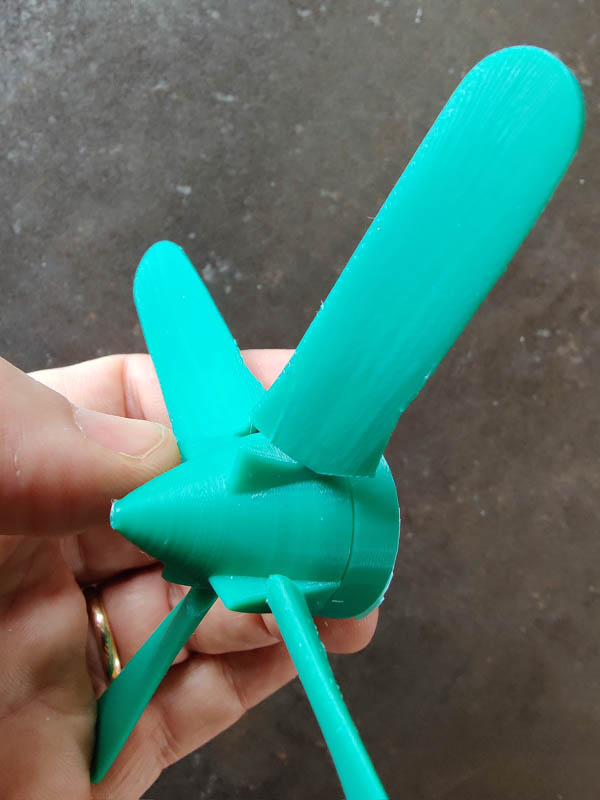
Four propellers with their blades are included. This will deserve heavy sanding more particularly on the rear face of each blade.
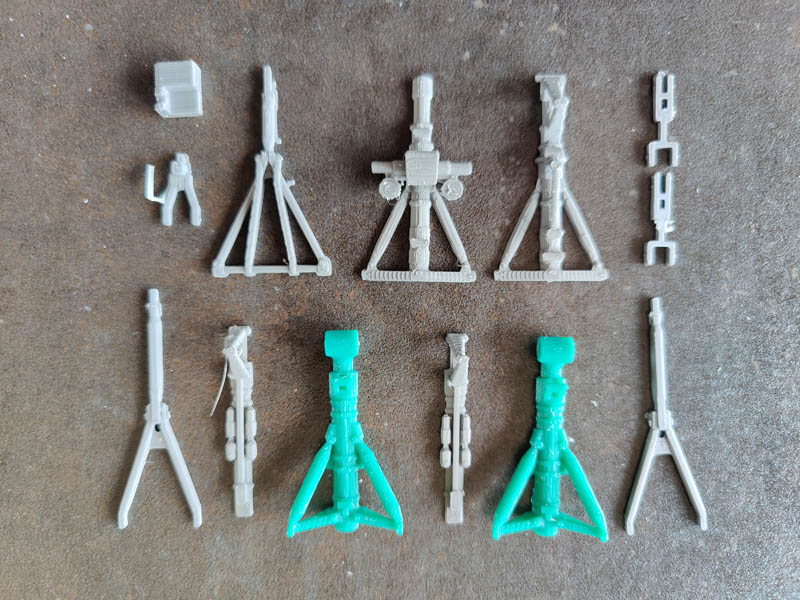
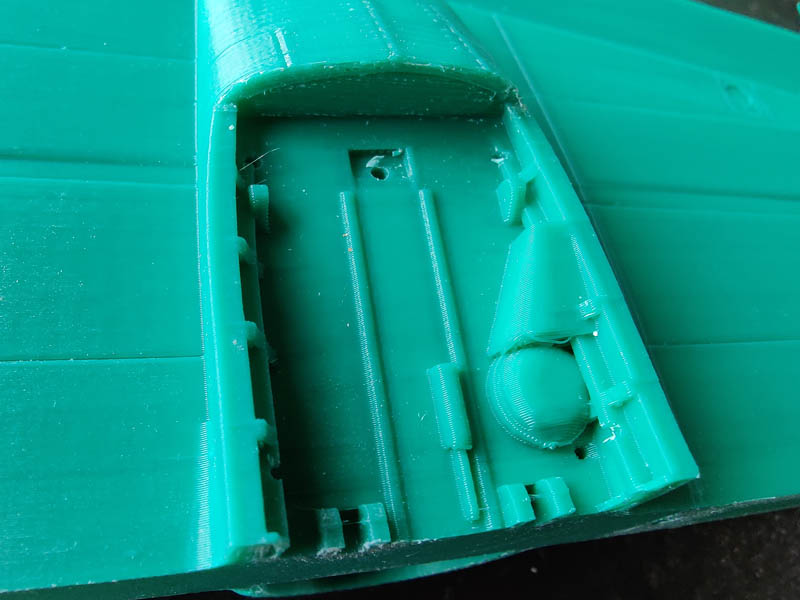
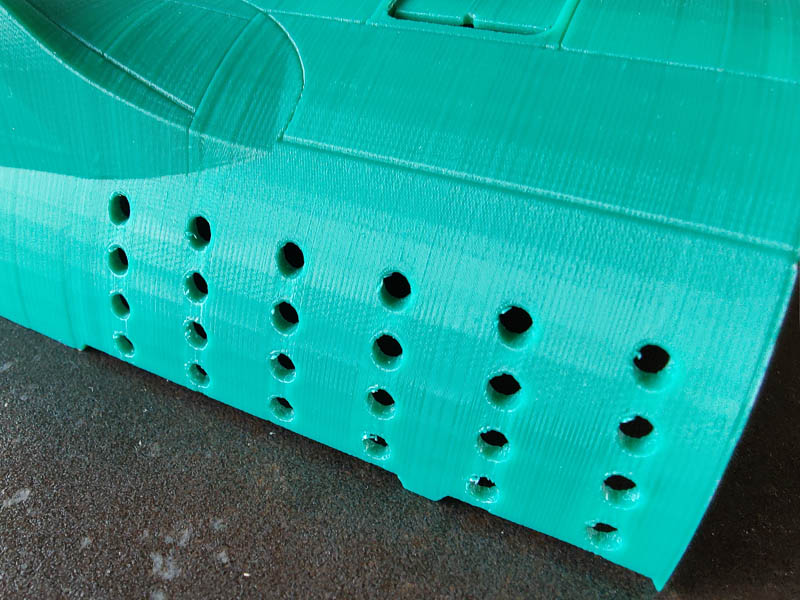
All bay doors are given as separate parts. Note you need to open the pre-cut front landing gear doors. They generally have thick attachment points that are sturdy but clearly out of scale. So, a choice will need to be made between solidity and accuracy.
The LG bays have generally correct structural details and can be a good basis for additional details. Alas, there are areas that should be smooth rather than layered but it will be very difficult to correct that (more particularly for the front well). Hopefully, this will not be very visible when the model will be on the landing gear.
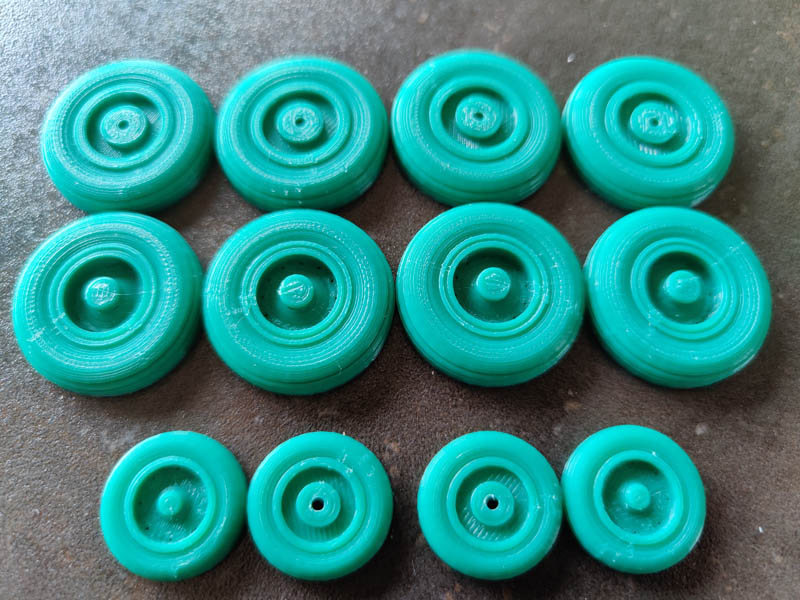
The LG legs are sturdy but basic. Cleaning them will be time-consuming but with time and patience it looks possible to get a correct result. The wheel parts are correct and simply split in two parts. Their axis should be made out of the included metal rods.
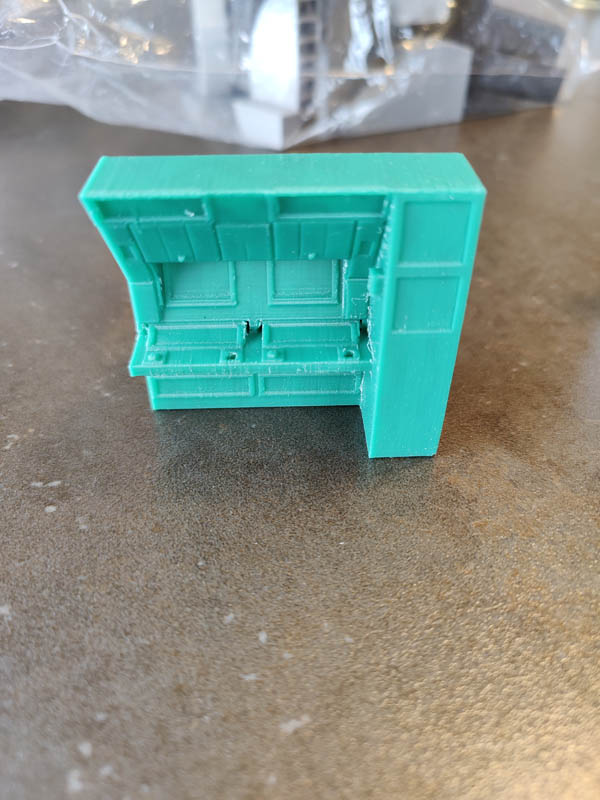
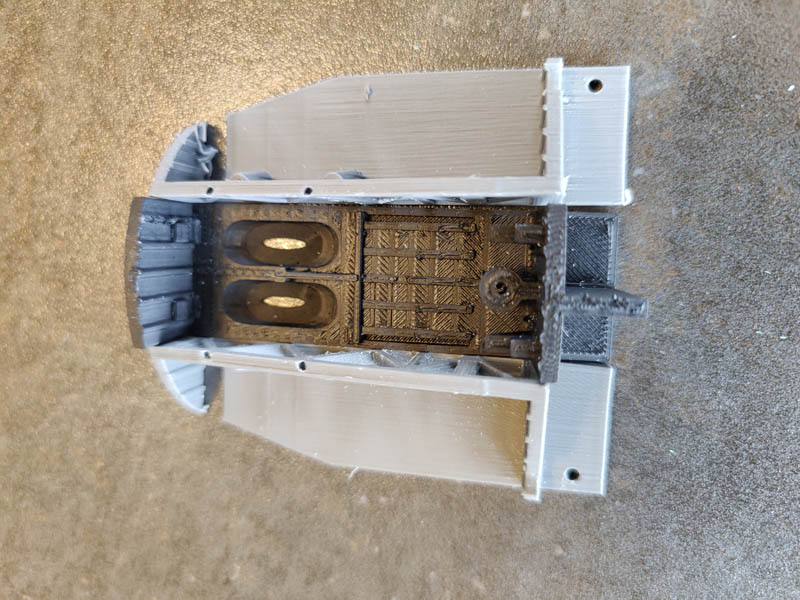
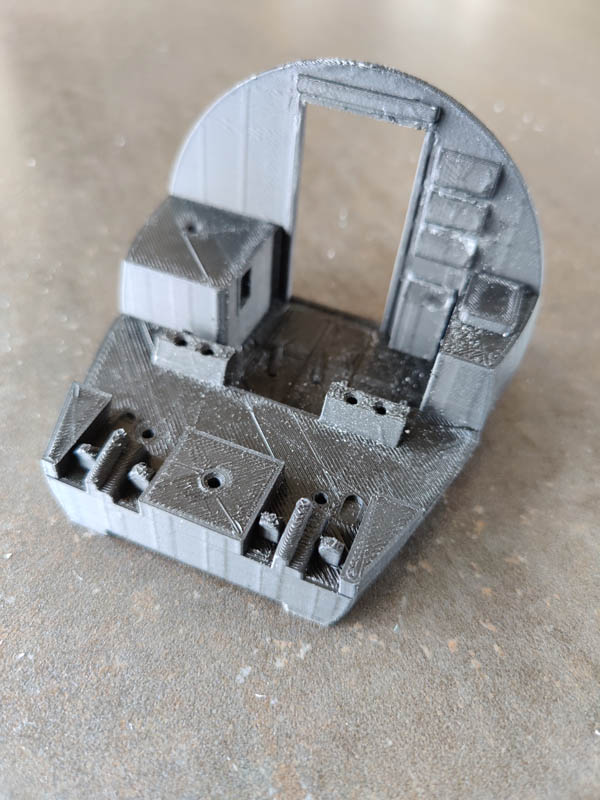
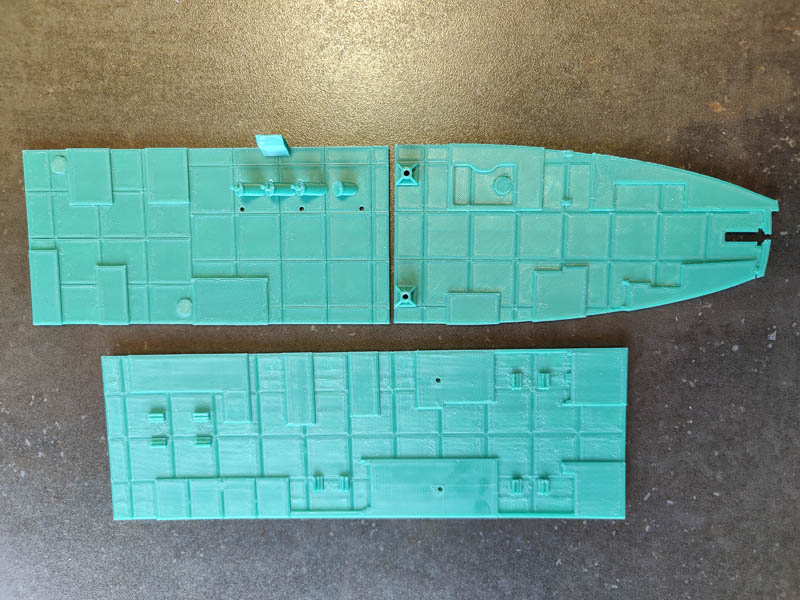
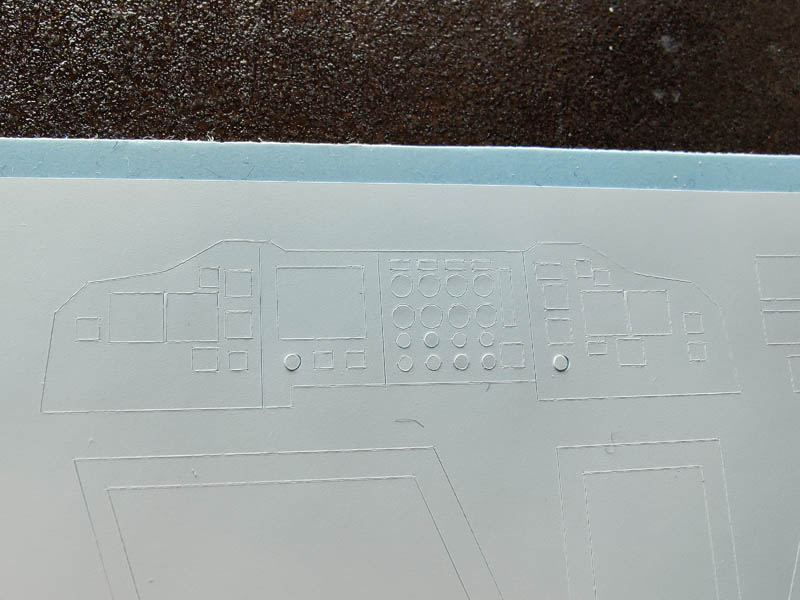
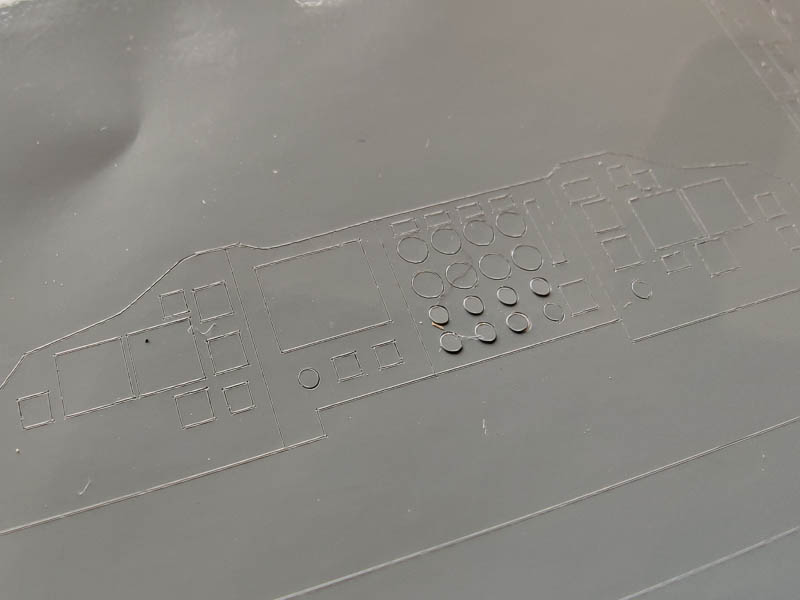
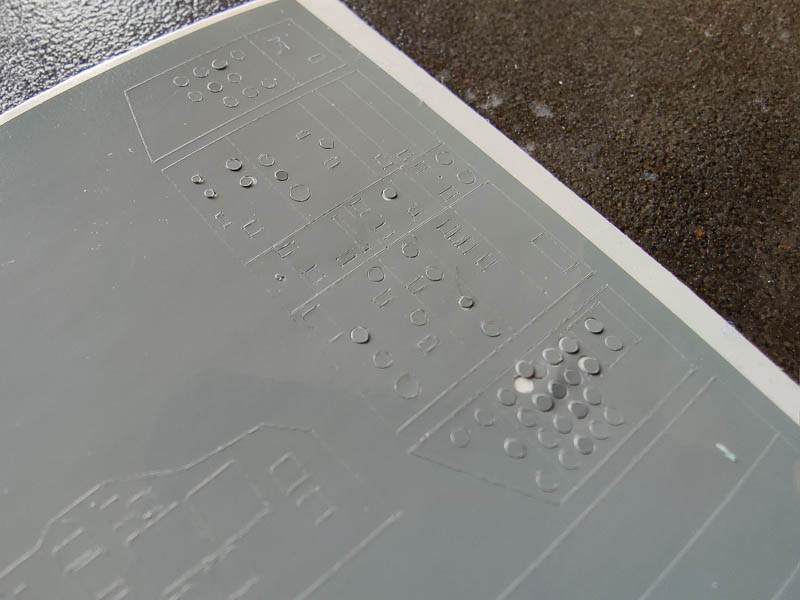
The main cockpit structure and floor is a single part that literally clicks into the front fuselage part. You must add the three seats, control yokes and some additional small components. Some vinyl parts are included to improve the instrument panel and the floor tiles. One part that I will probably replace is the upper part of the control yokes. In such a scale this deserves to be separated from the column. Some details should also be scratchbuilt (such as the throttle levers).
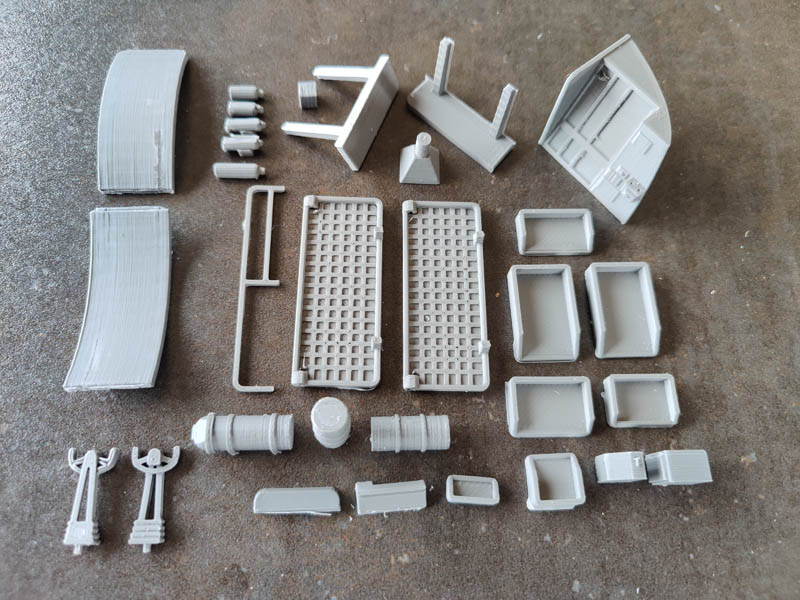
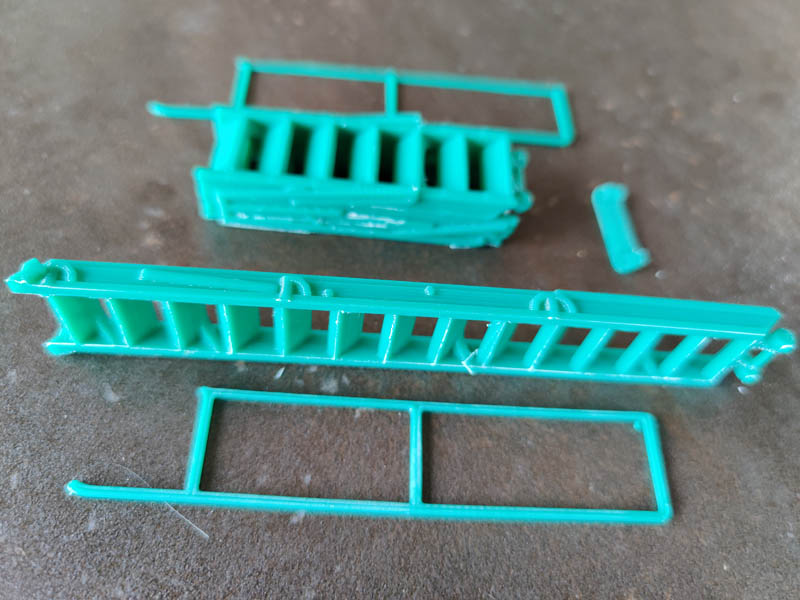
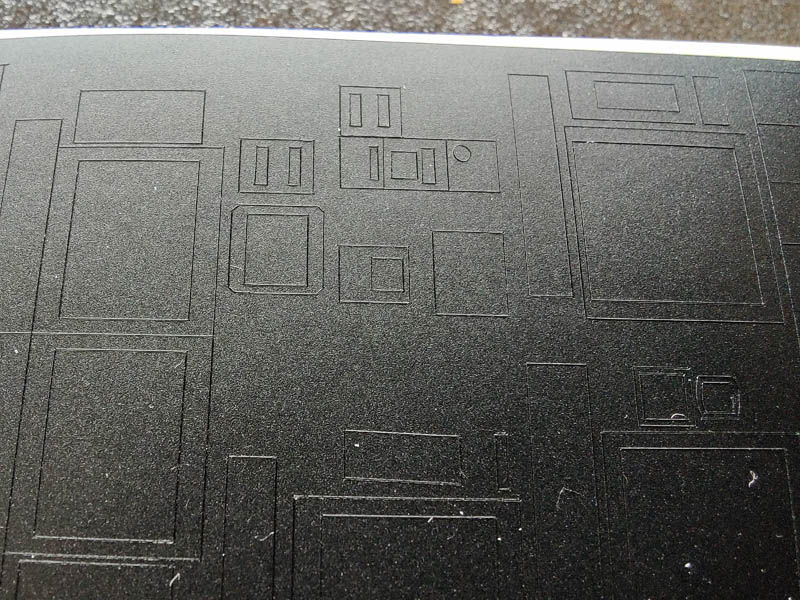
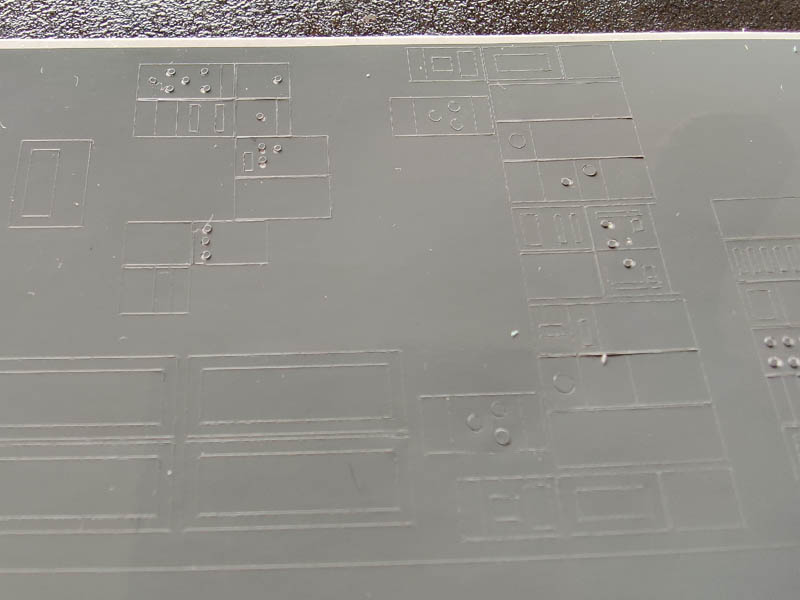
The cabin floor is made of three long sections including some details such as sonobuoys launchers or seat bases. It is recommended to recreate the floor tiles in thin plasticard as the cabin one was actually smooth. Note the kit pattern looks correct. Personally, I will add them in the visible sections. 15 large parts will be used to reproduce all the electronic boxes, computer closets and other compartments, the toilet, the small kitchen as well as the foldable beds. The seven cabin seats are included. Some small parts are added such as the parachute holders or fire extinguisher bottles. However, it will probably be easier to scratch build the small batch of cylindrical components rather than sanding the parts while trying to keep a correct round section.
The two-parts bomb bay is basic but looks correct. With regard to internal details only the door retraction arms and the weapons pylons are given.
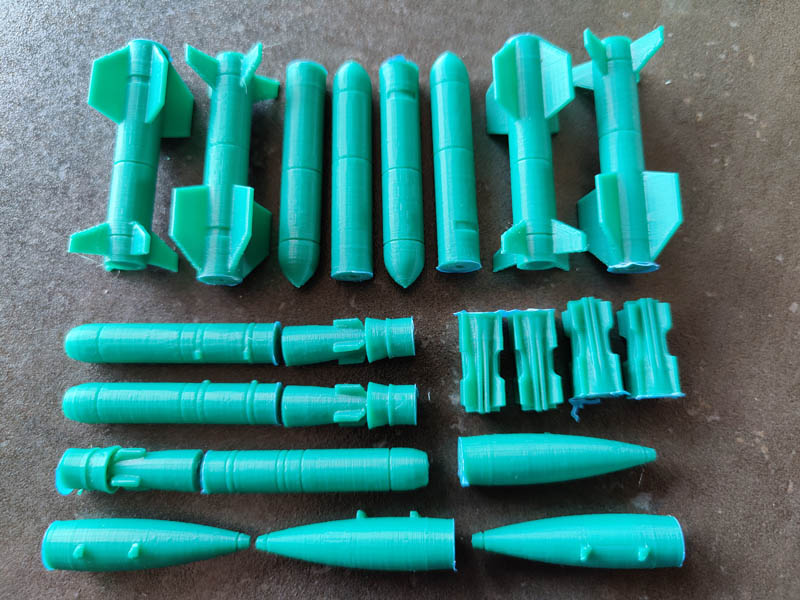
Ten external (identical) pylons are included. Unfortunately, the panel lines are far too large on such components. The kit also includes a good set of weapons: 4 AGM-84 Harpoons, 4 Mk62 mines and 3 Mk46 torpedoes. Except the too thick winglets and large panel lines, they are nicely shaped.
There is just a small number of external parts (such as antennas) to add as the P-3 airframe has very clean lines. The two stairs depict a later type and are quite well detailed with their handguards.
SCRATCHBUILDING OR NOT?
The kit is giving all main components you may need. However, the level of detail is more comparable to a very detailed 1/72 kit than a current LSP. This opens the question: do you need to add other elements to improve the kit? Because of an obvious lack of aftermarket components, you will be on your own.
With regard to the external components, improving the surface detail should make the job. Antenna wires and some other components may be added but the essentials are there.
There are nonetheless some specific areas that deserve more attention:
- The fuselage intakes should be deeper.
- The engine air intake are too shallow and the exhausts are too thick. This is typically one case where scratchbuilding FODs will be the easiest solution and give some colour variations.
- The windows. The kit only has a thin plastic sheet to reproduce them. Alas, the oval side windows in the fuselage were typically convex, not flat. They are included as 3D printed parts but not made of clear monofilament. So, either you must cheat and use the flat clear plastic, either you use the 3D printed parts as a master to vacuform or crash-mold new bubble windows.
With regard to the internal areas, a lot of things may be added:
- Many pipes and small details can be added in the bomb bay but if you fill it with torpedoes and mines, there is no need to go too far.
- Small details are missing or are not accurately depicted in the cockpit and cabin. Assess what will be visible as hundreds of hours can be dedicated to improve such areas. Personally, I think that the floor tiles should be covered with polystyrene, details added to the visible areas and the soundproofing layer added to the top of such areas where they are visible. Dozens of pictures are available on the web to give you hints.
- The landing gear bays can also be far more detailed but the main elements are fortunately included.
- The sonobuoys launching tubes are too shallow if you just close them with plasticard. This will ask for some thinking to improve the look even if this is not the most visible part of the airframe.
Note that kit has sturdy attachment points that are sometimes out of scale. In that case, the compromise between strength and accuracy needs to be balanced by each modeller.
And finally, should some components be completely rebuilt?
Hopefully, the question only applies to some elements such as the landing gear legs and the cockpit control yokes. As designed, they will need a LOT of work to get something that is comparable to an injected part. If something would require to be printed with SLA, this is at least such elements. I think that most if not all the components of the LG can be acceptable if putty is used and everything is cautiously sanded with fine diamond files but very probably some cylindrical components can be replaced with styrene or metal rods.
THE ASSEMBLY
A preliminary check is showing that assembly of 3D printed parts should be easy. Only some parts were slightly distorted during the curing and will ask for clamps. In my kit it looks only the nose has such a problem. Otherwise, the assembly is really LEGO-like!
Wood and metal sticks rods are included and the instructions give you the relevant sections to use to reinforce the seams between all the large parts as well as the LG, bomb bay doors, weapons, etc. Holes to receive them are present in all large parts. So, you can create assembly pegs with sections of such rods. There are also some flat parts intended to reinforce the seam between the different sections of the cabin floor (they were in the sandpaper envelope).
The used thermoplastics did not react to my plastic glues but I did not test very hot ones. Nonetheless, CA glue and epoxy are recommended. For the largest components, epoxy glue is the best solution as it is less brittle than CA and will better withstand the tensions in the assembled model, more particularly when you will move it.
THE INSTRUCTIONS
With regard to the instructions, I received three PDF files per email when I ordered the kit. They are also available on the OMM webpage: http://one-man-model.main.jp/.
The first file describes the recommended assembly techniques for such 3D printed models as well as how to prepare correctly such parts. The second PDF is giving a detailed list and visual identification of all the kit components. The third one is showing how to assemble the model.
The instructions are actually better than what you can find in most resin kits. However, take your time to correctly identify all the components. All sections of reinforcing rods are given to assemble parts.
I did not find any information related to the need to add some weight in the nose. This is something that will need to be assessed as a considerable amount of the components is located behind the axis linking both main landing gear legs. Keep also in mind that the only location in which you can easily add weight is the nose tip.
Another aspect that is fully missing is some guidance regarding internal and external painting. For a US Navy plane, the early scheme was FS16440 gloss light gull grey over FS17925 gloss insignia white. Initially the plane had a black nose and antiglare panel and the lettering and stenciling was essentially in black FS17738. Some warnings FS11136 bright red stripes and ‘DANGER’ FS13538 yellow arrows complete the standard decoration of the plane. Flaps upper surfaces were painted with FS11136 bright red to show if they were not fully retracted.
Later, the plane moved to the full 16440 scheme and when the overall grey scheme was introduced, the flaps were painted the same colour as the rest of the airframe.
Do not forget the walkways were always a slightly different colour. Propellers ask for black colours with white stencils and three red and white tip stripes.
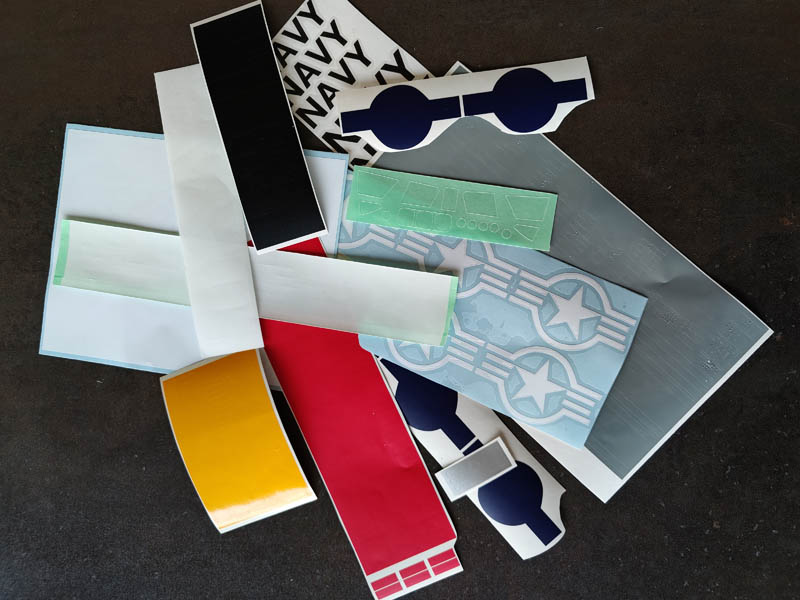
The kit has no decals but a basic bunch of US NAVY standard markings (no VP unit ones). Fortunately, most of them can possibly be recycled as masks. But test that before as the glue is not the same as the mask ones.
Personally, I will make new masks for the larger markings and recreate stencils with laser-printed decals. Hopefully, with the plane maintenance manual (NAVAIR 01-75PAA-4-1) and the numerous detailed walkarounds you can find on the Internet, this will be time-consuming but not very difficult. With regard to stencils, the plane had more than 300 decals put on the full-scale airframe. So, you can really ‘go to town’ with them. The propeller white stencils are surely the most annoying item to reproduce. Without an ALPS printer the easiest solution is to ‘print’ them in white on a black background with a laser printer using white decal paper.
For the interior, all bays/wells and the internal side of their doors are gloss white. The cabin and cockpit require too many colours to mention here but a large majority of them are hues of light grey with some beige soundproofing material and red seats. So, refer to walkarounds but keep in mind that not a lot of things will be visible from the outside.
THE REFERENCES
There are not a lot of published references about the P-3 Orion.
With regard to books:
- Schiffer published a quite large study (‘Age of Orion: The Lockheed P-3 story’). This gives a detailed history of the type, the technical upgrades as well as the use by US services and the exported airframes. Recommended even if this is not really a modeller’s book.
- Squadron Signal released an ‘In Action’ booklet (volume 193). It is good but as usual quite basic to use it as a major reference.
- World Air Power Journal had various good articles about the P-3 in their series of Mooks. The last issue released (volume 43) had a quite detailed article about the US. Navy versions.
With regards to manuals, the NATOPS flight manual is giving some interesting information (e.g. weapons configuration in the bay) but I highly recommend the illustrated parts maintenance file (NAVAIR-001-75PAA-4-1) as it has a description of all the technical stencils. I found both of them for free on the web after 15 minutes of search.
And last, there are multiple walkarounds available on the Internet. In some hours I found more than 1000 pictures dedicated to the P-3.
Actually, if you combine the different references, it is possible to get enough material to detail that kit and find relevant color information.
If you consider export versions, the situation is very variable as some airframes were virtually identical to the US ones whereas others were noticeably different (such as the Canadian Auroras). So, choose you topic and assess what will need to be possibly changed as the kit is depicting a basic US airframe.
CONCLUSION
The kit costs around 50.000 Yens. This included overseas P & P. This is not cheap but not expensive either if you consider everything is ‘hand-made’ by a single person and the size/complexity of the model. The shapes are there as well as all the components to make a very basic but generally accurate P-3 model. Panel lines are generally accurate even if oversized. No rivet is reproduced but there are very few of them on the full-scale airframe (most are within the bay doors).
Obviously various shortcuts were taken because of the limitations of the technology and this means long hours of sanding will be required. Photoetched parts, SLA printed or classical resin parts would be welcomed to replace some of the basic components but this would impact the price without any doubt.
Assembling the kit as such is possible if you want to hang it or just want a BIG P-3C rather than an accurate replica. However, this will not look better than a basic desk model.
If you want to get a result comparable to any ‘classic’ LSP you will need to consider:
- The lack of any aftermarket item except finer bombs/mines and Harpoon missiles.
- The need to prepare/rework the surface of close to all parts. This essentially means many hours of sanding.
- The need to add details and/or replace/sand some too thick components.
- The need to vacuform the bubble windows
- The need to find a solution with regard to the markings.
It is useless to say this will not be a weekend project if you really want to improve the kit. However, I am convinced this is the best large-scale P-3 Orion we will ever get as a model.
I did my best to take acceptable pictures of the parts but the winter light was very bad whereas the size of most parts did not help. However, the review combined with the pictures should give you a good overview of the contents.
Overall, the kit is highly recommended to experienced multimedia modellers willing to invest time in a major project.
December 2021 Thierry Laurent
© Thierry Laurent 2022
This review was published on Sunday, January 02 2022; Last modified on Sunday, January 02 2022