
Tamiya 1/32 A6M2 Type 21 "Koga's Zero"
By Chris Wallace
Koga's Zero
1/32 Tamiya A6M2 Type 21
"One of the greatest prizes of the Pacific war."
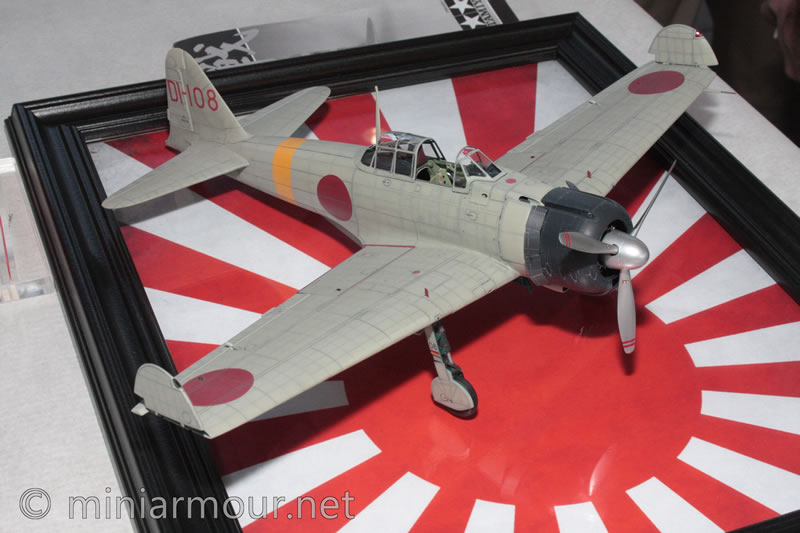
This particular Zero has come to be known as "Koga's Zero" after its pilot, Flight Petty Officer Tadayoshi Koga. As part of the greater battle of Midway, this Zero flew from the Ryujo and took part in a raid on Dutch Harbor in the Aleutians. The Zero was damaged in that raid so Koga decided to make a forced landing on the island of Akutan with the hope he could be picked up by a submarine stationed off shore.
On his final approach to what appeared to be a meadow, Koga lowered the landing gear. When he landed the wheels dug in to the marsh-like surface and the airplane flipped onto its back. Despite being under orders to prevent a Zero from falling into enemy hands at all costs, Koga's wingmen did not strafe and destroy the aircraft hoping Koga had survived the landing. However, Koga's neck had broken when the airplane flipped.
A month later a US Navy PBY Catalina flying boat on patrol spotted the Zero. After reporting their findings to superiors an expedition was sent to recover the Zero. The airplane was soon removed from the bog and brought to Dutch Harbor, where it was cleaned up and put in a crate for shipment to San Diego.
The Zero was quickly repaired and flight testing began in late September 1942. Test Pilot information together with the improved capabilities of the Hellcat, were credited with helping American pilots tip the balance in the Pacific.
The Kit
There have been many reviews of this model and in this author's opinion, its one of the best, if not the best 1/32 prop fighter on the market. This is Tamiya's second Zero, the first being the later variant A6M5. I won't go into an exhaustive review but I believe this is the better kit to buy as it has the folding wing option and a superior design for the dorsal spine (the A6M5 does not have a separate spine piece and both rivet and panel line detail are shallow in this area.)
Construction Begins
I chose to keep this to an out-of-box build although I was tempted to add some wiring to the cockpit and engine. I find that when I start to add after market or scratch built components, the build takes me much longer. To be honest - the scale and the quality of the parts in this kit are as good as it can get. Some kits need aftermarket to 'add to' the finish product. This one can get away without it. I did buy Yellowhammer’s 1/32 A6M2 Zero Type 21s decal sheet (YHD32014) which included the markings for Koga’s Zero as well as vinyl painting masks.
One of the best things about this kit is that you can easily build it in subcomponents. Some subcomponents are more time consuming builds (cockpit, engine) and others are relatively quick (flying surfaces, landing gear).
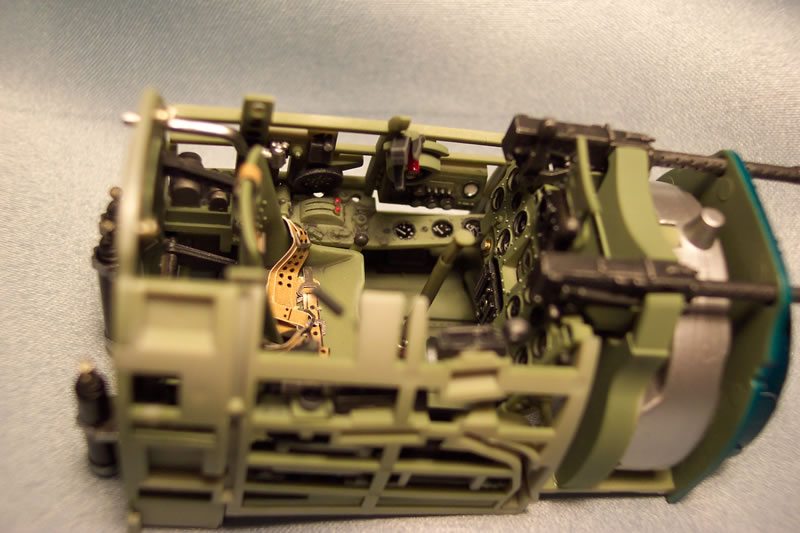
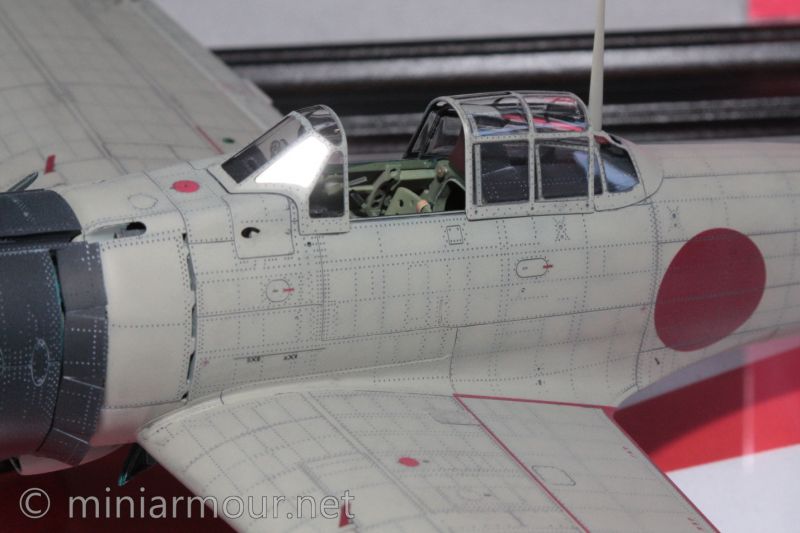
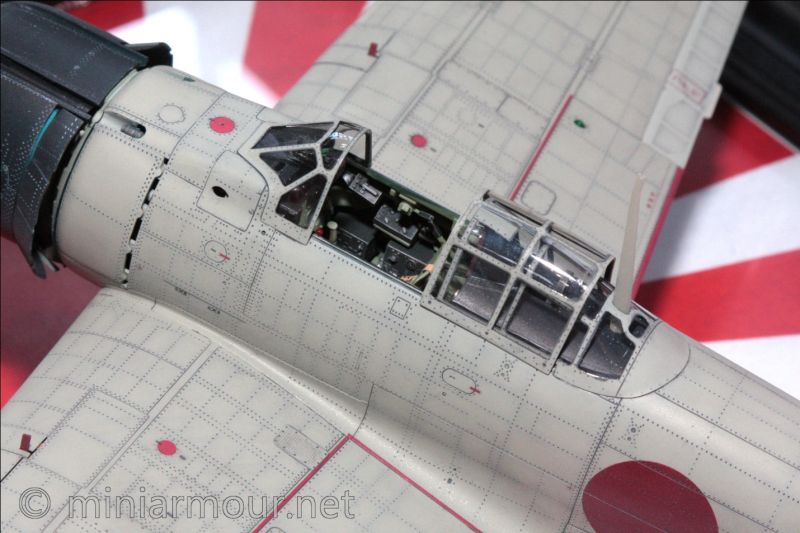
Cockpit
Despite what the instructions say, I started with the cockpit. There is a wide variety of opinions as to what is the ‘correct’ colour of the interior of any Japanese airplane but my thinking is that since I always make mixes and shading, it won’t really matter. The components were sprayed with Tamiya's IJN Cockpit Green (XF-71) lightened 25% with flat white (XF-2). I did this to have them stand out from the inside of the fuselage sides which were painted straight interior green. The difference in shade is subtle but noticeable.
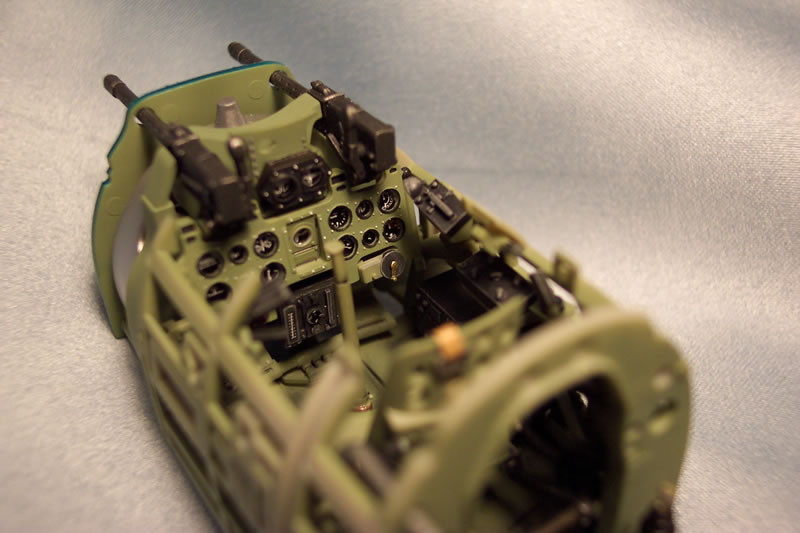
Tamiya's excellent instrument panel was painted and decorated according to instructions. The inside of each dial face was painted with Tamiya's NATO Black (XF-69). I gently dropped a thinned mixture of NATO Black into the recesses at the top of the instrument panel. I took out the magnifying glass to help me individually highlight each bolt head with flat white.

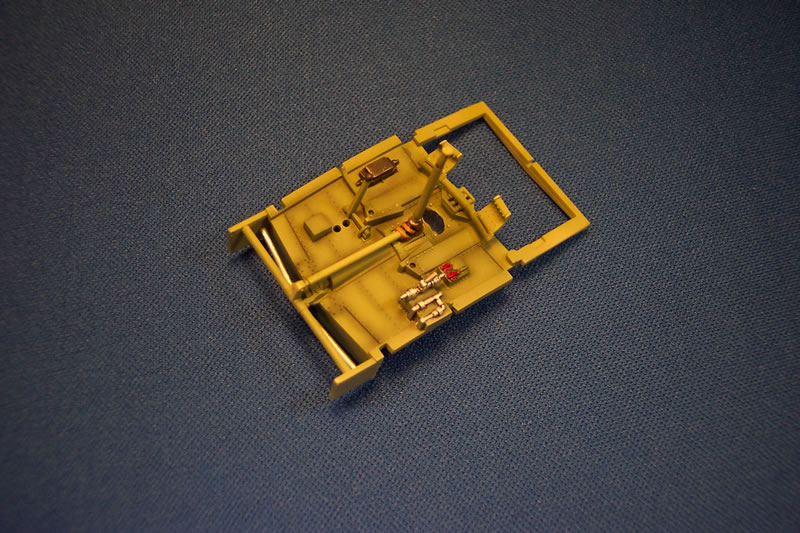
The Cockpit floor was next. After spraying the basecoat, I took a very thing mixture of NATO Black (3 drops paint to 7 drops thinner) and carefully highlighted the rivet lines, join lines and the outline of equipment boxes. With such a thin mixture (and low pressure) you can gradually build up these lines to a point where they are noticeable but not overpowering. Once completed I masked and sprayed the black boxes and hand painted the rest. Again, bolt heads, radio dials, etc. were individually picked out with a magnifying glass and a 000 brush.
The sides were completed as per the instructions. I did deviate with the colour callout for the radios as I felt all black radios would stand out better than the IJN Cockpit Green callouts. Painting these subassemblies is just an exercise in patience. There are a lot of individual colours and it is time consuming but the end result is really worth the effort. I wanted this to be a clean build so I did not use a wash in the cockpit except on one of the radios on the right hand sidewall.

The seat and rear bulkhead assembly was painted with IJN Cockpit Green and then another thin mix of NATO Black was used to follow the rivet lines and the "opening" at the back of the chair. The bolt heads on the chair were individually highlighted with a lightened mix of IJN Cockpit Green as were the edges of the seat and the opening to the back of the aircraft.
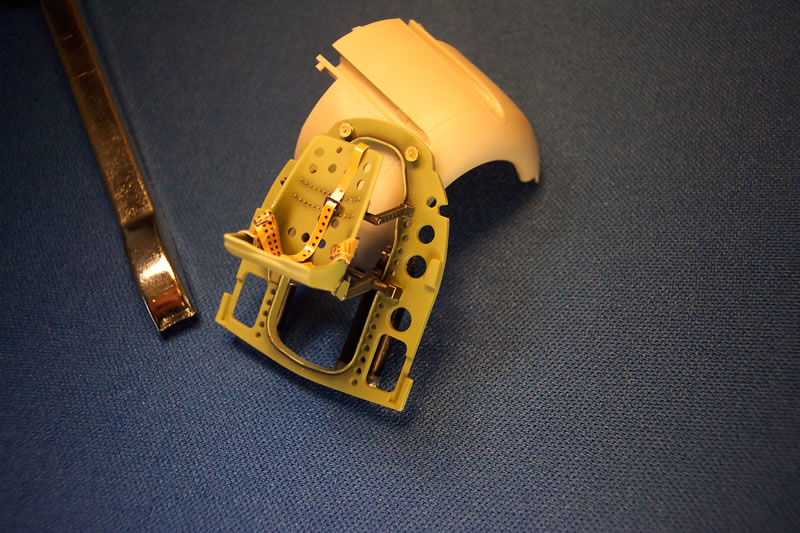
The seatbelts were carefully cut out using a new blade - they are a little tricky but once you are successful with the first one, the rest are not too hard to do. The belts have a gloss sheen on them and will benefit from a flat coat or even a very light mixture of brown shot through an airbrush. I chose to flat coat them.
The cockpit assembles easily into a self contained unit that will slip into the fuselage after it is assembled but prior to installing the wings.
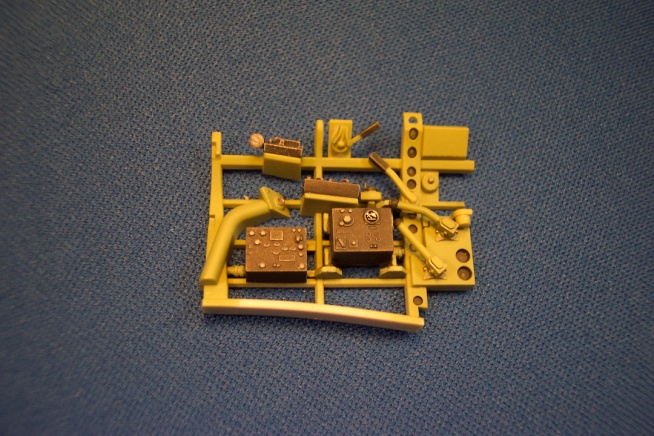
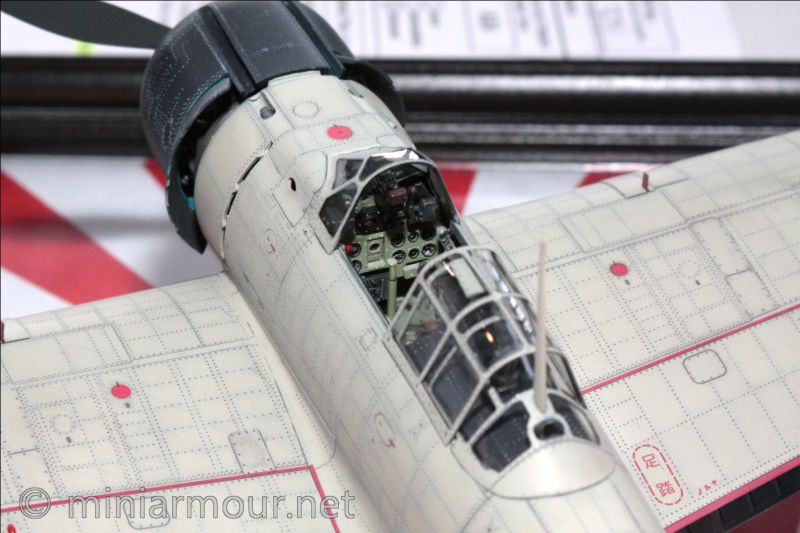
Engine
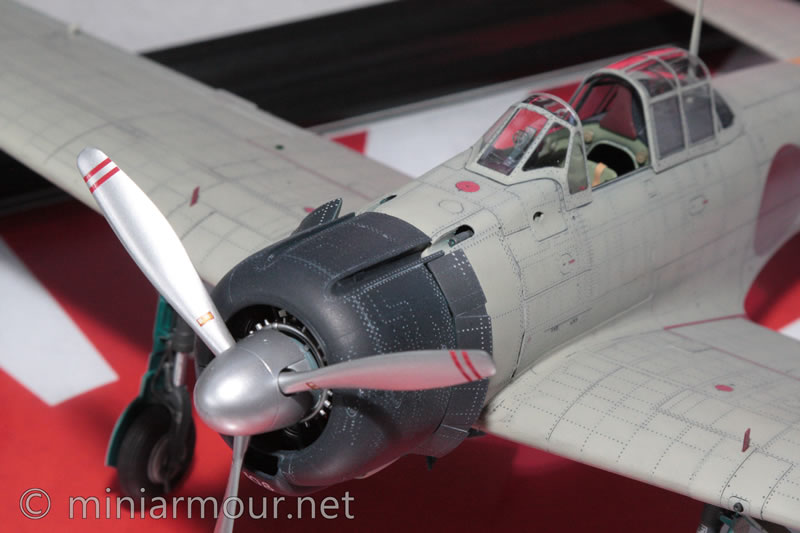
I think my favorite part of a build is the engine. This kit includes an excellent 'sub-kit' of a radial engine. The cylinders were first painted using NATO Black. I then drybrushed with Citadel Bolt Gun Metal followed by Citadel Mithril Silver. I can't say enough about those paints and drybrushing, nothing beats them. While some might consider the double drybrush as overkill, I think it really enhances the finish and gives an excellent impression that the parts are metal.


The exhaust ring was first airbrushed with Citadel Mithril Silver thinned with Tamiya Acrylic thinner and then coated with a diluted mix of flat brown (XF-10) and NATO Black. The approximate ratio was 2:1:7 of brown:black:thinner. This mixture was applied in light coats at very low pressure until a nice rust effect was showing. I then 'dry-dabbed' or 'stippled' brown and black dots by lightly dipping the end of a stiff brush into a small amount of paint, dabbing it a few times in a paper towel, and then randomly applying it to the exhaust. Easy does it here as the effect is better with less dabbing than with heavy paint. The last part of this is to dust it with a little rust colour from Tamiya’s Weathering Master B Set.
Final Assembly and Prime
I then followed the instructions from this point. I airbrushed and assembled the interior of the fuselage then inserted the cockpit assembly into place. The wings were assembled next and aside from the tricky main gear area, it goes together simply and perfectly. When I joined the wings and tailplane to the model I only had to use a small amount of filler along the bottom of the rear of the fuselage and only to fill in a few slight imperfections. After carefully fixing the affected rivets with a sewing needle and sanding, it was perfect.
On this build I decided to sand after priming to help with the smoothness of the finish. I simply sanded using progressively finer sanding cloths and plenty of water in the sink.
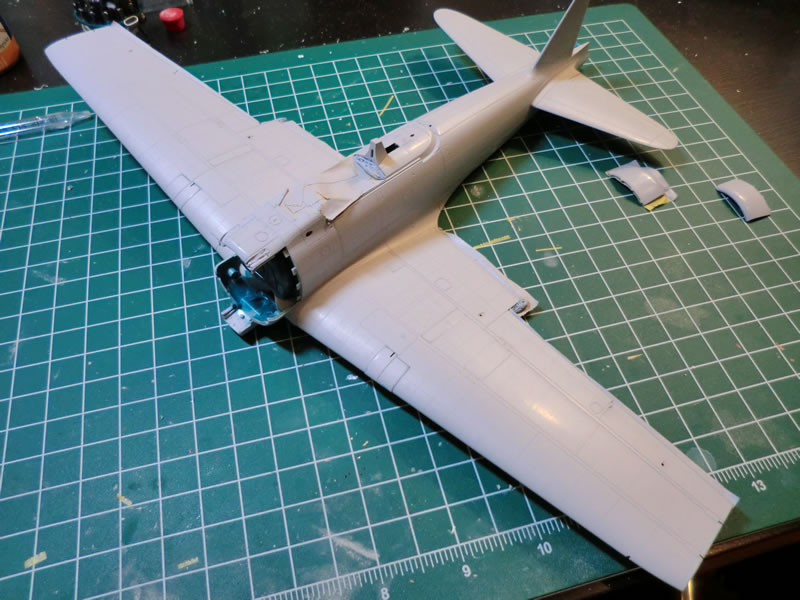
This was to be a relatively clean build so I only applied a thinned Dark Grey (XF24) preshade. The ratio of paint to thinner was less than 1:1 and I worked at very low pressure and very close to the model. At low pressure and with a thin mix, I go over all panel lines and rivet lines.
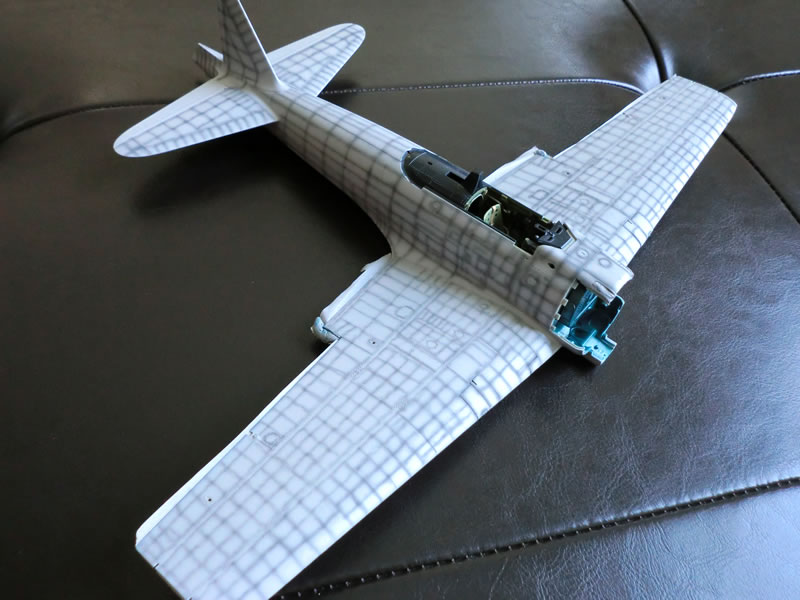
This mix allows me some flexibility to build up the preshade to where I want it. I prefer this to a one shot line where I have less control. Because I am building up the lines, I tend to get more precise preshade lines. The only downside is that my method takes a little longer.
Next came the basecoat which was a mix of Tamiya's IJN Gray Green (XF-76) and flat white mixed 3:1 and that was thinned about 1:1 with Tamiya's acrylic thinner. Again, I use low pressure to hit each panel individually. Low pressure leads to a dry tip so I used a drop or two of Tamiya's new acrylic retarder. This stuff really works and you don't need a lot of it. I wanted to have the preshade "just" show through. Its at a point where it does not overpower the airplane but you do notice the depth of the finish.
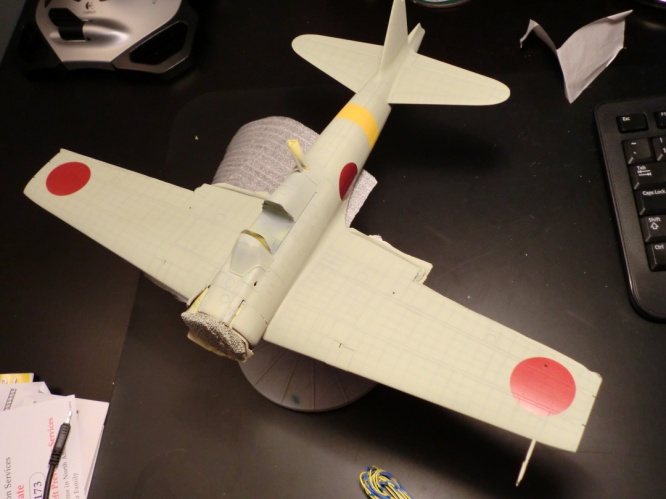

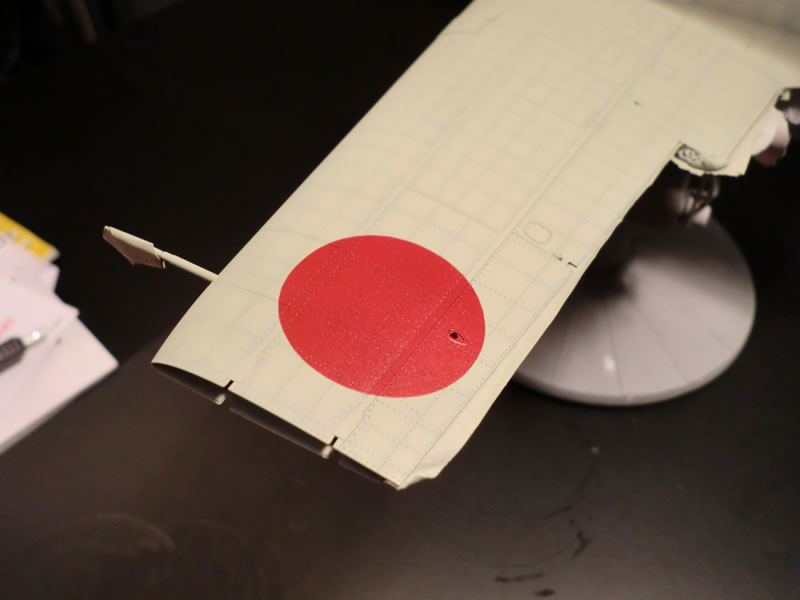
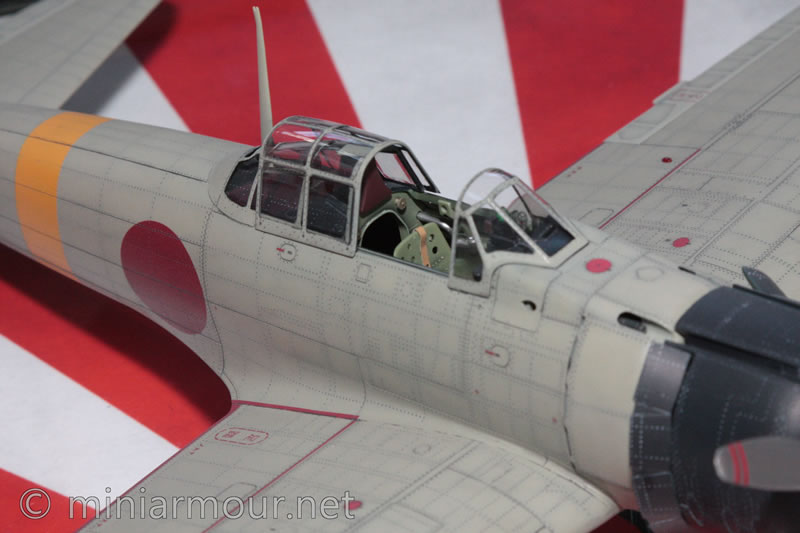
After the base coat was applied, I decided to try to paint on my own markings. Koga’s Zero required national markings what were slightly smaller than the masks provided for in the Yellowhammer set. I used an Olfa circle cutter to cut some custom sized vinyl masks. The process to make the masks was easier than trying to properly place them! The sticky aspect of the vinyl mask made it tricky to get the right placement but once the perfect spots were found, the mask conformed to the surface perfectly. I also made a mask for the yellow fuselage band.
My only tip in painting your own markings is that you need to be careful to apply very light coats of paint to prevent runs. You want to almost 'mist' the outside edge and shoot the airbrush from the outside of the mask toward the middle. Try to avoid spraying directly at the edge of the mask until you have a few light coats down. Once you get some colour built up, you can apply slightly heavier coats until finished. Again, it is time consuming but the time spent here will save you from fixing colour runs that went under the mask.
Fabric Flying Surfaces
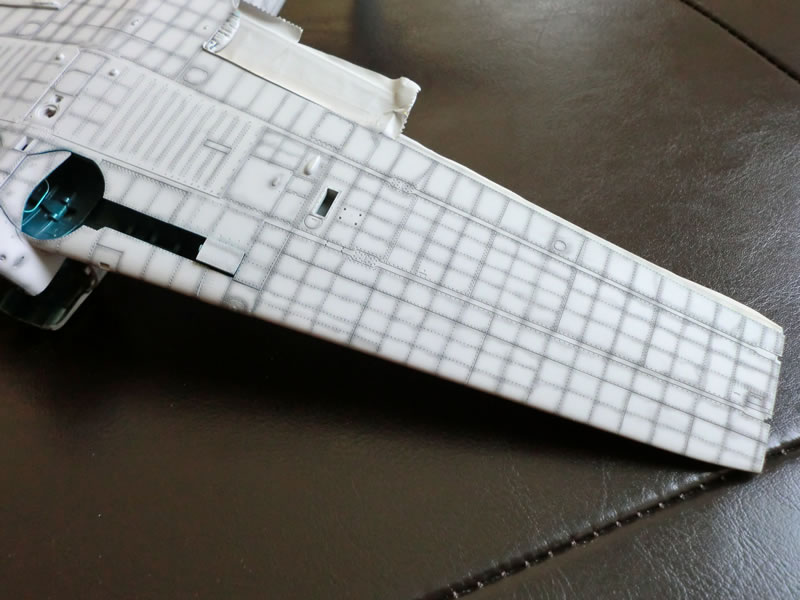
I get a lot of compliments on how I do my fabric surfaces. The Zero had these surfaces on the ailerons, elevators and the rudder. Most pictures I have seen of the Zero show a slightly different colour on these surfaces than on the metal surfaces. I replicated this by with a mix of IJN Gray Green with a flat light grey - approximately 3:2 and this was thinned 1:1 with Tamiya’s thinner.
Once dry I make very thin strips of Tamiya tape and lay them over the texture of the 'rib' of the elevators, ailerons and the rudder. Then I use Tamiya tape to mask all around. At the end of the process all I have is a series of 'boxes' of the basecoat surrounded by tape.
I then take a very thin mix of dark grey (about 3 drops paint to 7 drops thinner) and use low pressure to follow the outline of the tape. I build up the colour slowly and make sure to not do too much. I actually try to paint the tape as much as I can so that the overspray will stain the fabric surface. This does not take long as it is an exercise in subtlety. The picture below clearly shows the effect.

Once the paint was dry I glossed the entire surface with Future in order to apply decals and a wash. The decals were from Yellowhammer and went on perfectly.
I then applied ProModeller dark grey wash. Its perfect for this basecoat - just dark enough. Any darker and the contrast would have been too stark. With a nice glossy surface the wash behaves beautifully and cleans up wonderfully. I really like this product and I enjoy using it.
Other than that I applied a coat of Model Master flat and installed all the many bits and pieces to finish the model.
Conclusion
I chose to build this out of box because I believe that there isn't much utility in replacing the well molded Tamiya parts with slightly better PE or resin ones. That said, I have seen some breathtaking versions of this model when fully decked out. In the end, this model will give you an excellent result no matter what skill you are.
Lastly, I want to thank Vladimir Adamec who took the excellent pictures of the completed Zero at a recent show. Vlad was kind enough to let me use these images for this article. I hope you enjoy them.
© Chris Wallace 2011
This article was published on Monday, December 12 2011; Last modified on Saturday, May 14 2016