
Revell 1/32 Fw 190D-9
By Saso Knez
The Fw 190D-9 popularly known as the long-nosed Dora was a stop gap to provide the Jagdwaffe with a high-altitude defense fighter, till the arrival of the Ta 152.
The Me 262 was most vulnerable when taking off and landing, so the jet pilots needed protection during this period of flight. Most grupen preferred the Dora for this task. Results were mixed but the leader of the JV44 Adolf Galland said: "Sashsenberg was a good pilot....We felt safer when his airplanes were in the air".
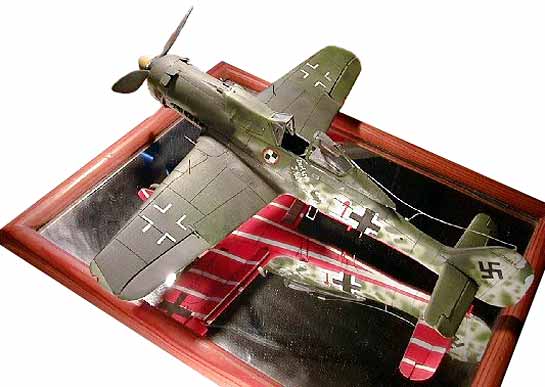
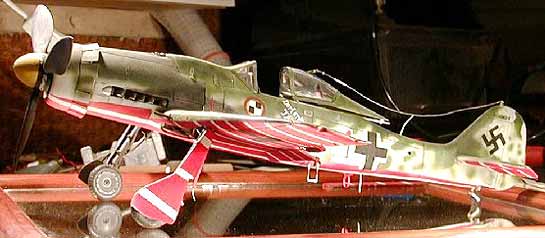
The airplanes of the Sashsenberg schwarm were painted with two greens (RLM 82, 83) with red and white striped undersides, so they make an interesting models to build and paint.
To make a breath-taking model you would use the latest kit, a good photo-etched set is a must and you would try to incorporate a resin or metal detailing set. But what do you do when you want to build an equally good model but the kit is older then you? An expert modeler can make an oldie shine, but beginners are often swamped with problems and it eventually results in a bad model. In my article I will try to present the problems and the techniques to deal with the obstacles.
As far as I know the only available kit in 1/32 is the old Revell kit (I now know that the Hasegawa kit is also out there). It is extremely difficult to get one. Before I opened the box I knew that I will have to do a lot of work, but I didn’t even suspect what I got myself into. But let’s take it step by step.
Cockpit Problems
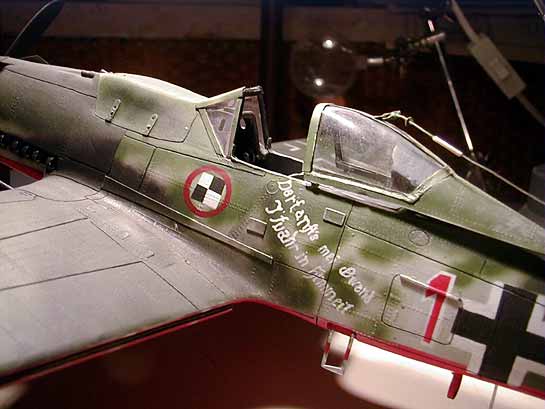
Revell’s cockpit was simple it contained: the seat, instrument panel, cockpit, and firewall. I scrapped everything but the firewall and the tube. I made the seat by stretch forming 0.75mm styrene over the kits seat. I filled the lower part of the new seat with Humbrol filler and then shaped it to make the step for the parachute and the wrinkles in the cushion. I formed the front floor of the cockpit with a thin aluminum sheet banded to shape. Then I formed and glued various installations from copper wire to the fire wall. The instrument panel was the most difficult part, because the photo-etched panel from Eduard was not the right size. It is divided into three panels. I advise that you cut them apart and scrap the upper part. I did it and it is the easiest way to produce a realistic panel (or at least one that will fit). I made the lower two instrument panels with original photo-etched parts, but I made the upper third from sheet styrene with photo-etched instruments. I did this because the photo-etched panel doesn’t fit into the fuselage. Then I constructed the supports for the photo-etched panel from strips of styrene. The throttle lever was made from banded strip of thin brass with a plastic rod and some copper wires. The brake pedal is made from the same plastic rod filled to shape. The instruments and the knobs on both consoles were scratchbuilt from brass rods and copper wires. The controls stick is a combination of copper wire partly wrapped with an aluminum sheet and the handle is a part of the kit column fitted with knobs. I made the canopy actuator drive wheel from circle shaped sheet styrene with brass and copper strips with stretched sprue handle glued to the end. It is best to make the Revi gun sight now when you are still working on the cockpit. I used two sheet styrene glued together then added a brass circle, and strip to support the reflection glasses I made one glass from a transparent box cover, and the other from an old negative. For rudder pedals I used the ones from Eduard set of buckles.
Wheel Bay Section
This was definitely the hardest part of the project. Why? Dora's wheel bay melts into the fuselage of the aircraft so you can see the wheel bay itself with the MG 151 canon and various installations, the ammo boxes, the firewall and the rear part of the engine. It is needless to say I had to scratchbuild it all. The wheel bay provided by Revell was much too shallow and totally incorrect so I cut it out. I started the wheel bay section in the fuselage. The firewall was in the kit and I used it but I added the lower part. Then I added the supports for the ammo boxes, I made those by forming the aluminum sheet in to a U-shape. The ammo boxes were made by gluing two of the thickest styrene sheets I could find. And then I filed it to shape. I added soldered brass ammo feeds. The numerous installations were made mostly from copper wire. The special profiled installations were made by wrapping a thin copper wire around the thicker one. The engine block is the easiest sub-assembly of the wheel bay. I used a thicker styrene sheet then normally and simply built the big inverted Y shaped engine block. At the rearmost part of the engine there is a larger block sticking out of the engine (magnetic starter) , make a hollow block from styrene and then add a capsule looking thing. made some more installations like the ones previously described. You must glue the engine to one side of the fuselage. I glued mine to the left side. Glue it close to the edge and don’t worry about the joint too much because it will be impossible to see. This is about it in the fuselage part of the wheel bay, the wing part of the bay is a little easier. I started by gluing a plastic foil (the thinnest plastic available) to the upper part of the wing so it levels off with the step in the firewall. Then I made the basic walls of the bay. Because there is a lot of holes in the walls you must have them shaped before gluing them to the wing, otherwise you are going to have a tough time centering the holes. When I finished the basic bay I made the ribs by shaping them to fit the wing and bay walls and then shaping the rib profile. Plumbing is made from solder and brass wire. In the wheel bay you can also see the 20mm MG151 cannon. I made those by sawing a T-34/85 turret gun (it was handy and had the right diameter and texture) into two parts, then I made the grooves with a triangular file, and the barrels were made from two hypodermic needles. In the place where the models fuselage bay melts into the wing I made an L shaped profile from the thinness plastic strip I could find to conceal the joint.
Time to Paint the Interior
Lately modelers have been asking me when is the appropriate time to paint the interior, I told them that the timing varies from one model to another, but they should follow the basic principles:
- you must paint all the spots
- if you mix the paint try to paint as many subassemblies as possible at once
- avoid masking with logical building and painting
- you must weather the interior
When I finished the bay and cockpit I decided that this is the most appropriate time to paint the interior. I started with the cockpit and painted it RLM 66 Black-Gray which I mixed from Testors enamels. The detail painting came next and a little sliver drybrushing then a black wash. Don’t forget to insert the instruments film to the instrument panel before painting. I decided to paint the wheel bay with German aircraft primer which I mixed from Testors enamels. The engine is black-gray with heavy weathering and the ammo boxes are red primer.
Main Landing Gear
Revell provided a landing gear that was up to date with then current standards in other words outdated, so I had to find a different solution. The main struts were easy. I used a brass ink container found in older pencils for the basic shape of the strut. The profile of the strut was achieved by wrapping additional plastic foil around the brass container. The hydraulic cylinder was constructed from very strong thick wire. I suspected that this will be the weak point of the constructed model but the wire performs well. The main wheel is OK, but after sanding you must recreate the grooves with a triangular file. Paint the wheel hub with a drawing template. The gear doors are acceptable with little modifications.
OK, if you made it so far I am happy to inform you that the problematic part(s) of the project is over.
Finishing
Eduard offers a photo-etched set for detailing flaps, which I incorporated. I scribed out the flaps, thinned them and glued the photo-etched flaps on. Now glue the fuselage together, start with gluing the cockpit to the fuselage half the engine is glued on. Continue with the tail and spine and work your way up. Then glue the wings together, be sure to remove the gun before you glue the wings together and reinstall it after sanding. I decided I will scribe in the panel lines with preserving the bolts and nuts structure. I used a strong needle for scribing, a brass ruler, and a scalpel for removing the burrs. When sanding you will destroy some rivets but try to replace them. I tried two techniques; drilling a tiny hole with a hypodermic needle to represent the bolt and ‘stamping’ the plastic with a not too hot needle. After I glued the model together, sanded it, added exterior detail like antennas , lights... I primed the model. I didn’t paint the entire model but I primed it only on the major joints (fuselage-wing, wing-wing...). Look for mistakes and correct them.
Painting
High time to get my thinking cap on and to determine the process for painting the five (!!) main color camouflage scheme.
I mask my models with a combination of masking tape and tissue paper. The later goes in all the internal bays or cockpit, then it is covered with masking tape to ensure that no paint gets through.
Sprayed the whole model with white primer. Final check to get any imperfection out of the way. Then masked off the white strips and the areas where the later white insignias will be.
Then after this the read color followed on the underside. This was left to dry for a bit. I masked off the whole lover surface with post it masks, to avoid the scratching of the paint, while I worked on the upper surfaces. The next coat that followed was the gray. The edges on the fuselage and on the nose between the red and gray were sharp and I masked them off with masking tape. The grey was sprayed in very liberal fashion paying attention to the smoothness of the color coat. This was left to dry for a while. Then I mixed the light green. All the spots and mottling are in this color so I paid special attention to density of the color. Remember it must be the same density as milk.
I use the Testors/Aztek professional airbrush. This is a two action airbrush. I first mix the paint with normal thinner, and not the one that comes in the same range as paint, because it is ridiculously overpriced, and I really don't see the effect of using this thinner. Then I set my airbrush to single action-that means that when you press the trigger you control only the pressure valve, and not the volume of the paint. So set it to single action and adjust the volume of the paint, so that when the trigger is fully pressed only a minimal amount of paint exits the nozzle. To do this shut off the paint volume valve, then s l o w l y roll it back to open position holding the trigger open. Then you see the paint coming out from the nozzle and this is the time to stop. In this setting you will have maximal control, and control is the most important factor in fine line airbrushing. This is a very precise setting and if you find that when you spray, little dots start to appear or no paint exits the nozzle at all this means that the paint is not thinned down enough. Experiment with the pressure a bit, but I find it best when the setting is just below maximal pressure.
All the spots and the transitions were made using this technique. Start out with the edges and then with the same setting work your way through. Take your time and relax. Often take brakes during the painting.
The was done with the dark green and with both colors on the wing. I didn't mask off the leading edges, but airbrushed them freehand.
This Dora was constructed from at least two aircraft. So the entire nose assembly was from a different aircraft. This had the dark green sprayed to the line of under the intake, where it transited softly to the gray color. I masked off behind the panel lines and sprayed the right color scheme on the engine cowlings. Now I left the model to dry thoroughly. I think I left it to sit on the desk protected by a carton shoe box for 10 days.
Now I removed the masks revealing the white strips, parts of the balkan cross, the white number 1 and some other bits. The templates for the crosses were made using the following technique.
I sacrificed about 5 square cm. of clear plastic. This was then covered with over lapping bits of masking tape. The whole thing was placed over a photocopied to size scale plan for the insignias. The mask was then cut off with a help of a ruler. This kind of mask can be used more then once, just make sure that no air-bubbles are trapped on the edges of the mask.
Using black paint and more masks done in this manner I finally finished all the crosses and the swastika on the tail. The spinner was also painted black. Since I had the black paint in the airbrush I airbrushed the black exhaust stains on the fuselage. Remember different cowlings different exhaust stains.
Red any yellow was then applied to the number and the spinner respectively.
This was the best part of the project-the inscription. I don't use decals. For me it seems to crazy to spray gloss or matt lacquer over a nicely finished model. I did my inscription with the Rotring range of technical pencils. Another idea I tried earlier is that you convert a normal 0.3 pen for this task. Empty the plastic container for the ink and fill it from ink from the Winsor & Newton range. Then Draw a couple of lines on paper with it. The paint will get to the right shade with time, as you wash out the black or blue ink. Remember to clean the tip of the pen regularly.
Now only the weathering. I did this exactly as the available photo showed. The most traveled sections were drybrushed. This is the easiest and most used technique, so I will not lose any more words on it except you most use a really DRY brush. This is so very important.
The washes were applied to the panel lines. No special techniques here.
For the exhaust stain I tried something different. I lit my candle and set a small part of sprue on fire. The smoke is very thick and greasy and by holding a cotton swab over the burning plastic I was able to catch a lot of smoke and particles. These were then generously applied to the exhaust area.
And this also finished the model. It was placed on a mirror to minimize handling and give better view.
I regard the Revell kit better then the Hasegawa one, since it has less major mistakes.
© Saso Knez
This article was published on Wednesday, July 20 2011; Last modified on Saturday, May 14 2016