
Revell's 1/32 Curtiss P-40E
By Randy Lutz
Article by Randy Lutz
Images by Jamie Leggo
Introduction
I suspect that almost all modellers are somewhat the same. We have numerous sheets of after-market decals for our models, yet we always crave the one scheme that has been overlooked by the decal companies. This was the case with me.
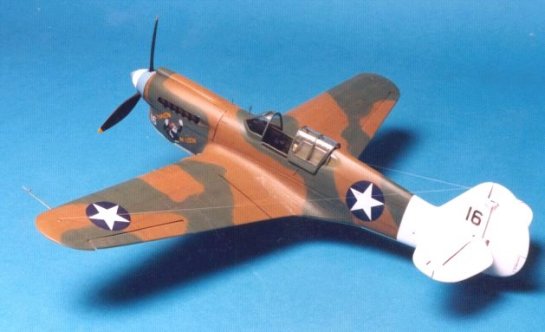
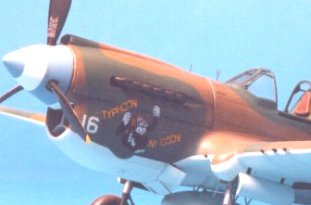
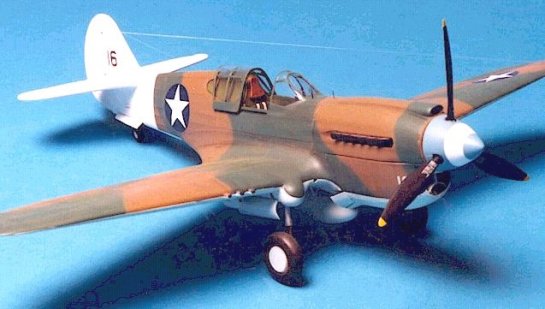
I could have built any number of attractive P-40's, but I wanted to do "Typhoon McGoon", only problem was, there were no decals. This is where it is nice to have friends in the decal business. The Ministry of Small Aircraft Production (MSAP) came to the rescue. While they were doing a printing run, they blew up the artwork for this subject and tagged it on the bottom of the sheet. I now have a set of markings that are truly unique in 1/32 scale. I think the appeal with this subject stems from the blue and white spinner and the all white tail surfaces, the American interpretation of British camouflage, not to mention the nose art. With decals in hand I was now ready to build the P-40 of my dreams, or at least one of them, because as you know we are never satisfied!
The Model
The Smithsonian edition of the Curtiss P-40E Warhawk is identical to Revell's original release except for the inclusion of an antenna mast. When compared to an unbuilt original edition from 1969 it becomes evident that the moulds have not suffered too much over the years, as the majority of the parts are cleanly moulded with only a small amount of flash around the landing gear struts and gun sights while sink marks were virtually nonexistent. The fabric control surfaces nicely convey the impression of the fabric stretched taught over the framework and have a very subtle fabric like texture. A 14 part Allison engine is included which is visible via the two removable cowl panels.
Overall the fit is not too bad with the wing roots being the worst fitting area. They will require styrene shims to fill the gaps and even out the dihedral. The decals as provided are for the P-40 which is currently on display in the Smithsonian. Added to the Smithsonian's aircraft since this model was released is the name "LOPE'S HOPE" in tribute to Don Lopez. This name does not come with the decals, and actually it is just as well, as some sources claim that it should not be on the aircraft as displayed since it is finished in a North African scheme, and Don Lopez was stationed in the Pacific and never flew P-40Es. Regardless, the desert scheme is a little boring anyway.
Construction
I had already started this model when I was given the latest release from Eduard. Detail set number 32-017 was designed for the Revell P-40E. Luckily I had not progressed too far and was able to incorporate all the parts. Some kit modifications are necessary and I strongly recommend that this be done before too much construction is completed. If at all possible, test fit as many of the photo-etched parts as you can before painting, as I have found that quite often they or the surrounding kit parts will require slight modifications. For greater information on the cockpit components of the Eduard set please refer to the review at the end of this article.
The basic interior components were airbrushed using Testors Model Master Interior Green (FS34151). This was followed by a dark wash comprising of a mixture of Interior Green, black oil paint and turpentine. Once dry, highlights were defined by dry brushing a mix of Interior Green and white oil paint over all surface detail. Testors Model Master Black Chrome was applied to the instrument panel and the numerous boxes and consoles. These parts were then treated to various shades of gray dry brushing to pop out the detail. As the back of the instrument panel is visible when looking through the windscreen, I added the backs to the instruments and the wiring than runs from them using Sutcliffe plastic tubing and fine wire. It was all painted black so it does not stand out, but is visible if you look carefully.
The kit supplied gun sight needs some refinements, and as a result I shaved off the beige reflector, thinned down and drilled out the reflector supports and added the clear lens as well as a circular disk of foil under the reflector glass. The Eduard photo-etched seat belts were painted in a pale linen color using Humbrol Sail White with a hint of brown added and were the last items to be installed in the cockpit.
The kit supplied engine air filter assembly was drilled out to accept the new Eduard photo-etched screens. Even though they are set quite deep in the nose they are visible and are a dramatic improvement over the kit part. This unit was airbrushed in Floquil Old Silver and fastened to the engine after it was painted flat black. The exhaust manifolds were airbrushed using Testors Metalizer Burnt Iron with the exhaust ports being picked out in black. The fuselage halves were assembled trapping the completed engine and cockpit assemblies. Plastic strip was used to build up the edges of the removable cowling panels as they are slightly undersize, and would result in overly exaggerated gaps. In my opinion the gaps are still a touch wide, but c'est la vie! This is part of the problem when working with older kits that incorporate operating features. Prior to gluing the engine panels in place the exhaust manifolds were covered with small pieces of clear food wrap to keep the camouflage paint off the burnt iron color Once the model is finished the food wrap pulls off very easily and eliminates the need for touch-ups.
The area behind the rear quarter windows was airbrushed Interior Green and then the windows were installed. These windows have always been an area that has caused me grief as the fit is poor, and glue has a tendency to discolor the clear portions. I was determined that this time it would be different. I used white glue to fasten the windows, ensuring that it made a complete seal around the edge. Afterwards, super glue was used to fill the seams. This method was selected as I have found that the white glue creates a barrier while inhibiting the fumes from the super glue from getting into the small airspace between the window and fuselage. The clear areas were masked off using photographic splicing tape. Next, Tamiya putty was applied to all seams and then the window areas were wet sanded to blend them in to the fuselage. The splicing tape protects the clear areas as it is highly resistant to sandpaper. The windscreen was installed using the same method but it required more sanding as it is too wide for the fuselage.
The next area to be tackled were the wheel wells and Eduard provides photo-etched inserts which will eliminate that "see through" look when viewing the cockpit. The inserts do require trimming to allow them to fit properly between the upper and lower halves of the wing but it is not something a pair of scissors can't handle. Once the proper depth has been determined the parts were airbrushed Interior Green and given the usual washes and dry brushing. The wing components were assembled and dry fit to the fuselage to see what fit problems will come up. This is probably the worst fitting part of the model as the both wings require plastic shims to fill in the gaps, with the left side requiring twice the thickness of the right. Before the main wing was actually glued in place, the moulded in cowl flaps were removed from the bottom of the nose as Eduard has provided a beautiful set of replacement cowl flaps. No less than 11 pieces go into the construction of the Eduard units. The only problem with removing the kit flaps is that they help align the front of the wing assembly by pinching in the sides.
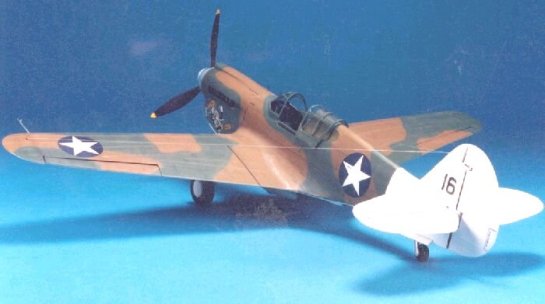
Once the wing was in place the tail planes were assembled and fastened to the fuselage. All seams were filled with Tamiya putty and wet sanded with progressively finer grades of sand paper. Any openings that had to be drilled out were done at this time, and these included the fresh air intakes at the wing roots, the gun camera, the rear fuselage jacking points and two small holes in the landing gear fairings. There is a ventral vent opening in the bottom of the fuselage behind the wing which Revell has moulded as an aerodynamic fairing. This was also opened up using a pin-vise and a half round file. The gun barrels were shaved off the front of the wings, and the fairings drilled out to accept the correct size of plastic tubing. As supplied by Revell, the gun barrels are under size and should be replaced. At this time I drilled out the landing light opening in the bottom of the wing to accommodate a Hasegawa Spitfire landing light at a later stage. Facial tissue was shoved into all the wheel well openings as well as the cockpit to keep out any over-spray.
Before any primer was applied, the canopy frames were sprayed with Interior Green so the correct color would show when looking in the cockpit area. This is a small step that is often overlooked by builders, but can add a subtle improvement to the appearance of the finished product. As a final check to ensure that all body work was acceptable, a light coat of Testors Model Master Primer was airbrushed over all areas that were subject to body work. Once I was satisfied that all was in order, the entire tail empennage was airbrushed using Testors Model Master Insignia White (FS17875). It took about 4 coats to obtain the proper coverage. While the white paint was mixed, I sprayed the spinner as well. I allowed a few days for this to dry, and while waiting I cleaned up the undercarriage, added the tow rings and sprayed them in Metalizer Non Buffing Steel. The tires were assembled and then rolled over a coarse file that was covered in lacquer thinner. This produces a cross hatch pattern similar to the diamond tread design found on American World War II tires. They were then sanded lightly to remove any unevenness and sprayed with Testors Rubber. If you have never tried the Testors Rubber paint I strongly recommend its usage. While appearing too light in the bottle, it will dry darker and is an excellent representation of the actual color.
Once the white paint had dried, it was masked off in preparation for the camouflage colors that followed. First was the under side paint. This is a somewhat elusive color, and one could be mislead by the artwork presented in the Squadron/Signal publication "The 49th Fighter Group". A short history lesson would be in order to explain the colors applied to P-40s painted to British standards. Based on factory drawings, Curtiss used the Du Pont 71 Flat line of paints. The colors while being close to the British standards were not exact matches. The Du Pont Dark Earth was a touch browner than the British equivalent, the green was closer to U.S. Medium Green (FS34092) and the undersides were finished in a pastel blue, very similar to the Duck Egg Blue from the old Humbrol line of Authentic colors The closest FS equivalent for this color is 35622. All P-40Es were finished in the same pattern with no mirror patterns being used. Admittedly this is a very short discourse on the colors applied. For readers craving greater detail, it is suggested that they refer to the excellent article written by Dana Bell in the January 1995 issue of Fine Scale Modeler.
Owing to the color required for the undersides, I had to deviate from my normal practice of using Xtracolor, and opted to use Gunze Sangyo Israeli Kfir Blue, number H-314. This was chosen over the FS35622 available from Testors Model Master as it dries to a semi-gloss finish and would be better suited for decals. Quite honestly, I did not know that this color is available from Xtracolor, otherwise I would have used it. After the undersides, it was back to the tried and tested Xtracolor paints. The blue areas of the spinner were sprayed Xtracolor X160 Synthetic Haze Blue (FS15190).
Based on photographs, it would appear that Curtiss employed a hard edge demarcation line between the upper and lower colors on aircraft painted to the RAF standard. Respecting this, I masked off the undersides of the P-40 using thin strips of masking tape to outline the areas. Note that on the left side of the nose the green camouflage dips down slightly. This is as per photos on page 44 of the 49th Fighter Group publication and is most probably because the aircraft displayed a different personal making before it was allocated to Kinsley. The first topside color applied was Xtracolor X2 Dark Earth BS450, which was tweaked slightly to darken it. Once dry, Xtracolor X114 Medium Green (FS14092) was applied freehand following the pattern applied by Curtiss. All paints were applied with the aid of a Paasche "V" dual action airbrush and cut with lacquer thinner.
While waiting for the camouflage to dry, the Eduard photo-etched inserts were added to the main landing gear doors as well as the tail wheel doors. They were then painted Interior Green and given a dark wash and lighter dry brushing.
It was now time to install the landing gear. Due to the retraction feature Revell has provided, the struts are a little on the short side, and if installed unmodified, the P-40 lacks that distinctive nose high attitude. To remedy this I did not install the struts as deeply as Revell as intended. Again, a little step that makes a big difference. I fabricated the brake lines from .025 Teflon electrical wire and held them in place with small strands of surgical wire tightly wrapped around the struts. The drop tank was installed using the kit supplied sway braces. Eduard provide a set of braces in their detail set, but try as I might I could not get them to fit properly. They appear to be much too long.
With all basic components installed it was time to apply the decals. For the national insignia and stencils, I used markings from Super Scale sheet No. 32-10 which is for North African P-40Fs. As mentioned earlier, the personal markings and the black and white numbers "16" were provided by MSAP. Solvaset was used on all decals to allow them to conform to the well defined surface detail.
Weathering
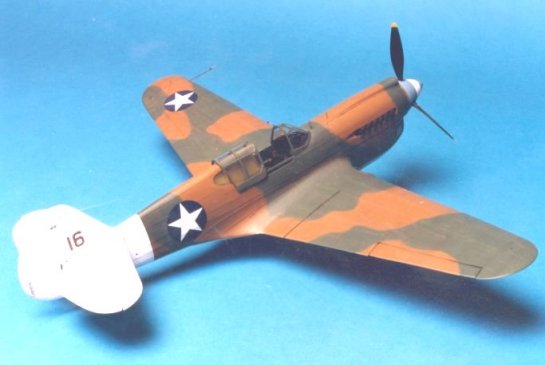
Once the decals had dried, a dark wash was applied to select areas to pop out the detail. This was followed by a mixture of Testors Pla Silver and Windsor and Newton Raw Umber oil paint to represent the chipping. It is applied to both wing roots, albeit a little heavier on the left side than the right, but is clearly on both sides. Small amounts were applied to the canopy framing, cowl panels and other panel lines.
The next step was the flat finish, and for this I used Floquil Flat. In hindsight, I wish I had used Testors Dullcoat as the Floquil finish produces a very slight sheen which does lacks sufficient tooth to hold chalk pastels. Subtle weathering was accomplished using chalk pastels. The bottom was the first area to be tackled. All major panel lines were treated to a gray pastel, just slightly darker than the undersurface blue. It is applied using a 000 sable brush, any excess is lightly blown away and then a larger red sable brush is used to blend the chalk pastel into the surface of the model. The nice thing about pastels is that if you make a mistake, they can be easily removed. A darker gray was applied aft of any major inspection panels and control surface hinge lines. Remember to always brush in the direction of the airflow over the aircraft.
Next were the white tail surfaces. I deliberately kept the contrast low by selecting a light gray pastel as my personal tastes run a little on the conservative side. I would prefer that someone has to search for the effect, as opposed to it jumping out at you. The wheels were dusted with a light brown pastel and then it was on to the upper surfaces. Black was used to highlight all panel lines that run in the same direction as the airflow and lighter shades of brown and green were applied to the trailing edge of panel lines which run perpendicular to the airflow and then drawn back with a wide sable brush. The pastels were applied over the span of 4 evenings in 2 hour sessions per night.
The final details involved the navigation lights which were painted with Humbrol gloss enamels, the antenna wires added from stretched sprue and Micro Scale Kristal Klear used to make the gun camera lens. This completed the P-40 of my dreams, at least until the next one comes along! I have found that most often it is the little details that make a model stand out on the competition table. Using the new photo-etched sets allows the modeler to add just the finer points such as ring sights, intake screens etc., or go all out and detail everything.
References
- P-40 in Action, No. 26, Squadron/Signal Publications. Carrollton, Texas
- 49th Fighter Group by Ernest R. McDowell, Squadron/Signal Publications. Carrollton, Texas
- War Paint, Fighter Nose Art From World War II and Korea, Motorbooks International
- Famous Airplanes of the World No. 39, Curtiss P-40 Warhawk Bunrin-Do Company, Japan
- Actual Kittyhawk in the National Aviation Museum, Ottawa, Ontario
© Randy Lutz
This article was published on Wednesday, July 20 2011; Last modified on Saturday, May 14 2016