
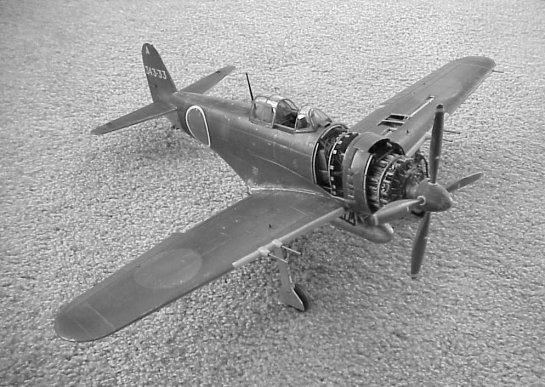
Kawanishi N1K2-Ja Shiden Model 21 (Violet Lightning improved) Spring 1945
By Mark Mallinson
Introduction
The model presented here is the 1970s vintage Bandai 1/24 scale N1K2-J ‘George’. A cursory in-box review of this large kit showed good recessed surface details and shape, but sparse and inaccurate interior details and an engine that needed a lot of help. Like the 1/24 Airfix kits, the wheel wells are little more than holes in the lower wing surfaces.
This kit sat for several years waiting for my scratch-building skills to increase to the point where it could be attempted. After doing some scratch-built improvement on Revell’s old 1/32 Oscar, I felt that it was time to try a real challenge. In this scale, it should be noted that this is a very large single engine fighter: it even makes my elegant 1/24 Airfix Bf 109 Emil look almost petite by comparison.
Brief History
Kawanishi’s N1K2-J was the last significant development of a line of aircraft that can trace their roots to the N1K1 floatplane fighter. A private venture by Kawanishi lead to the development of the N1K1-J land-based fighter. This aircraft featured a mid-wing arrangement with very long and structurally weak landing gear. Correcting these deficiencies lead to the N1K2-J in which the wing was lowered and landing gear strengthened, engine power and cooling improved and the general aircraft design was greatly simplified to eliminate weight and improve manufacturability.
The heart of the George was its Nakagima Homare 21 eighteen-cylinder radial engine. Compact in size for its 1990 Hp rating, this engine proved to be unreliable under operational conditions and turned out to be a ‘maintenance hog’. But when the engine and aircraft systems worked well, the Shiden Kai was a formidable adversary. Equipped with automatic combat flaps and four 20mm cannons, in the hands of a skilled pilot the Shiden Kai could hold its own in a dogfight against most US fighters.
Interior Details
The cockpit interior was the first area to be attacked, and it quickly became apparent that the kit supplied parts bore little resemblance to reality. After carefully studying photos of the Champlin Fighter Museum’s George, I decided to replace almost the entire interior with scratch-built parts. The few kit parts that were used like the seat, foot pedals, right side console and floor plate all required major modifications and used in conjunction with many scratch-built components. The rest of the kit parts were replaced with scratch-built details including the left console, instrument panel, Type 4 gunsight, copious sidewall components and rollover beams. The only after market parts used in this kit were the Waldron and Detail Master instrument bezels, Waldron instrument placards and seat belt hardware.

Scratch-built Foot Pedal Assembly
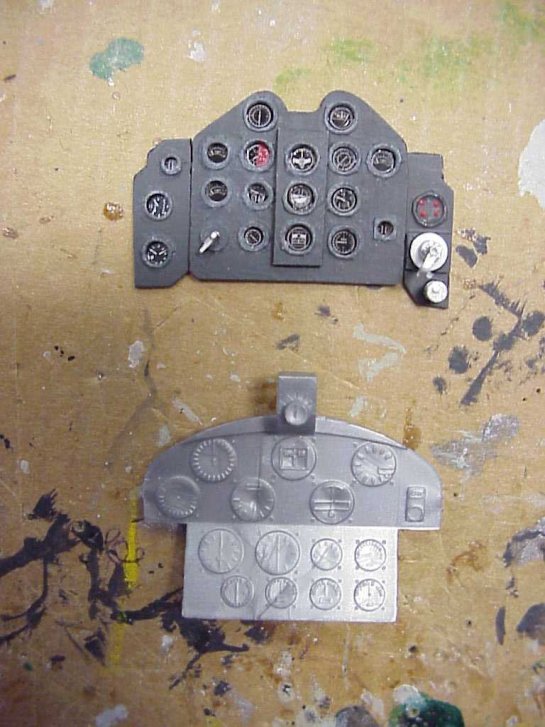
Scratch-built and kit supplied instrument panels
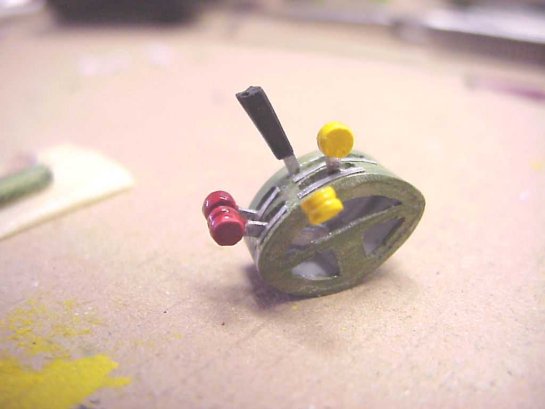
Scratch-built Throttle/Propeller Pitch Quadrant
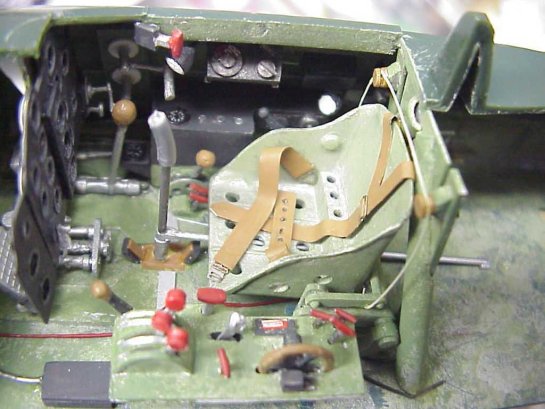
Right Side Interior
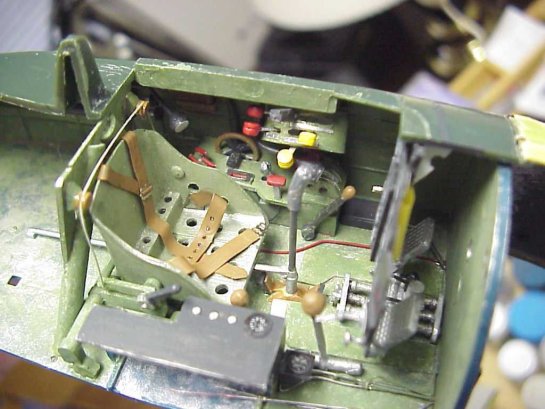
Left Side Interior
Supercharger and Fuel Tank Bays
The kit supplies interior parts between the cockpit and the engine including a firewall, intermediate wall, tubular engine bearer structure, the supercharger and two of three tanks. If built OOB, this area would be sealed and hidden when the fuselage halves are glued together. This forced me to perform plastic surgery with a razor saw and carefully cut these thick panels away from the rest of the fuselage. The remaining details including the missing hydraulic fluid tank and all of the actuators, tank support straps, plumbing and wiring which were all scratch-built using lead solder, copper wire, styrene card and aluminum foil. My general strategy while detailing this area was to start adding details near the aircraft centerline and progressively move outward. Once installed, parts were washed with POLLY Scale oily black from their model train line of acrylics.
Right Side View of Supercharger/Fuel Tank Bays
Left Side View of Supercharger/Fuel Tank Bays
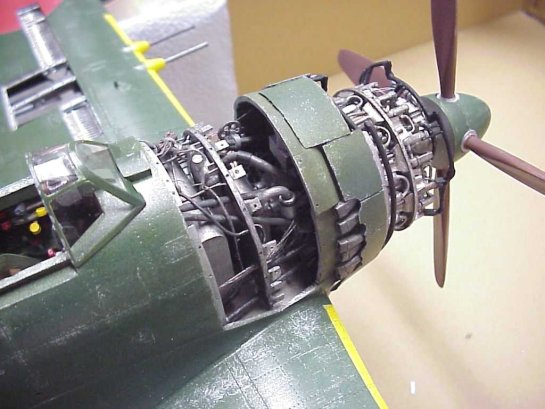
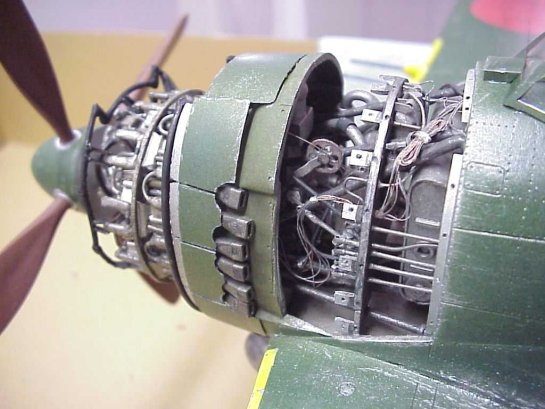
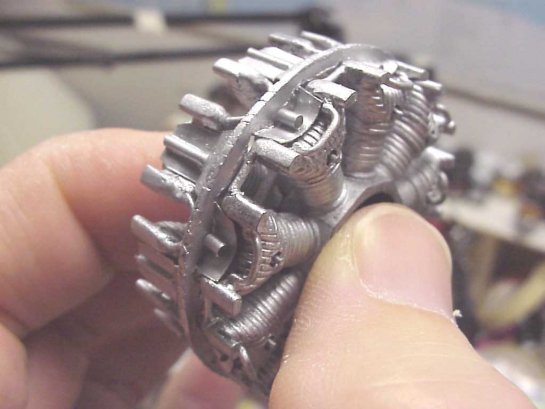
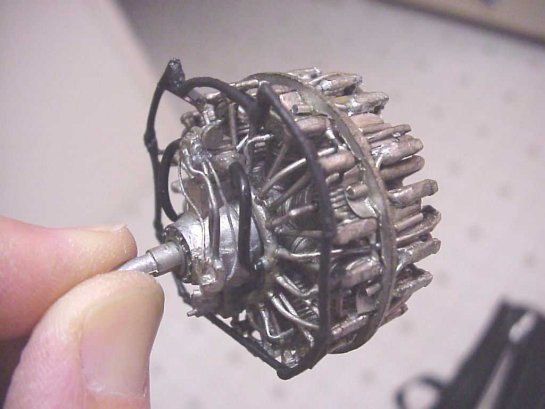
Engine Modifications
A real challenge in detailing Bandai’s Homare 21 was figuring out how to model and install the forward and aft engine baffles. These intricate stamped sheet metal baffles cover half of the forward cylinder heads and all of the rear cylinder heads. I managed to model the forward baffles using wine bottle and kitchen aluminum foils. After trying a few different methods to get the correct shape for the aft baffles, I settled on a more simple “artists impression” version using wine bottle foil. Both sets of baffles were then glued to a baffle ring that I made from a CAD produced pattern chain drilled into Evergreen sheet. All other missing brackets, oil lines, propeller pitch control mechanism and wiring were made from copper wire, solder and styrene.
 Engine Baffles Made from Wine Bottle Foil
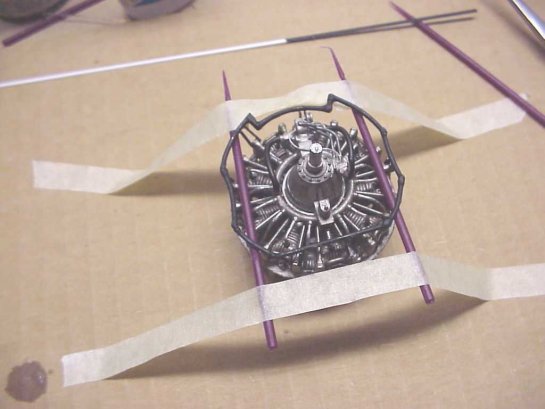
Another challenge to detailing the Homare 21 was modeling and installing the two Cowl Support Rings. Bending solder sections to shape and taping the sections down onto a flat surface, the joints were super-glued together. After painting flat black, the rings were centered around the engine and elevated using rods. With the Ring taped in place to the rods and rods to the table, mounting brackets were made from styrene strip and CA glued in place. Then the tape was carefully removed and spacer rods slid out from under the mounted rings.
Cowl Ring and Attachment Bracket Installation
Compared with the ~100 parts added to my Oscar’s Sakae engine, this big beast required close to 200 scratch-built and modified kit parts.
Finished and Washed Homare 21 with Forward Cowl Ring
Wings, Combat Flaps and Wheel Wells
Bandai’s wings are much like the Airfix 1/24 scale model’s wings with flaps molded “up” and wheel wells with little detail. For this kit, Bandai did include the main spare that provides wing dihedral and acts as a closeout for the aft of the wheel wells. The rest of the wheel well details must be added from styrene strips and frames cut from styrene card stock.
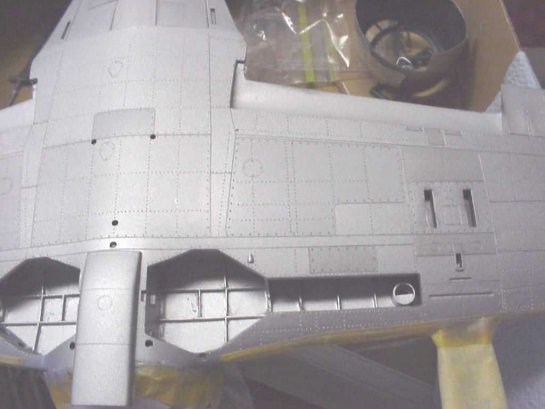
Wheel Wells with Structural Details
I decided early on that I would deploy the fowler-type combat flaps to their maximum 30 angle. Cutting the flaps from the wings, the missing leading/top edges were built up using laminated styrene card that was sanded to match the airfoil shape. The flap wells in the rear of the wings were closed out with thinned and shaped styrene sheet. Following photos in AeroDetail #26, I modeled the flap roller assemblies and bent tracks from extruded styrene T-section rod. Extra lengths of track were included for each roller assembly, then cut to proper length during installation. To aid installation and ensure the same deployment angle on both wings, I made a fixture out of cardboard that could be taped to both the flaps and the wings. This fixture held the flaps in place while I cut and glued the tracks and installed the solder deployment rods.
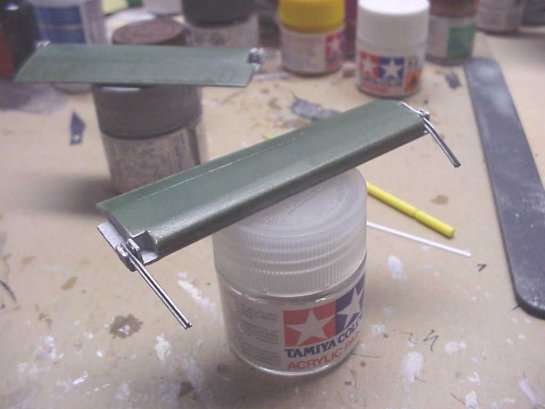
Combat Flower Flap and Deployment Rollers and Tracks

Installed Combat Flap, Tracks and Actuator Rods
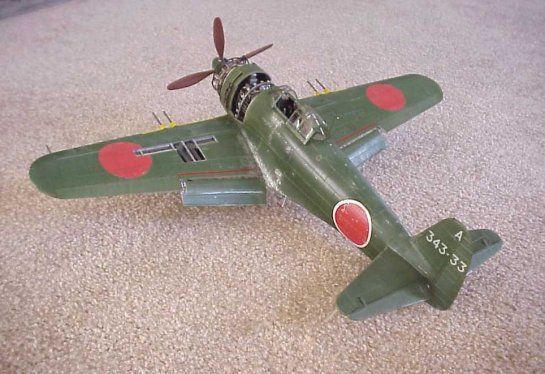
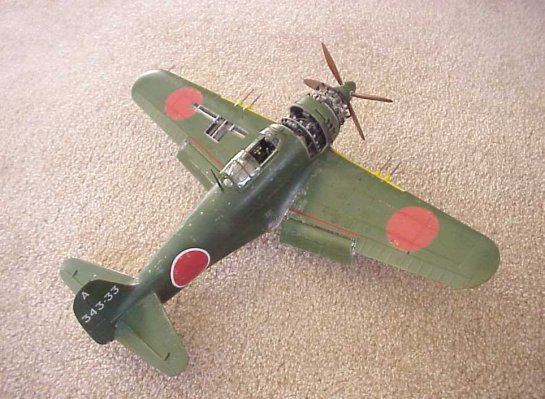
Painting
The weathered interior was primarily Tamiya acrylic flat aluminum and their IJN interior green (XF-71). Green was applied over primed aluminum with a short/rough brush in a “splotchy” and uneven application to simulate heavy wear as seen in photos of the un-restored USAFM George.
The exterior was similarly primed with Tamiya flat aluminum acrylic. On the underside, I picked out several panels and highlighted them with a mixture of lightened or darkened aluminum. This resulted in subtle contrasts between the different panels.
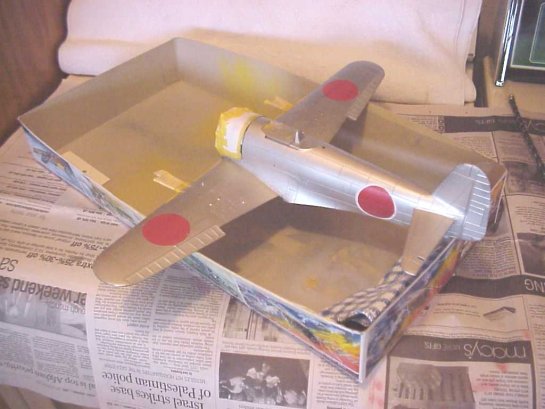
Due to moisture damage to the kit decals, I decided to paint the Hinomaru using a custom mixture of insignia red and red/brown. In order to mask-off the meatballs, I used some adhesive-backed frisket paper and a couple circle templates. To ensure consistent color for all Hinomaru, I first sprayed Tamiya white on top of the flat aluminum, then the custom red. While the meatballs on the wing’s upper and lower surfaces were relatively easy to do, the fuselage with its white ringed Hinomaru was a bit more difficult. This involved using a carefully centered frisket paper ring around the white primed area prior to applying my ‘rising sun’ red.
Painted Hinomaru on Flat Aluminum Primer
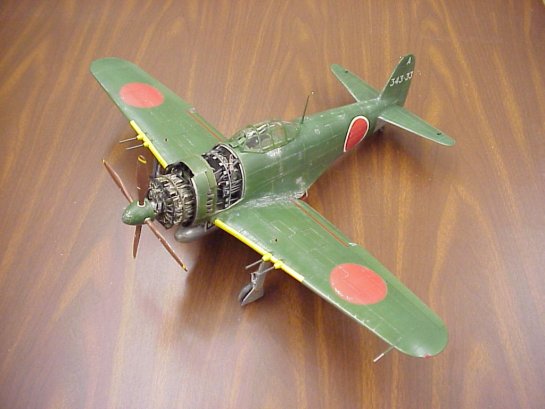
The main fuselage color was sprayed with Tamiya IJN deep green acrylic, thinned with rubbing alcohol. After a couple days, I sealed that under brush and sprayed layers of Future. This outer color was then given around one month to dry before any further work. Final weathering was based on period photos showing heavy chipping and fading of the IJN green. This was accomplished with a rounded Xacto blade, a Prismacolor silver artists pencil and a variety of sanding sticks and fine grit sandpaper used to wear-away the paint down to the aluminum primer.
Conclusion
This model has been by far the most involved project I've ever attempted and my wife is glad it’s over. There is much about this effort that I've left out and there are several simplifications, oversights and errors that I discovered too late to fix. With the recently announced re-release of this kit and Bandai’s 1/24 A6M5, the timing seems right to publish this article. While this kit could be assembled OOB to produce an attractive and impressively large George, my research and scratch building based on it have been a good learning experience.
References
- Aero Detail #26, “Kawanishi N1K2-J “George” Shiden Kai” ISBN #4-499-22711-9
- Guttman, Jon, “Mighty Wind, Violet Lightning”, Aviation History magazine, January 2002
- Mikesh, Robert, “Japanese Aircraft Interiors” Monogram Aviation Publications, ISBN #0-914144-61-8
- Lawson, Paul, “Violet Lighting” Scale Aviation Modeler International magazine, August 2001
- Dave Pluth’s Japanese Aircraft web site, Walkaround section http://www.j-aircraft.com/
- Lynn Ritger’s Detail Page web site http://detailsite.tripod.co
Mark Mallinson 2002
This article was published on Wednesday, July 20 2011; Last modified on Saturday, May 14 2016