
Sterling Models 1/32 B-17F
By Larry Hawkins
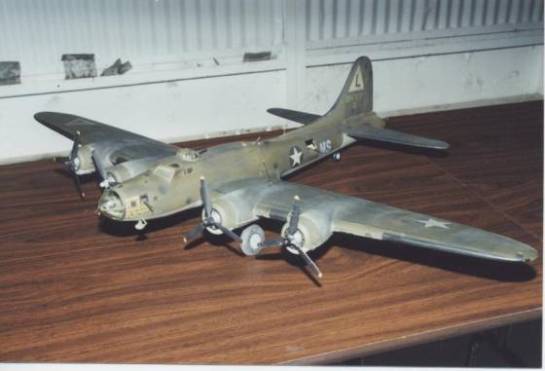
This is the Sterling Models balsa wood kit in 32nd scale. I have worked with balsa for over 45 years so I figured let's go one step further. At the time there was no 32nd scale B-17, and this was available and at $25.00 I couldn't pass it up.
First of all, I cut out all the formers and etc. and laid them out and then went to work on the fuselage first, which was a task in it self. This took a week to get everything set up and to start gluing. During this time while waiting for the glue to dry, I started on the wings and as they were to be set aside and they to were left to dry. During this time I took all my reference intel and started figuring out the lay out for the cockpit and the nose section and waist positions, and the radio compartment. One thing that really helped out was the 48th scale instruction sheet that I had several copies of.
One thing about this kit was that it was made to have the entire plane covered in silk span, or to the laymen a paper coating, and this was the same for the nose section, which I thought was not for me. After all the sections were dry, I went over everything and checked for excess glue which had to be sanded off, so to apply for the 1/16th thick sheet balsa that was put on after it was put into water for 30 minutes, the reason for this is to make the balsa soft and pliable. This was taking out of the water and let set for a while and then glued into place and this process was done to the wings also. During this assembly I used a lot of straight pins, and that's a lot of pain when one has to push them in and pull them out after the glue has dried.
After all this was done, I let everything dry for a couple of days and went over it to make sure everything was dry before proceeding to add the wings to the fuselage. The tail and the elevators are solid balsa sheet, and there cut out as to the plans that came with the kit. These were added before the tail was glued into place, and that to was left to dry. Then when this section was dry and gone over for excess glue and etc. Then the fun part begins, the cockpit area is cut out and shaped for the vac top piece which covers the flight deck and to the radio compartment.
Forgot one thing here that I should have put this in where I mentioned the instruction sheet. I copied the bulkheads from these then took them out and had them enlarged them to the proper size to be added to the flight deck and etc. Now, back to the construction phase.
Now, I cut out all window positions and the waist positions as well. It's starting to look like a 17,and I'm really looking forward to getting it painted, but that is along way off. After all the cutting and etc. was done, I started sanding and filling areas with autobody putty and spotty putty, because this gave it strength and didn't give when a little pressure was applied. Balsa is easy to put a hole in it and not hard to fix but this was not to be, got lucky. After I added the seats and instrument panel and console and etc. plus the radio compartment was detailed and the table and set was added for the radio operator, and then after this was all done, I glued the vac cover to the top of the fuselage and filled it around the edges with spot putty and let dry. Sanded the edges down to conform them to the fuselage to make it smooth and ready for paint.
After all the above was done, I started working on the nose and used the technique that the guys use for building ships in a bottle. Added navigator's table cloth cover for the rear bulkhead, bombardier's panel, toggle switch for the bomb release, Norden bomb sight, seat for the bombardier, and the .50 mg's for the nose and the two side windows, and finally the feed chutes for the .50's.That's a lot of stuff for the nose and I still had room for anything else, but that was enough.
All the vac parts that came with the kit were cut out and sanded done to shape and etc. I check the fit of the cowls so not to put them on the nacelles to far back and give the right fit for the engines that are William's Brother's kit engines of the 9-row wasp type. Got a little a head here. As is stated the nacelles are vac and had to be cut out and glued together and sanded to fit the cowls, so I hope this was not confusing. For the rest of the building, I got everything ready for the primer.
There was a lot of sanding and filling to be done be after all this was done and redone, then it was ready for the primer. This a/c was primered at least 10 times and let dry for one week then gone over again for the final 10 coats of primer, and that to was left to dry for two weeks so to let everything dry and check for shrinking and cracking. You're probably wondering why all the primer, well balsa wood has a tendency to soak up any type of moisture and any kind of paint will do this, including auto primer. And it makes for a great permanent casting of the wood, if you know what I mean. After the waiting period, again I went over everything and after this was done and I was satisfied with the primer and sanding, it was ready for the O.D. and neutral gray bottom. Then when this was done and dried then I added the handmade markings and some decals that were in my scrap box. Then when these were dry and etc. I added a couple of flat coats to seal the markings.
Then I stated adding the top turret, ball turret, the waist guns, tail guns, the collector's brass .50's that went in the waist, 3 in the nose, and the rest were from the Revell 48th scale kit of the B-25 kit. There was .50 in each kit and these were redone to fit into the top turret and the radio operator's post. All these have feed chutes from the Huey slick kits and they work great. Added a P-40E bead sight to the rear gunner's position also. The wheels and tires are R/C rubber tires and scratchbuilt wheels and scratched the gear legs out of tree sprue, and the same for the tail wheel strut. The wheel and tire is from the 48th scale C-47.
And now that everything is in place and looking good, I went over it again, but nothing needed to be corrected. I removed all masking tape over the clear parts and checked them for fogging or over spray. Satisfied with all I have seen, it's ready for one last thing, the antenna wires. And that's that.
I built this kit back in '88, since then it went into a nosedive and has torn the clear nose off, it was fixed and you see the results after the contest.
This model placed 3rd in the contest at the Combat Air Museum, Forbes Field, Topeka, KS.
© Larry Hawkins
This article was published on Wednesday, July 20 2011; Last modified on Saturday, May 14 2016