
Hasegawa 1/32 Fw 190D-9
By Kevin Weiche
Introduction
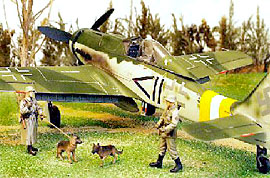
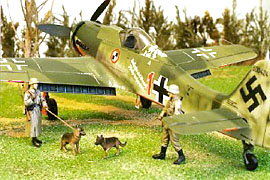
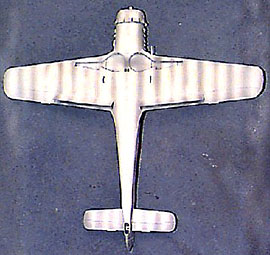
I got the idea for constructing two models simultaneously after reading an article by Brian Cauchi in which he describes building both a Revell and a Hasegawa 1/32 scale Me 262, an article I enjoyed, particularly because I was then constructing the Hasegawa version of this kit. In March of 1999 I bought a 1/32 scale Hasegawa Fw 190D-9 kit (Collector’s High Grade Series CH3X, 1986) from Hobby Link Japan and stowed it for future building. This kit has been out of production for a few years but recently has been reissued. In July I was picking around a basement hobby shop in Moscow, Idaho, when I noticed a Collector’s High Grade Series CH12 190D kit (1994), featuring decals and box art depicting an unusual “Papagei” staffel aircraft of JV44. Actually these aircraft were not called “papagei” (parrot in German) during the war, but Wurger (red-winged shrike). These Doras flew cover for the Me 262s flown by pilots such as Galland and other “experten” and were painted with red undersides and white stripes for easy identification by friendly flak. I couldn’t resist and bought it. Now I had two nearly identical kits. I decided that I would build both kits at the same time, using techniques learned from one kit with the other. One kit I would build to depict “red 1” of JV 44 and the second one I would build in the more typical coloration of an aircraft of 4JG2 as depicted in the Fw 190D Walk Around series book and incorrectly depicted in the instruction sheet supplied with the kit. This article will discuss the construction of these two kits, which I completed in November.
References
I relied on two references:
- Walk Around FW 190D, E. Brown Ryle and Malcolm Laing, Squadron/signal publications
- Doras of the Galland Circus, Jerry Crandall, Eagle Editions Ltd.
Both books proved invaluable and are excellent, but Crandall’s book is nearly flawless with interesting text, good photographs, and precise illustrations by Thomas Tullis. Assuming that these two books are accurate, the instructions supplied by Hasegawa are inaccurate. To my dismay references indicated that the numbers and unit emblem decals for “red 1” should be red rather than the black decals supplied. Additionally, the slogan decal which reads in German, “Sell my clothes, I’m going to heaven,” is misspelled. Otherwise, the general color scheme recommended in the instruction sheet is accurate. For the JG2 aircraft, Hasegawa’s instructions are seriously flawed as they show this aircraft in a color scheme of RLM 82 (bright green) and RLM 75 (gray violet) when the Walk Around book shows this aircraft in RLM 82 and 83 (dark green). Additionally, the instructions show the lower cowling and lower rudder yellow, a color not indicated in the Walk Around book. Since both aircraft would then be colored in similar 82/83 top and side schemes, this would simplify painting.
Initial Construction
At first glance, the gray polystyrene kits were nearly identical although the CH12 kit had a few more parts that were not used in the kit, such as a 300-liter drop tank used with 190As or 109s. Both kits come with white metal landing gear, props, and other parts. Stainless steel etched parts and small copper tubing for cannons and aerials as well as wire for brake lines are included. Vinyl tires and clear plastic sheeting for instrument panels are nice additions not included in “average” kits. Decals for two aircraft are included in each kit: in CH12, the aforementioned “red 1” as well as an aircraft of Stab/JG4; for CH3, the JG2 aircraft I built as well as the aircraft flown by Gerhard Barkhorn of JG6.
The wings of the aircraft feature raised panel lines as well as rivets that are too pronounced for the scale. The shell ejection ports on the wing undersides are also raised too much and needed sanding down. In addition, two odd protuberances just in front of the wheel wells are not indicated in my references and were sanded flush. The fuselage is nicely done with recessed panel lines. One of the first steps was to glue the wing halves together, sand down the raised lines and rivets, and scribe lines using Dymo tape as guides. I next attached the flaps in the down position after removing some pesky mold marks from them. The flaps are intended to be lowered in this kit and have nice detailed ribbing on their insides. I glued together a drop tank and the elevators.
I next worked on the cockpit tubs and decided that red 1 would be done with the canopy closed and JG2 would be finished with canopy open. I cut seatbelts out of a dollar bill using the measurement recommendations from my instruction sheet. This was the first time I’d done belts and figured the strong flax of a bill would work well, and they did. I used the etched buckles and set them aside. The instrument panels were nicely etched and came with clear plastic to attach behind them to create the illusion of dial glass. I found this instrument panel difficult to work with and not exactly the best fit. As placed according to instructions, the lower panels were not recessed far enough and crowded the joystick. I had to do a little modification to get them located were I wanted them. Red 1 received less attention because I was going to close the canopy anyway. I’m not really as much of a fan of interior detail as I am a stickler for exterior appearance, but I finished the cockpits as well as I could and was satisfied.
I mated the fuselage halves and attached the wings. I did this before attaching the landing gear, contrary to the instructions. This allowed me to attend to the gear more freely and set them aside while I worked on the aircraft. Later, when I attached the gear, I had to trim a bit off the attachment points of the gear to fit them into place, but this was not difficult and it was a good move, in retrospect. As far as the wing-fuselage joint, this was perhaps the most problematical. On actual aircraft, this joint is smooth and fairly seamless, a far cry from the gaping maw I stared into! I understand that the wings of this kit were originally from an earlier 190A kit, explaining why the wings had raised detail while the fuselage had the more modern recessed panel lines. The poor mating of the wings and fuselage could be explained by the fact that these two components were not designed for each other. I had a gap in each kit of 1-2.5 mm and decided that putty was not enough on its own, especially since this joint would be bearing weight and would flex, probably cracking the putty compound eventually. I decided to cut some polystyrene card and fit a length into the gaps, glue it, sand it even with the adjacent skin, and then fill in any remaining gaps with putty. This technique worked extremely well though called for quite a bit of sanding.
As with every kit I build, I bungled several times during construction. The most serious, and one I initially decided against including in this article, I might as well confess and be done with – I forgot to attach the cockpit assemblies until AFTER I’d joined the fuselage halves! I could not believe I completely forgot to do this. My only excuse is that I was building these kits together and had a lot on my mind – this sub-assembly and that one – and simply overlooked it. I may have at one time decided to attach this through the wing root from underneath, but now that the wings were attached, this wasn’t an option, so I pondered a solution and decided to trim away and force the assembly through the tight cockpit opening in the fuselage. After all the fussing and foul language, I was able to fit them both, though this became the greatest difficulty of them all. Enough on this--what catharsis! Modeling is the process by which we devise solutions to problems as they arise. In this scale, a lot of modeling is required!
Miscellaneous Final Notes on Construction
A few things to look out for in this kit include remembering to attach the white metal exhausts before joining the fuselage halves, unless of course one wants to experience a similar frustration to the one I enjoyed with my cockpit assemblies. The photo etched fuselage reinforcement strips that are to be glued to the fuselage just below the cockpit and above the wing roots for whatever reason would not stay put. The super glue bond proved fickle and the slightest brush against one of these parts would result in their becoming unattached. These stainless steel parts are more difficult to work with than the more-pliable brass of, say, Eduard brand. The greatest care must be taken not to inadvertently snag an edge on one of these thin parts as a bend would be difficult to re-bend and have lie flat against the fuselage.
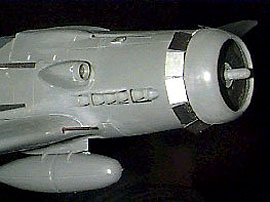
The nose cowling proved to be another part that needed modification for a proper fit. The front of the fuselage over which the cowling fits needed to be trimmed back to ensure the cowling had the proper spacing from the fuselage. I fitted a thin strip of plastic in a gap just aft of the cowling top. Metal cowling flaps are a nice touch to this area.
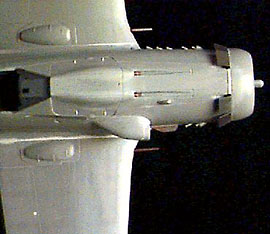
I cut two shell ejection ports into the belly of the aircraft as depicted in my references. These were where the spent casings from the cowling guns were discarded. Additionally, I used a little disk of styrene to fabricate a gun camera cowling along the leading edge of the port wing.
These kits require the use of super glue and 5-minute epoxy in greater quantity than with most kits. I would recommend epoxy for attaching the gear to their covers because there is little surface contact and this is a fragile connection. Also, epoxying the metal gear to the well attachment points is a good idea. Of course the etched parts all require super glue.
A patience-trying procedure was constructing the gunsights. A small white metal part makes up the central unit upon which is attached two clear parts, one of the parts additionally housed in a bent etched part. This level of detail is impressive, but equally impossible for those without a steady hand or a deep well of patience. More than once I lost one of these small parts and had to recreate it from the clear sheet remnant leftover from the instrument panel. Not having a shop like more fortunate modelers, I did most of this work in my La-Z-Boy recliner and had to get up and tilt my chair over dozens of times to wait for a dropped part to work its way through the cushions and onto the floor, where I could capture it and try again to attach it!
I had the wings, cowlings, and fuselages assembled. As sub-assemblies set aside, I had the spinners with props, landing gear, and canopies, as well as the various antennae.
Painting
This is the stage that is most intimidating, but also the part I enjoy the most. No matter how well constructed the model is, painting will “make or break” it. I’d studied my reference materials long enough to know exactly what I wanted – now it was time to act. I began by masking off the cockpit areas that I had already painted. I primed both models with a general-purpose gray primer that cost about $1.29 a can. I’ve got asthma so take great precautions when painting and priming, particularly with primers and lacquer clear coats as these materials are particularly hard on the respiratory system. Once primed, I began painting the undersides of each aircraft, and it is here where the greatest divergence between these kits began.
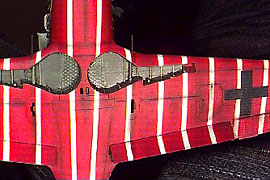
The JG2 aircraft would be RLM 76, the elusive shade of which all modelers of Luftwaffe aircraft are familiar. Red 1, on the other hand, was painted with white stripes and then when dried, these were masked with Tamiya tape cut to the proper width and then the entire underside was painted red. When the masking tape was removed, my eyes met a very bizarre color combination! I used a little pastel chalk on some panel lines and for the gun exhaust stains and painted the national insignia onto Red one. I painted the wheel wells RLM gray and then drybrushed them with a little Humbrol enamel light gray-green. I did the same to the insides of the dropped flaps. Next I sealed the undersides with Testors gloss clear coat and applied the national insignia decals to JG2, using Microsol. I then used black watercolor paint mixed with water and a drop of detergent to wash the panel lines and recesses. This wash never really went on as well as I would have liked, going on too light, but I avoid using oil-based paints whenever possible (my allergies) and persist with this watercolor. I increased the amount of pigment and was able to get a bit of wash visible. I used moistened Q-tips to remove any excess wash. After everything looked good, I sprayed a final coat of Testors dullcote on the bottom to permanently fix it all. With red 1 I pastel brushed the panel lines a bit more-heavily to show up through the red coloration. Though a bit heavy, it gives an “illusion” of reality that suited my taste.
I might mention that I did a little experimenting along the way. I wanted to create a fuel-streaked drop tank so came up with the idea of putting a minute drop of water-colored wash onto the filling cap of the tank and then using a can of pressurized air to blow the wash down over the tank in realistic streaks. I did this and the effect was convincing.
Red 1 also had badly peeled paint on the canopy housing. I painted this silver-gray and then dabbed a bit of white glue to it. When dry, I painted this in the appropriate green and then picked off the glue with the point of my knife, revealing the bare metal beneath. Highly realistic effect, although a liquid mask would probably work a bit better since white glue adheres more.
Next was the side mottling and painting of fuselages. With red 1, I applied RLM 82 with my Badger 175 airbrush using the medium tip, small diaphragm compressor, and Tamiya acrylic paints mixed 50-50 with Tamiya thinner. I mixed a few paints together to come up with what looked to me to be the proper shades of RLM 82 and 83. I believe that for proper scale effect, slightly lighter shades are necessary. This paint goes on very dry and the needle tends to clog after prolonged use, so I had to swipe the tip of the needle occasionally to ensure proper flow.
Red 1 requires a lot of mottling and non-descript patterns on the fuselage. No clear delineation between the green and light blue-gray exists. Once I had it completed I wasn’t satisfied. It just didn’t look like the aircraft depicted in Crandall’s book, so I reapplied RLM 76 to the fuselage for another try. I cogitated upon and stared at the photograph for a few days and tried again with much better results. RLM 83 was also applied in similar fashion. I had the look I wanted. For JG2, a line of demarcation between the 76 and greens required me to use some heavy paper to cut the right pattern. I rolled up small pieces of Tamiya 10mm tape to place behind my mask to hold it about 3mm above the surface of the plastic so I would have the slightly soft edge I desired. This I did but I needed to touch up a bit of overspray here and there and fuss with it until I got the look I wanted. The darker 83 was similarly applied. Mottling consisted of only five or six per side and then the rudder for JG2.
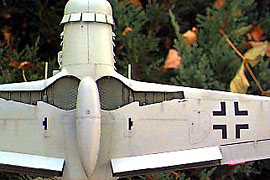
Using the masking technique described above, I did both aircraft’s’ wings, first applying the lighter 82, then masking off for the 83. I followed my references to duplicate the patterns for each. Red 1 proved a bit more difficult because the nose of the aircraft consists of 83 over 76 with a red underside as well as a sharp delineation of 83 along the seam of the gun covers. In the actual aircraft, this indicated that the entire engine assembly was attached to the fuselage from the factory in what is known as a “power egg” component.
I next airbrushed exhaust stains on both aircraft. JG2 called for particularly extensive staining. I used black with a touch of brown added and was pleased with the outcome. I next epoxied the landing gear in place, trimming off their attachment points a bit to twist them into the wells. Holding them at just the right angle until the 5-minute epoxy set required patience. Care must be taken not to rend the delicate covers from the gear struts. Some pastels were put down along some panel lines and I sealed the upper surfaces and fuselage with a gloss coat. I then washed some lines, used a silver pencil to weather a few areas, and applied decals. For Red 1, decals were ordered from Exact Decals. I did all correspondence with the owner, Charlie, through his website (exactdecals.com) and e-mail. He was backed up with orders but after a few weeks, he sent me a proof sheet of the decals he created from scanned reference images I sent him. The proofs were excellent reproductions of high quality of which I approved. Charlie then sent me the decals. Considering the time he spent on my project, the cost was negligible.
I might as well digress a bit on decals here. The decals supplied with both of these kits were problematical and substandard. Red 1’s decals were fissured and several were not accurate. The numerals and round unit emblem were black instead of the red shown by my references. The white decals were badly yellowed and I never intended to use the white stripe decals for the underside, opting instead to paint on the white belly stripes. The slogan for the side of the aircraft, badly yellowed, had the last word, “heaven,” misspelled. JG2’s decals were also yellowed, though not as badly, and I used them. These seemed thick compared to the Tauro decals I used before and seemed extremely brittle. Application of the yellow tail band was nightmarish and it pulled apart in several places. More skilled modelers might do better than I. I had to even off some imperfect matching of broken edges with my airbrush and yellow paint. I just hate band decals like this and am determined to paint on such bands in the future. Some minor inaccuracies, such as black tail stencils rather than red ones for Red 1 were ignored and I used the packaged decals.
I set aside red 1 until I get the decals, and concentrated on JG2 by spraying a final dull coat removing the tape over the cockpit opening and then attaching the prop/spinner, canopy, and miscellaneous aerials. The finished product was impressive. It was exactingly modeled on the drawing and looked convincing. Red 1, once its decals arrive, will undoubtedly look just as good. The last thing I did was string some invisible thread for the canopy to rudder antenna. For JG2’s open canopy, revealing the instrument panel and seat belts, the antenna was strung slack. With Red 1’s closed canopy, I will stretch the thread taut.
Epilogue
Hundreds of hours later, the journey was over. Building two kits in different schemes is a trying and not for everyone -- I will not do it again! While it does allow the builder to use skills and techniques learned on the first kit with the second I found myself often confused between them and sometimes would do work intended on red 1 with JG2 or visa versa. Literally thousands of decisions have to be made during modeling and having two kits complicates matters. These two kits represent only the second and third 1/32 kits I have built, a deceptively low number when one considers the amount of time required to build them to an acceptable level. The investment in time is worthwhile as the finished kit is impressive and depicts the beautiful lines of the latest piston-engine fighter produced in quantity to be sent into the suicidal skies of a crumbling Reich.
Final Notes

To photograph construction, I used an antiquated and not totally satisfactory Kodak DC-50 digital camera. For the diorama photographs, I used my trusty, and some might say, “antiquated”, manual Nikon FM and meterless (broken!) F-2 with 35 and 50 mm lenses.
The following is a list of a few inaccuracies with these kits that modelers may find helpful when they construct their own Hasegawa Fw 190Ds:
- two extraneous protuberances just aft of the cowling on underside
- no shell ejection openings for cowling guns on belly
- raised wing panel lines, rivets, and wing cannon ejection openings too large and raised (wings only)
- wing gun cowling bulges rounded (not the right shape)
- spinner appears somewhat undersized
- landing gear appear 2-3mm too tall, perhaps as a result of the gear not being compressed as they would normally be on an actual weighted aircraft
- the ventral profile of the nose appears too sloped; it should be more linear
- the JG2 aircraft should have the older flat canopy; only blown canopies are included in these kits
- etched instrument panel fit is troublesome
- JG2 instructions indicate possibly inaccurate color scheme
- wheel wells are closed; actual aircraft have wells open in front, just behind the engine
- decals are thick, brittle and badly yellowed
- instructions omit attachment of the pilot’s ladder which is included in the kit
- minute gunsight parts require uncommon dexterity and vision
I wouldn't usally do this but I really know this kit well, so I might mention that there are some more inaccuracies:
- The central part of the lower wing has the the wheel well openings too big, and so they are not as far apart as they should have been
- The bulges for the wing root cannons are awfully wrong.
But the good news is that both inaccuracies I mentioned here will be soon corrected by an cottage industry correction set (specific to Red 1):
- numerals and emblem black; should be red
- slogan misspelled. The last word on the decal says “himmeil” when it should read “himmel!”
- no loop antenna should be fitted to this aircraft
- no drop tank has been photographed attached to this aircraft
- a section of the area behind the headrest should be painted a lighter gray; instructions do not indicate this
Current Project
I am currently building a Revell 1/32 scale Messerschmitt 110G-4 nightfighter flown by Martin Drewes. This kit, like virtually all in this scale, has its share of minor inaccuracies and needs work but does appear to be generally accurate in shape. A good review of this kit has already been done by, if I recall correctly, a Mr Charles Metz. I will be using some brass photo-etched parts and scratchbuilding a few things for this huge kit. Changes in my painting procedures will be my discontinued use of Testors gloss and flat lacquer sprays and using their acrylic clears airbrushed instead. The spray lacquer is foul smelling, darkens colors, and from reports I’ve read, yellows over time. Otherwise I will be following the same general approach as I did with the Doras. I will write up another article if interest and time are sufficient. Enough typing already – it’s time to model!
© Kevin Weiche
This article was published on Wednesday, July 20 2011; Last modified on Friday, June 02 2017