
Rutman Resin 1/32 Scale P-47D "Look No Hands"
By Jay Wheaton
Introduction
The new 1/32 P-47 Thunderbolts from Hasegawa and Trumpeter are really great as far as I can see. I present here a Rutman resin P-47 model that I constructed a year or so before the introduction of those kits (although as you will see I have since updated it with some Hasegawa parts). Let's see if this can compete. At the time I built this model, the modeler had two choices of P-47 in 1/32 scale - the Revell-Germany plastic kits (razorback and bubble top) and the Rutman resin kits (razorback and bubble top, plus the P-47N). Since I had learned a bit about resin with a Rutman P-51B, I chose the latter, but got myself a Revell kit anyway just in case it had some better options (in the end I used only the decals). This resin model is truly the most difficult effort of all my modeling experiences, with the Rutman P-51B a close second. We all applaud Jerry for providing us his resin products, for sure. But they are "diamonds in the rough" and require materials, skills, time, patience, and determination far in excess of that required for plastic models, especially the excellent new ones available today.
I will describe in more detail as we go over the model, but there is a common theme - sub-par part fit and sub-par part quality. Rutman supplies some great details that can give a great look but resin quality is often spotty, with bubbles and/or thick flash to deal with. Every part is a trimming/filing/Dremelling/puttying project; there is no such thing as a perfect fit. The modeler has to create the best fit he can. Accordingly, you will see imperfections - please recognize that this replica was as much a sculpture effort as an assembly effort. Still more time and patience may have improved my result, but as it was I spent more than 400 hours on this airplane. With that said, to me this model pretty nicely depicts the husky, all-business, war machine look of the P-47 Thunderbolt, and that is what I wanted. The Revell kit could not do that.
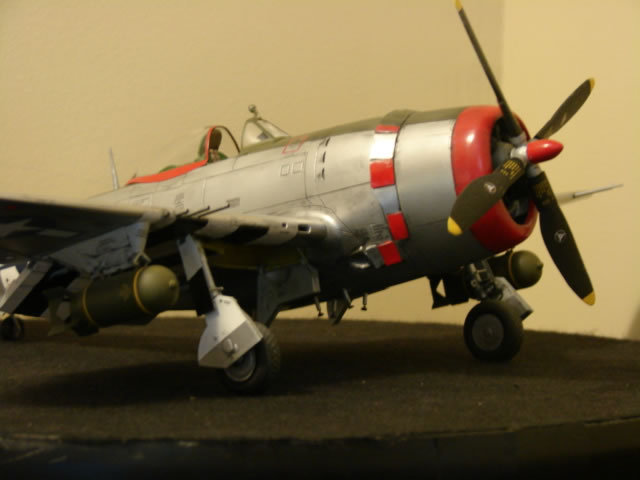
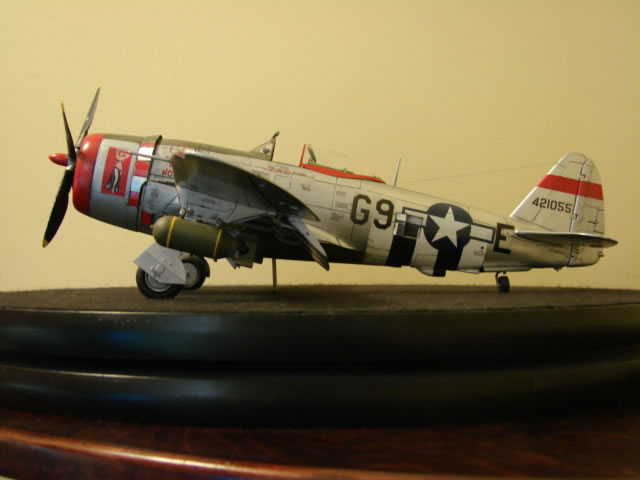
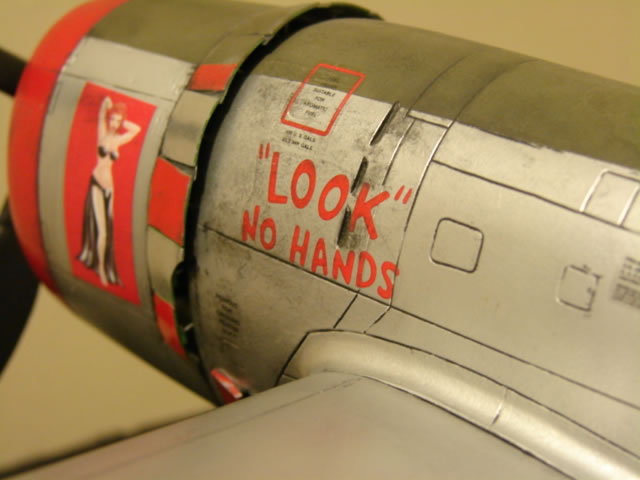
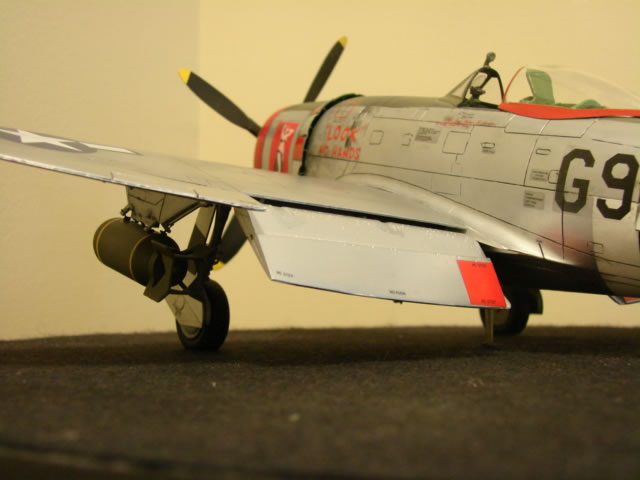
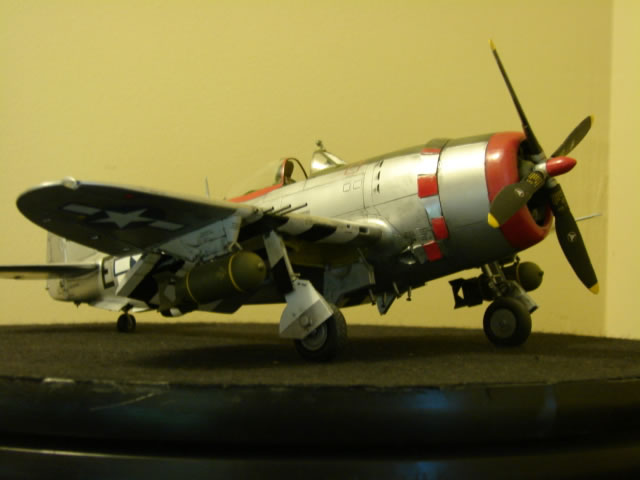
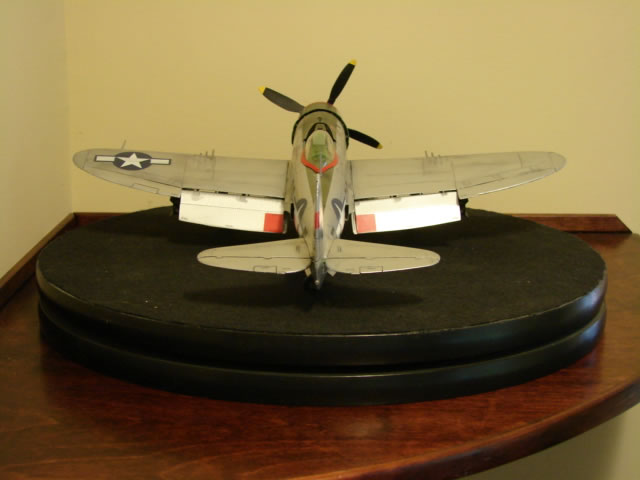
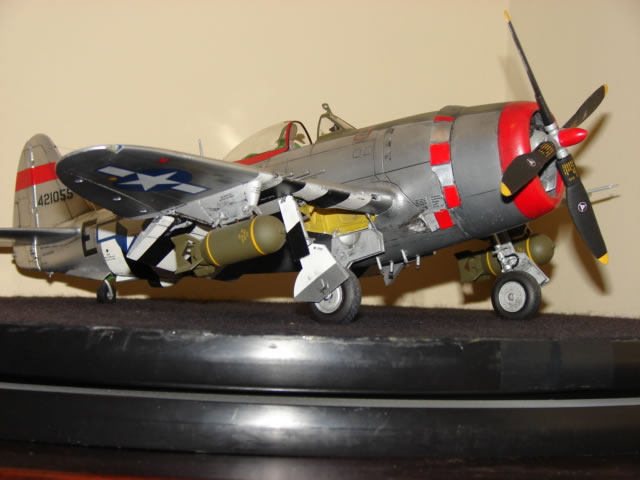
I have represented a 9th AF, 405th FG, 509th FS P-47D "Look No Hands" flown by a Major Chester Van Etten although that is not what the decal reads (Captain Melowyn Johnston??). Anyway, as was often the case there were apparently more than one "Look No Hands" aircraft, one a later D-model version with a fin strake. This one would be an earlier aircraft, and I added one half coverage invasion stripes even though I have never seen a picture of it that way, because I just love D-day stripes on P-47's, and I would like to think it had them at one time. Decals come from the Revell kit - at the time perhaps the only decal set available for a 1/32 scale bubble top Thunderbolt. Not now. Since the Thunderbolt (especially 9th AF) is particularly well known for its ground pounder role, I fitted it with bombs.
Let's tour the model:
The Engine and Prop
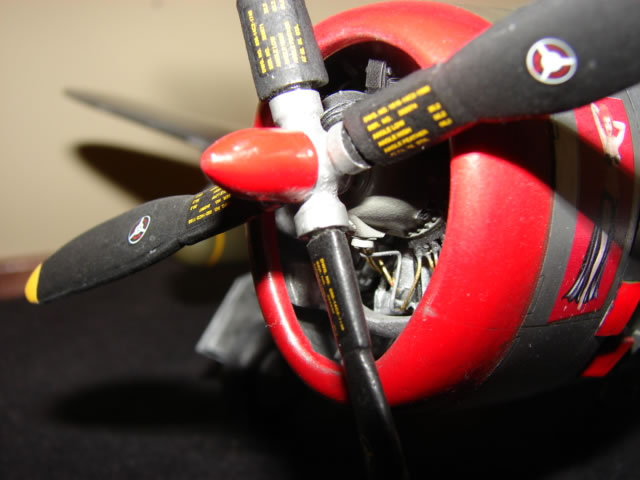
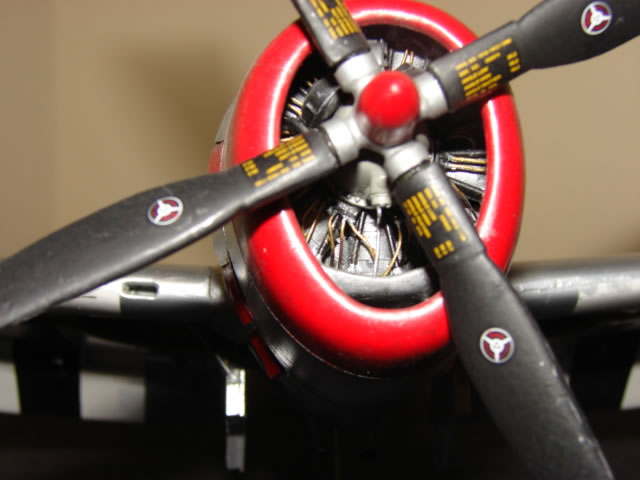
Rutman supplies the Teknics P&W R-2800 resin kit. It is a fabulous engine kit that has far superior resin quality compared to that of the Rutman kit itself. It's a shame the radial is hidden as much as it is in the cowling - much great detail will never be seen. Each cylinder (18 total) is a separate unit to be trimmed and fitted to the block. Valve guide sleeves (36 total), same story. OMG - so many parts…enough said. One has to do one's own wiring on most radial engine models and this is no exception - I used copper wire and painted the wires gold. By the way, the big Pratt doesn't fit in the cowling. I had to sand the inside of the cowling until I could practically see through it, and then grind off a bit of the valve covers on each cylinder of the forward bank. Also, there is no means of mounting the engine - I just added copious amounts of epoxy and slid it into the cowling. No exhaust stacks for this model - they would have been scratch built and beyond my abilities, and they would be all but invisible anyway.
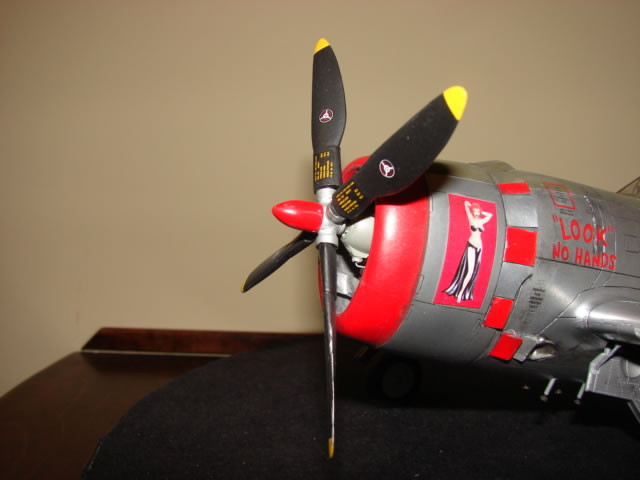
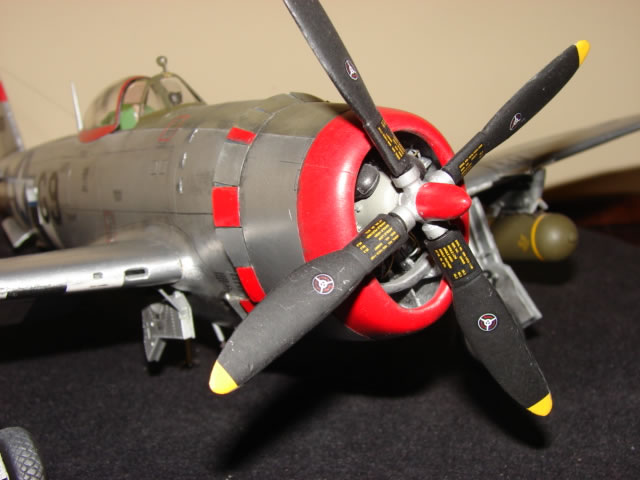
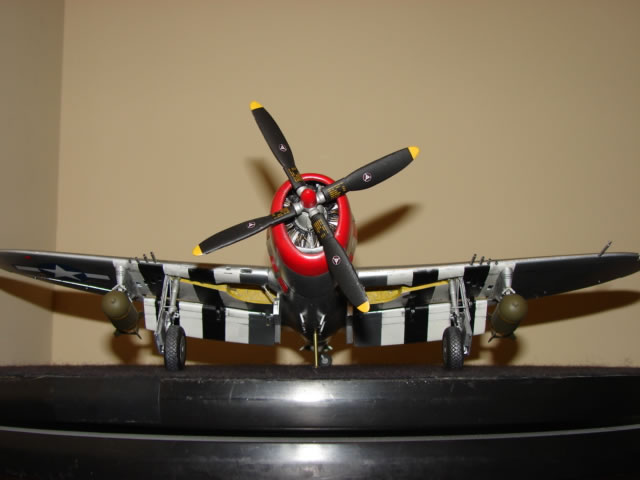
The propeller is the GE Hydromatic type with paddle blades. Rutman offers several P-47 propeller types and I chose what I think is the authentic one. The propeller was a tough job. Flash and bubbles were a factor, and since the blades are separate, one has to be careful with alignment. I drilled four holes in the base as accurately as I could, and then filed the individual blades roots to fit in the holes. Lots of work on a very important component, but I am happy enough with it.
Cowl Flaps
Rutman provides a thin strip of plastic sheet stock in which to cut the cowl flaps. After scaling pictures, I thought it wasn't right sized so I just made my own (also out of sheet plastic). I have seen some modeling efforts where coke can aluminum is used - another good idea. I rolled the individual pieces over a magic marker to give them some curvature. Attaching to the cowl - again no easy task, as there is nothing in which to mount them. So I created a circular shaped frame from stock plastic rod and bonded it to the aft edge of the cowl on the IML (scratch building was a common theme through out this modeling effort). Problem solved. I put in some semblance of the linkage for the cowl flaps - I have seen a couple of more impressive efforts on LSP, but I am just not that good.
Cockpit and Canopy
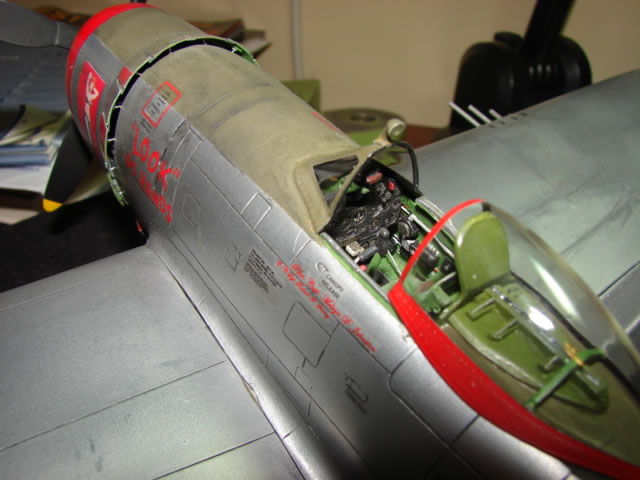
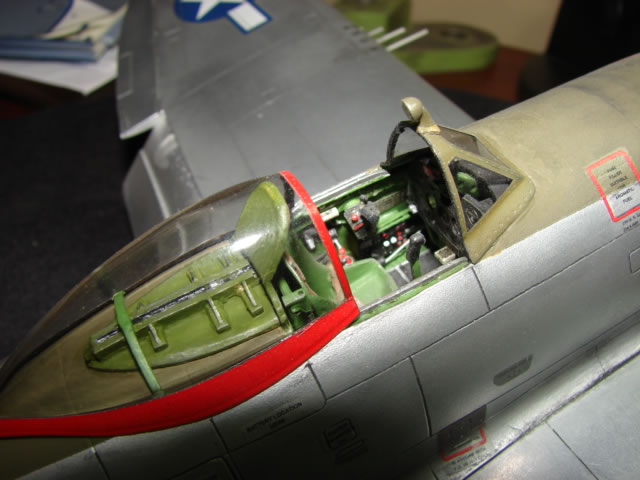
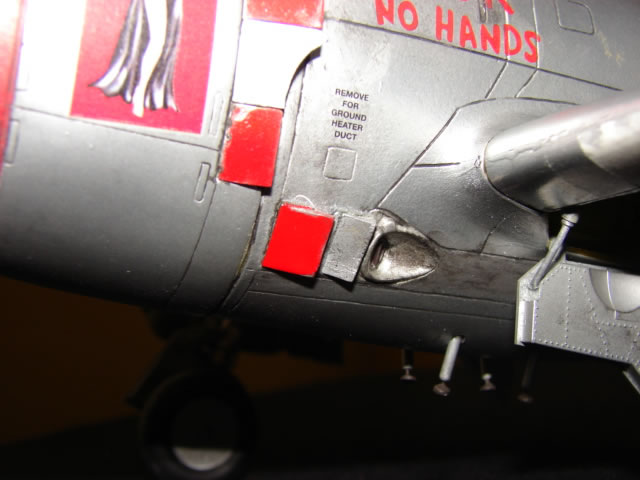
Rutman's cockpit is extraordinary. There are lots and lots of parts and most of them required a good bit of surgery. But the final product is very convincing. I augmented with a Waldron P-47 set, and also omitted the instrument panel hood because I see lots of war pictures where it is missing. That required me to create little "cans" to mount on the forward side of the instrument panel, since they can be seen. The cockpit took as much time as the engine which was a lot. As with the engine, it's a bit disconcerting how much stuff cannot be seen. Weathering is provided almost exclusively by my grubby hands.
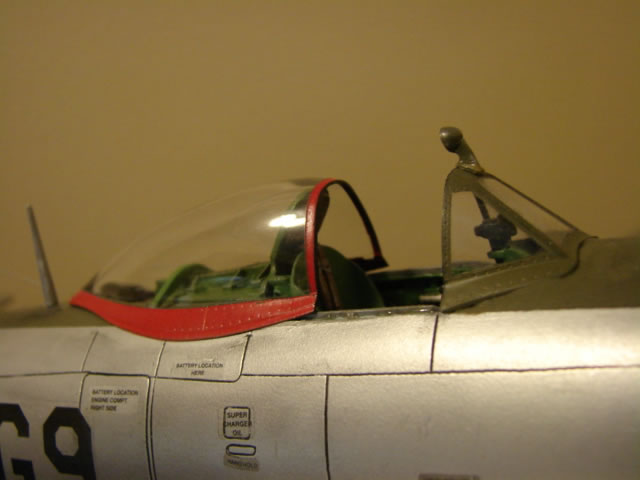
This is a Hasegawa canopy you see. The Rutman canopy, if memory serves, is a vacuform and it is shaped like the Revell parts. This shape is incorrect in many ways, and I discarded it immediately. I originally installed the Revell parts because it was an easier task, but when the Hasegawa kit came out, I bought one and modified my model to accept the much more accurate Hasegawa canopy parts. This was not easy, as I had to carve slots into the fuselage for the windshield portion to fit into. But the improvement was worth the effort. Also you can see that I added a scratch built external rear view mirror which the real aircraft apparently had.
Tail Landing Gear and Opening
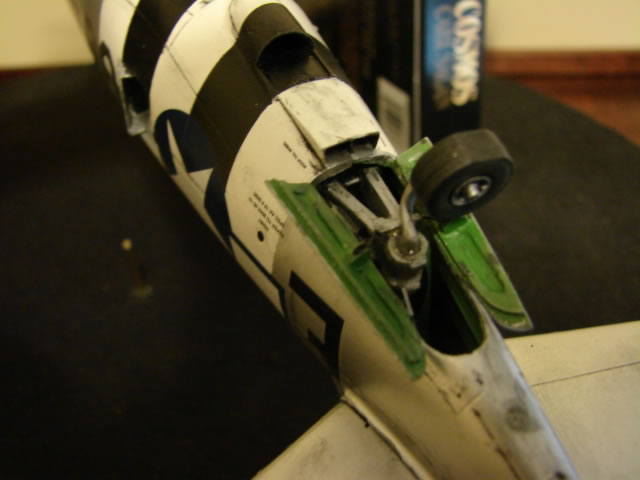
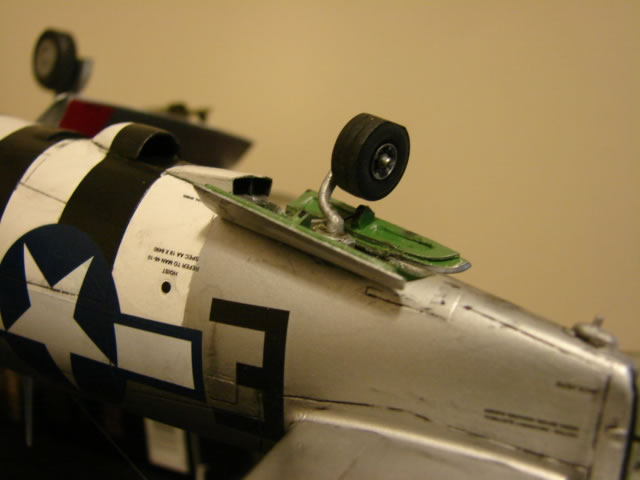
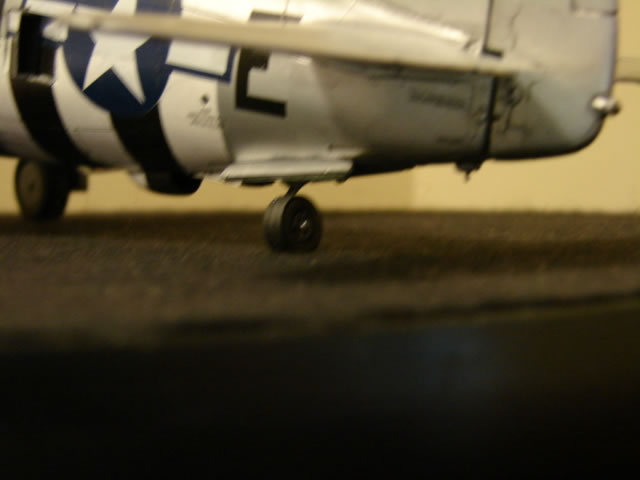
If you want more than a canvas-covered tail wheel bay on the Rutman Thunderbolt, then you have to create another means for attaching the tail gear. I took that as an excuse to shoot the moon (I was inspired by another P-47 effort I saw on LSP). I created from scratch a tail wheel bulkhead, local fuselage stringers, and two other fuselage frames for the tail wheel bay. Then I created the tail wheel A-frame, linear shock strut, and other components, all from scratch. I used a great picture in the reference book "P-47 Thunderbolt - Detail and Scale". This was quite a science project, and you can't even see it unless you turn the thing upside down and peer in. Oh well, I know it's there, and it supports the tail wheel strut very well indeed. The Rutman tail wheel itself was widened by cutting it in half and inserting some plastic sheet stock. Why are tires and wheels nearly always too thin on airplane models? I used the Rutman white metal tail wheel strut, which is far too weak to support the model for very long. More on that later. I turned the wheel sideways to a random position, and ground a flat on the tire, to add realism.
Fuselage General
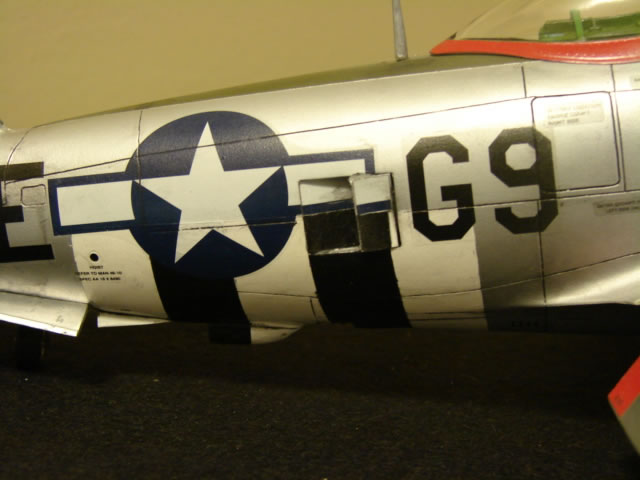
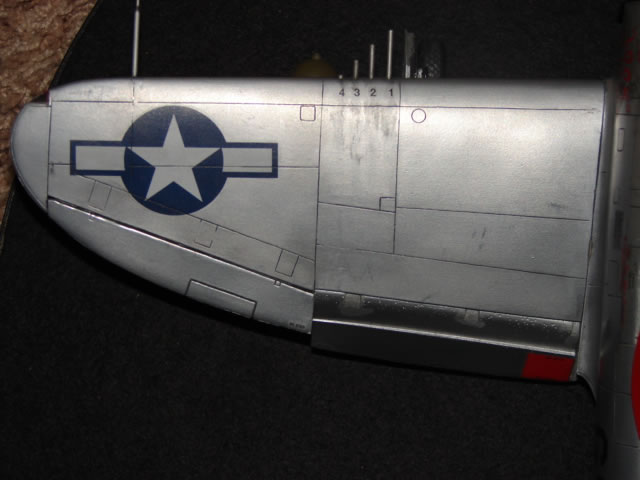
The Rutman fuselage is just beautiful IMO. Nice panel lines and the shape is spot on as described in LSP reviews of this kit. But the two halves require an immense amount of sanding, grinding, putty, etc in order to fit together decently. Master level modeling skills are required for complete success. As you can see it has natural metal finish, but it's a little dull. I am not sure why - I gave it a good sanding and buffing and applied a coat of white primer. But the NMF just didn't take quite like it does on bare plastic. However I justify - how many unpainted combat aircraft in WWII had mirror finish polished aluminum?
Tail Feathers
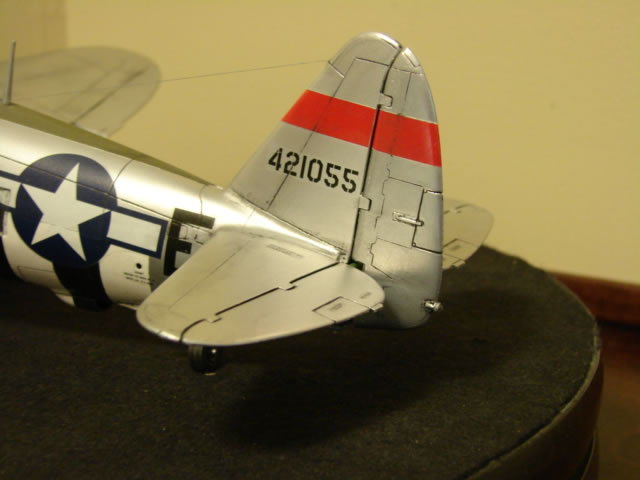
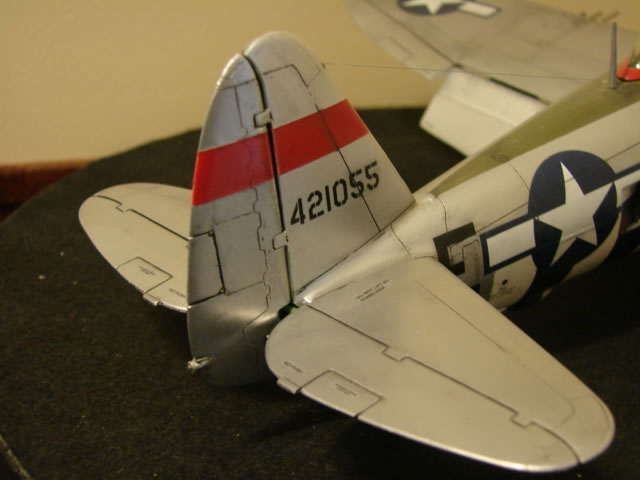
I wish Rutman had separated the elevators from the H/stab. I briefly considered cutting them but didn't. Also, the panel lines are pretty faint on the elevators and scribing those complex wiggly shapes was beyond my skill level. The only thing I did special on the H/stab was to connect the two elevators with a torque shaft for that authentic look. The rudder came separate as it should be, and it looks great - one of the only parts in the kit that was close to problem-free. And no panel line faintness there. Fitting it to the fin was a real task however - the aft (open) end of the fin was entirely too small to fit the rudder into because of excessive resin thickness. I had to grind away much material, and then provide a scratch-built spar to stabilize the two halves of the fin. I should mention that the rough edges of the fuselage halves presented serious problems at the fin leading edge and tip. Great care must be taken not to over-sand or over-grind, as the fin will become too thin. But one cannot avoid a less-than-perfect fin leading edge. I did my best to give it a more aerodynamic section but there was only so much I could do.
Main Landing Gear, Doors and Bays
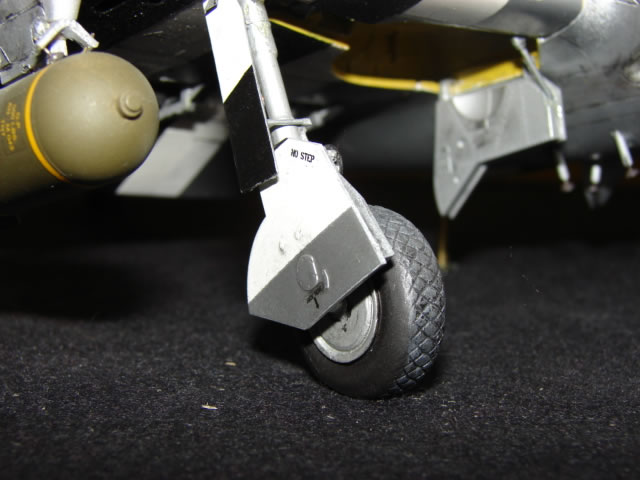
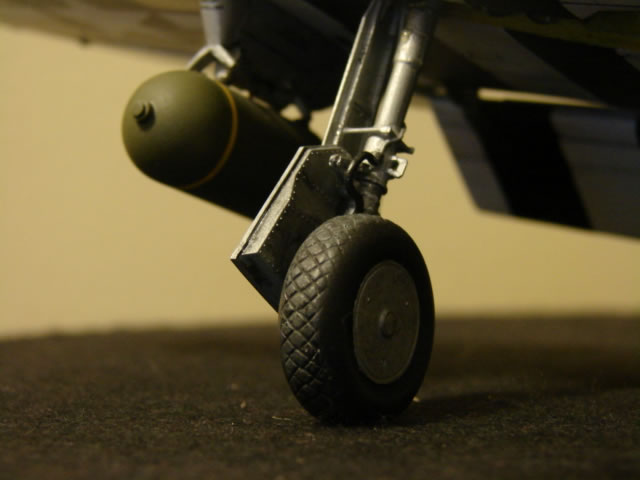
The main landing gear struts are Rutman white metal units with resin scissor links. The scissor links looked like they had a bad case of rheumatoid arthritis, and required tons of microscopic surgery with file and Xacto knife. I added brake hydraulic lines and also a wire that represents the retraction rod which in real life partially retracts the oleo as the gear swings upward in order to get the overly long gear into the wing. I want readers to notice that the landing gear rake angle is correct - this is a pet peeve of mine. Many otherwise fine P-47 modeling efforts are spoiled by main landing gear that are too upright.
It is time to mention that the Rutman white metal gear struts cannot support the model for long. The metal begins to sag (the tail gear within hours, and the main gear over weeks). This is a terrible thing to happen to components that the modeler has put his heart and soul into. So you will see a post under my model which supports almost all its considerable weight. I wonder if all pot metal parts do that - I have seen recently a great looking aftermarket main gear set also of metal.
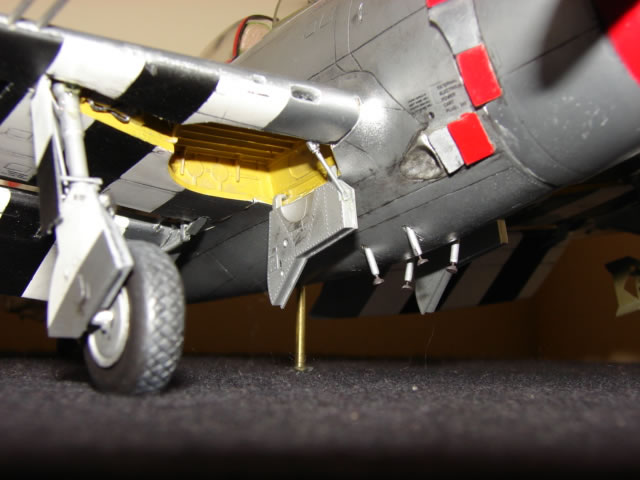
Moving on, the gear doors both wing side and fuselage side are from Hasegawa. Both the Rutman parts and the Revell parts leave much to be desired, especially the fact that they are inaccurately thin which tends to detract from the look of robustness you must have for a Thunderbolt. It was easy to adapt these Hasegawa parts. By the way, please note the scratch built gear door links, and body door actuators. The wheels themselves are Rutman resin with the wheel covers instead of spokes. No problems here.
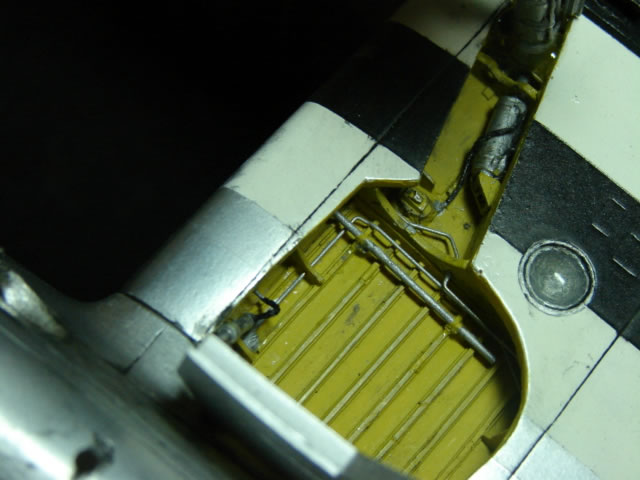
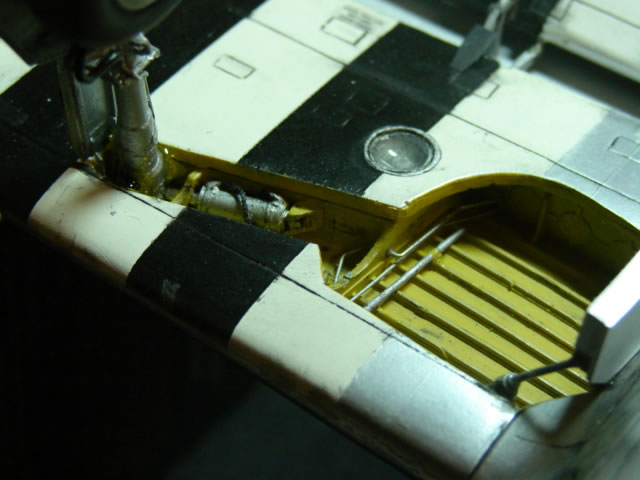
The LG bays were fairly straight forward - I added plumbing per pictures in the books. Fortunately the P-47 landing gear bays are relatively devoid of hydraulic lines and wiring. Did the LG bay parts fit into the wing? Not a chance. It was a bit of a nightmare. The effort left me with a table full of resin shavings and dust, and a scarred psyche.
Flap linkage
Rutman provides these big flaps, and if you want them down there is no good way to attach them. I faintly remember some photo-etch stuff…but maybe that was from an aftermarket kit. Anyway, I took this as a worthy project. I went to the local air museum which has an excellent real live Jug on static display, and wore out my welcome by sneaking underneath and inspecting, measuring, and sketching the flap support linkages. That plus some good photos from the web, and "Detail and Scale" gave me enough to go on. What you see here are scratch built links made from plastic sheet stock. Clevis-ended links are simply 3 pieces glued together with the middle piece shortened. I had to saw significant slots into the flap leading edges to accept the links - but this is realistic. I worried that the attachment would be spindly and fragile, but it is actually very stout. As you can see, there are three linkage supports per flap, and what is harder to see is there are two drive input points. Unlike some of the other exhausting sub-projects I committed to on this model, this one is more easily seen.
Wing

First the obligatory rant on fit - nothing fit. The wing halves look really cool, but risk being ruined by trimming/filing/Dremelling the flash off them. I did not appreciate the ailerons being integral with the wing, so I sawed them off. Of course, that required scratch building a rear spar segment to maintain the proper thickness of the wing just forward of the ailerons. The ailerons were a major project in that the trailing edges were blunt and ragged. The aileron leading edges were a sculpting project as well. Wing LE edge details - gun holes, gun camera opening, and air inlet opening were all disasters which required a total re-do with putty and sculpting. The wing tips were too thick and required copious amounts of sanding and scraping. My guess is that better quality is had with the Hasegawa and Trumpeter kits for a small fraction of the effort. Resin is evidently a labor of love.
The flaps received their share of rework as well. But there is a crucial modification I should have done but did not. And that is to fill in the negative step on the upper surface. This doesn't exist on the real thing and clearly is there for those who want to show the flaps stowed. Maybe one day I will break off the flaps and re-do them, but that will ruin the support links. So I will have to muster up the courage. For the reader considering this kit - fix that problem BEFORE you install the flaps.
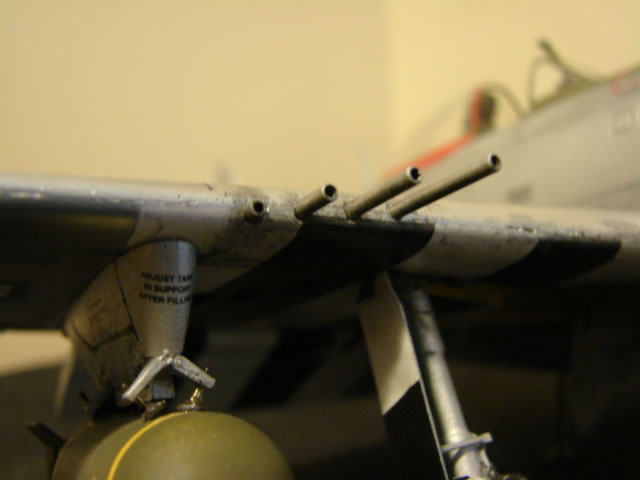
I used aluminum tubing for the guns, filled with plastic rod and drilled to scaled 50 caliber - very cool and very realistic. The only hard part was drilling the holes in the wing LE with "reverse-dihedral" such that the guns are parallel with the ground. I wonder why Republic saw fit to do that; maybe easier to bore sight…… Tip lights are from Hasegawa (they were just painted resin until I bought the Hasegawa kit). And the landing light on the bottom of the left wing is from clear plastic sheet. Still to modify one day are the colored ID lights under the right wing which are merely decals right now.
One more thing to say about the wings - the attachment to the fuselage was as hairy a step as any on the whole kit and a good opportunity to ruin the project. Rutman's fuselage molds are designed for the P-47N which had a wing root extension and was quite different locally, and has to be ground on pretty good to accept the D-model wing. Again, thousands of resin filings and lots of dust - kudos to me for somehow getting those wings attached with correct dihedral.
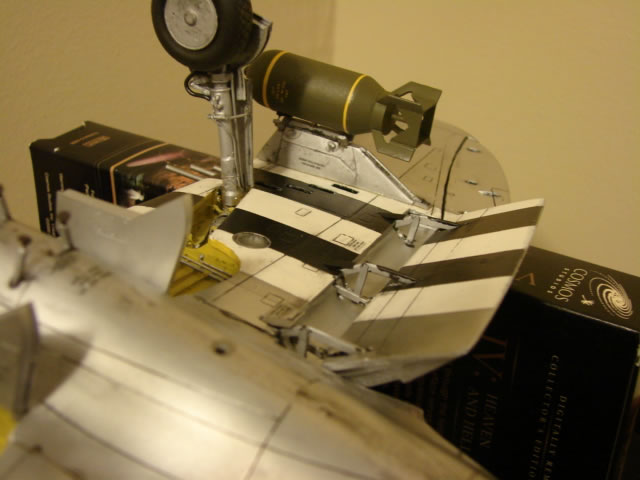
External Pylons and Bombs
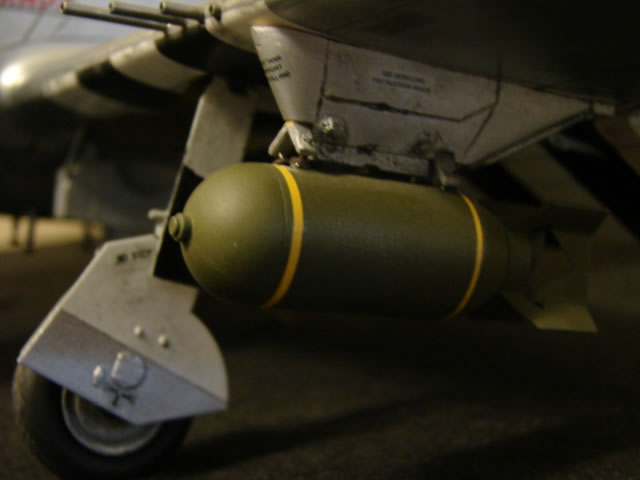
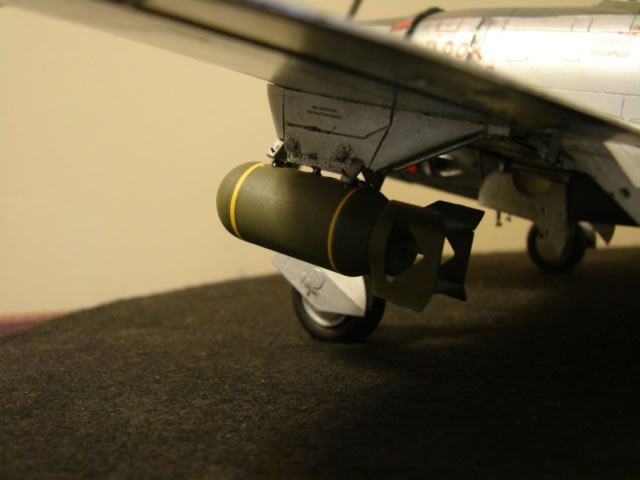
The bomb pylons were a separate order from Rutman; not all P-47's had them. True to form the resin parts were diamonds in the rough - very rough. I really struggled with these important parts, trying to get them to fit well with the lower wing surface. So there they are. The new plastic parts must be a breeze in comparison. I got the big 1000 lb bombs from a Trumpeter P-38 kit. I simulated the studs on the sway braces with steel wire and little rounds of plastic sheet cut with a Waldron punch dye.
Closing
Finish is Testor's metalizer aluminum. I gave it a wash of black water color to fill in lines, and dry brushed some black paint for grease and exhaust stains. The Revell decals were just fine to my surprise - nice and thin and they responded nicely to the Microsol.
Here are some closing shots:
So now that we have these great Hasegawa and Trumpeter offerings, would I recommend the Rutman resin kit? I would have to say that if you appreciate resin for what it is, are a sucker for punishment, have plenty of time and patience, and want a true challenge, try the Rutman kit. It appears accurate in shape and to my eye it pulls off that bulky Thunderbolt look, and has this sort of artistic appeal that perhaps only I see. Also it comes with the superb Teknics engine. But truly, too much has to be done for adequate fit and I believe nobody can reproduce the fit quality of the new kits. So I can hardly recommend it with such great alternatives out there. If money is no object (my gosh I spent a lot on this), get the Rutman and just use the parts you may like better than those in your baseline Hasegawa or Trumpeter kit. The combination will be awesome.
Here is what I used to build "Look No Hands":
- Rutman 1/32 P-47D full-up kit
- Waldron 1/32 P-47 cockpit update kit
- Revell 1/32 P-47D kit (miscellaneous parts later replaced by Hasegawa parts, and the decals)
- Hasegawa 1/32 P-47D kit (miscellaneous parts)
- "P-47 Thunderbolt In Action" from Squadron/Signal Publications
- "P-47 Thunderbolt in Detail & Scale, Vol. 54" from Squadron/Signal Publications
- Trumpeter P-38L kit (just the bombs)
- Republic P-47D from the Seattle Museum of Flight (my thanks to the management for grudgingly allowing me to get close to it)
© James Wheaton 2008
This article was published on Wednesday, July 20 2011; Last modified on Saturday, May 14 2016