
Dragon 1/32 Scale P-51D Mustang
By Jay Wheaton
Intro

So most everybody knows that the long awaited replacement for the Hasegawa 1/32 Mustang turned out to be from Dragon. And almost universally, Mustang model builders are disappointed in Dragon. In the words of one reviewer they could have "printed money", by getting things right. I agree - there are lots of problems with this kit. But in my estimation it is much better than the old Hasegawa, and if you combine them it's better still. And most importantly, Dragon got the scale and shape more correct on the basic parts (fuselage, tail, wing anyway). All other Mustang model manufacturers, regardless of model scale (except Tamiya 1/48 maybe), fail here. How maddening that this is the case, with the modeling world's most represented WWII fighter.
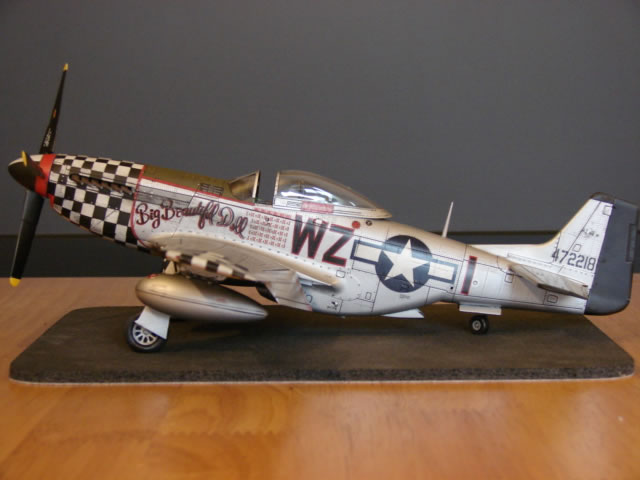
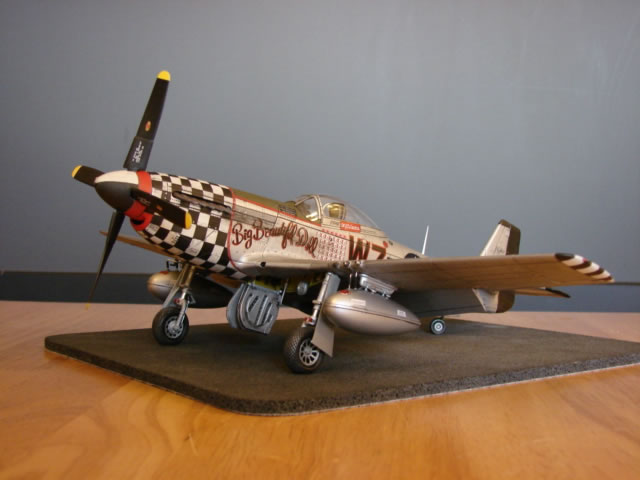
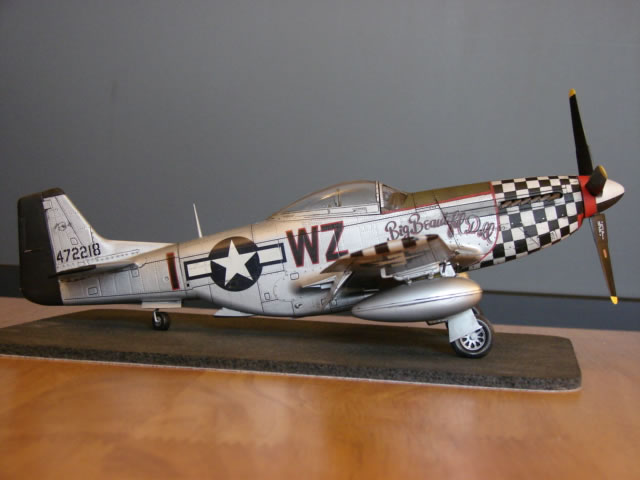
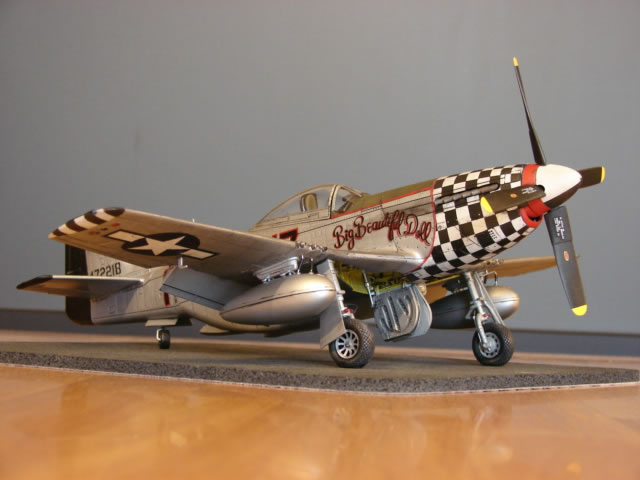
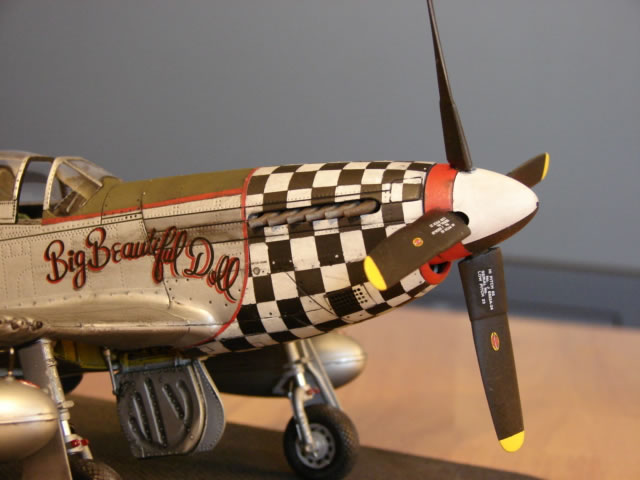
As you can see, I dressed this one up as "Big Beautiful Doll", the personal mount of Colonel (at the time) John Landers of the 78th FG, a group more famous for their P-47s, but still they came up with perhaps the most interesting paint job of the war. Vintage is about February 1945. Yeah I know, there are a lot of models of "Dolls" out there on the web, but none that I have seen so far that are Dragon. There are a couple of war photos of this aircraft (a good one in "P-51 Mustang In Action"), and tons of color photos of modern flying versions of it. I saw that the modern versions have inaccuracies, and I tried to make this one like the war photos instead. Even that was a guessing game, as the paint job appears to have evolved some over the months that it was flown. Anyway, much thanks to Hasegawa - their latest release includes the "Big Beautiful Doll" decals.
Here are the big problems with the Dragon kit as I see it, and what if anything I did about it:
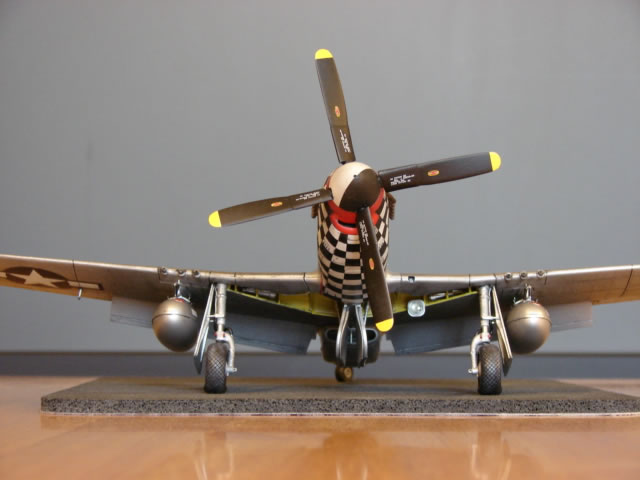
- Mis-shaped propeller blades (an understatement!). Fixed, as much as I could with filing and trimming
- Landing gear (a train wreck!!) - Fixed with scratch building
- Out of scale and inaccurate cockpit - Fixed with Verlinden
- Deep rivet patterns - Ignored (I'm just not that talented)
- Wind shield doesn't fit - Fixed with careful filing
- Tail wheel cutout and doors too short - Fixed with Hasegawa parts
- Wing front spar is not straight (follows the wheel well cutout) - Dremmeled it away and made a new one from scratch
OK - let's tour the model:
The Cockit
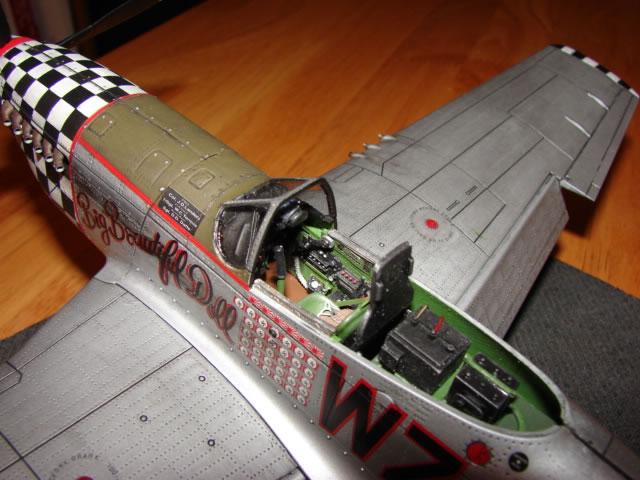
The Dragon Cockpit is almost usable, but I had an old Verlinden kit around so I used it instead. I found it fits into the Dragon fuselage more easily than the Hawegawa that it was designed for! There were no real problems here, and it turned out pretty good. I should mention though that the Dragon cockpit floor is too narrow. But adding .040 x .040 stock plastic does the trick. I used the earlier set of D-model radios from a Grand Phoenix kit rather than the Verlinden late war ones. I don't know for sure which ones the Doll had - I have never seen the Verlinden late war set-up in a war photo.

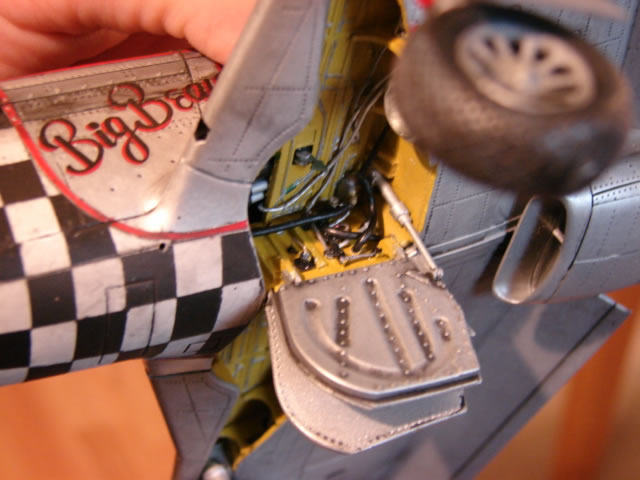
The Landing Gear Bay
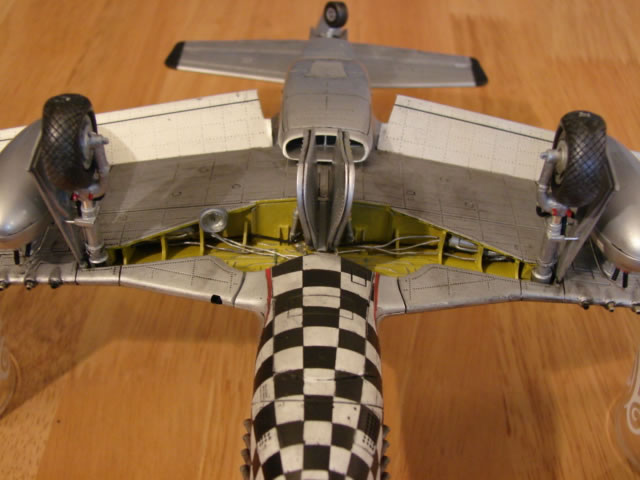
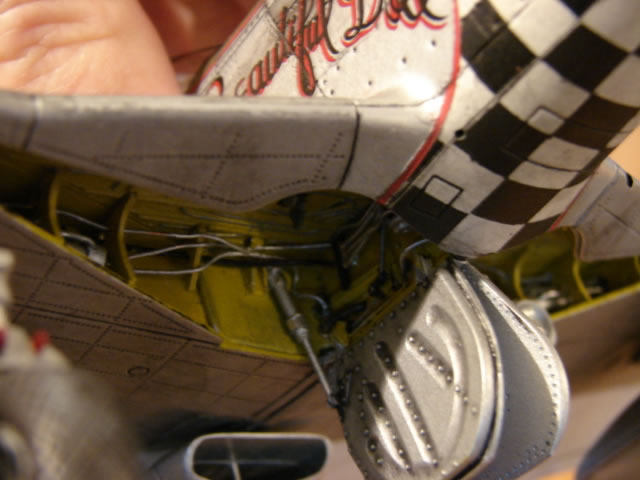
I really don't know for sure why all mass production manufacturers of P-51 kits insist on making the front spar follow the contours of the wheel well cutout (only Jerry Rutman has it right). It's wrong and to me it's maddening. So I went to work and did the major surgery. That was a big deal, and took more time than any other part of the model, but worth it. Now I have a nice shelf for the LG actuators, and was able to put in ribs and formers that look more real. Also I could now route hydraulic tubes and cables properly along the spar.
If I were super motivated I would have removed the fakey stringers and replaced with good stock, but I stopped short of that. I did, however, discard the center line bulkhead and scratch built another one. This was easier than I expected, and I then was able to add scratch built tubes and hoses and mechanisms that are supposed to adorn this structural component.
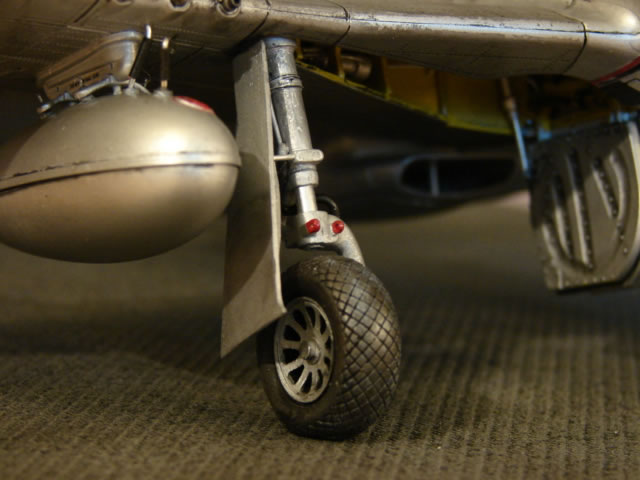
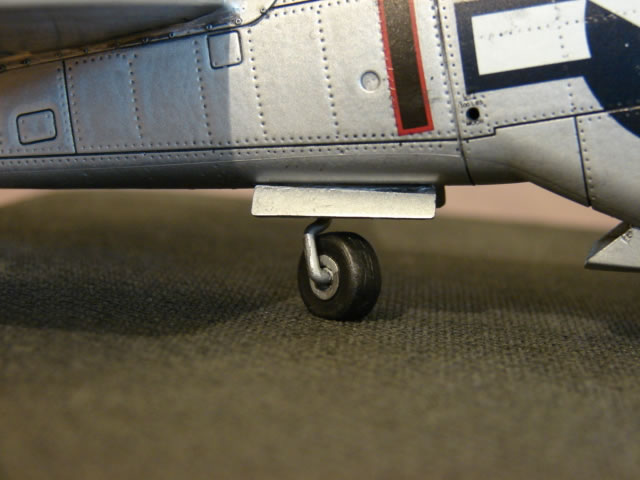
The Landing Gear
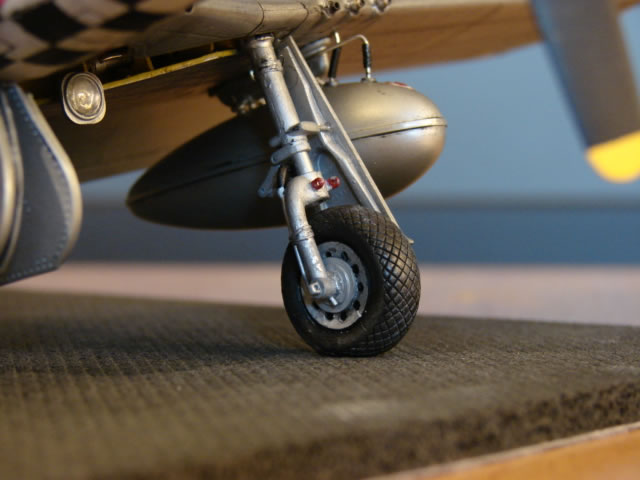
The Dragon landing gear are horrible and nightmarish. Sorry to whine, but it is true. It looks like Dragon tried to imitate Trumpeter with the spring-loaded oleos. And they pulled another Trumpeter stunt with the rubber tires and hokey wheels. AND - the means of attachment to the wing is so spindly that I doubt the gear could support the model. I salvaged the gear upper tubes and the lower wheel-mount portions and torque links and that was about it. The oleos were made from aluminum tube stock. I fashioned a cantilevered gear support shaft that simulates the real thing, and that provided a robust attachment to the wing spar. But this is very tricky - you have to get the angle just right ahead of time with the wing off the fuselage, and there is no real chance to adjust it later. Lots of layout work with pencil, paper, measuring, etc. I see a lot of otherwise great Mustang models with incorrect landing gear rake angle. Not so here. Also I added the True Detail wheel set - a must for 1/32 scale Mustangs IMHO. The gear doors are from Hasegawa - the Dragon versions were almost unusable.
The Wing
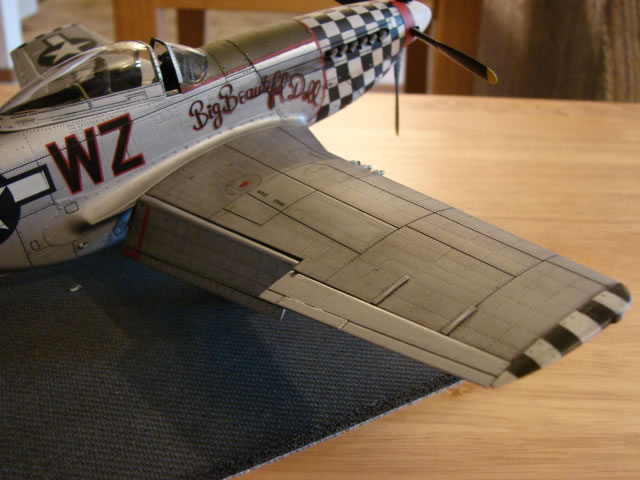
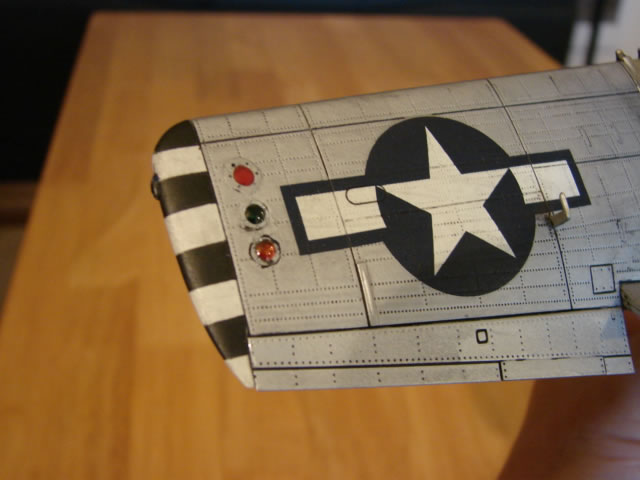

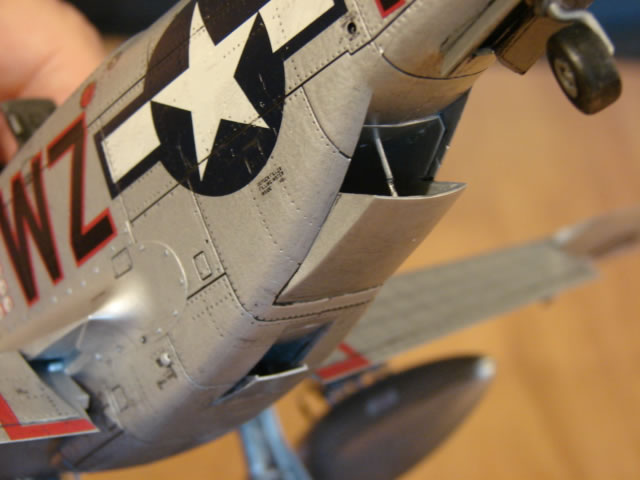
Except for the wheel well the wing was very straightforward. It is largely out of the box, and the fit is really good. I like the separate flaps and ailerons, and the machine guns are a lot better than the Hasegawa ones. One lousy thing Dragon did with all the moving control surfaces is they cut slots in the parts for the metal hinges. Yuck. So I filled in all slots with plastic sheet stock. I really have no need for moving control surfaces. Curiously Dragon omitted the pitot tube, which I stole from an old Hasegawa kit. And the clear position lights on the tips were so small that I couldn't trim them. Also one disappeared into the ether. So I scratch built some and used drips of 2-part epoxy for the lenses.
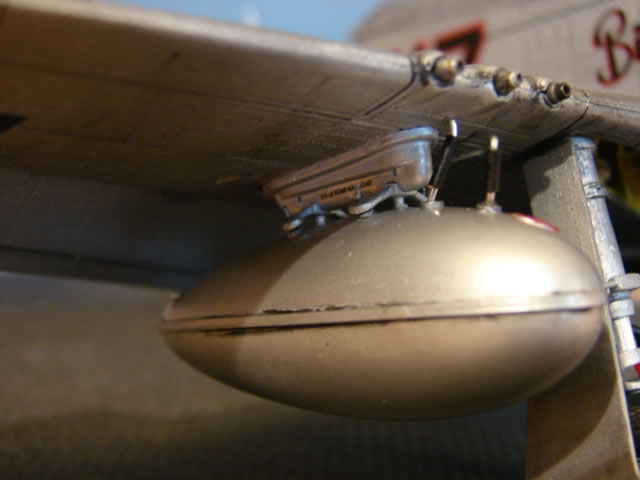
The bomb pylons are a bit too fat, but useable. The sway braces are really pretty good, but I cut off the little integrally molded studs that bear against the bombs (or fuel tanks in this case), and made some of my own with guitar string. Easy to puncture fingers here, which I did. Note that the tanks are plumbed - I am getting good at that. Lot's of practice from my other P-51's.
The Propeller
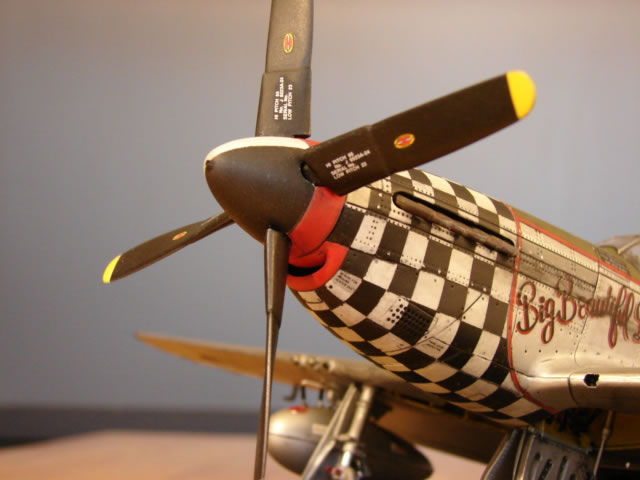
Wow. What can I say about the props… What you see here is the result of tons of filing and trimming (and cursing); I am rather proud of this effort. What were they smoking at Dragon??? What is the story with the Dragon prop blades? P-51's have signature features that give the aircraft its famous look. And the props are one of them. You just have to get them right. Hasegawa didn't get them right. Even Tamiya didn't get them right, but Dragon takes the cake. The Dragon items are indeed reverse cambered, as some modelers have suspected. That is sinful, and really cannot be fixed - just toned down with sanding and shaping. And the profile of the cuffed portion at the root is all wrong too, to say nothing about the rest of the prop shape. They are too thick and too wide by a long shot. I wanted to give up on them. I was going to use the Hasegawa props, but in the process of measuring and scaling many photos of the Hamilton Standard cuffed propeller, I found that the Hasegawa blades are too narrow by a good bit. So reasoning that it is better to have too much material than too little, I began the hard work. I filed the heck out of the prop blades to try to get them into some kind of semblance of the real thing. I "de-reversed" the camber as much as I could, and in the process thinned up the cross section. And I narrowed the profile to more resemble the real deal. This took lots of time, times 4! Lastly I replaced the roots with a more realistic flat and wide section, using a metal pin to attach to the prop blade itself, buried in all that plastic. The spinner, by the way, is very nice. Shaped perfect to my eye. But I had to enlarge the holes for the larger prop roots, which required a whole lot of grinding and destroying. Kind of hair raising, and also this completely wiped out any easy means of attaching the prop blades. But no problem - with my handy-dandy prop alignment tool of my own making, I bonded the props to the spinner accurately with great globs of 2-part epoxy.
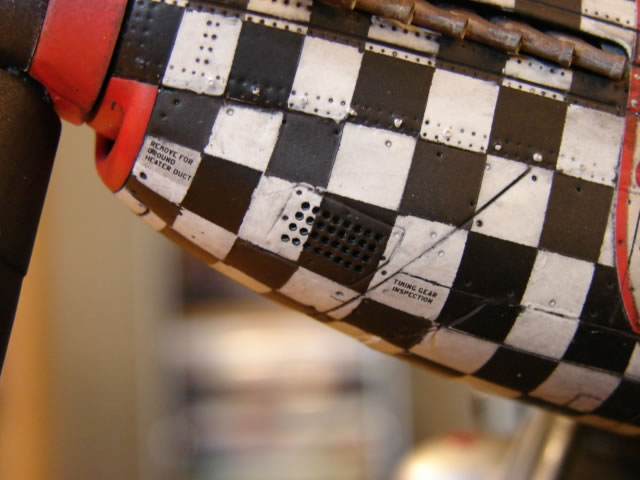
The Fuselage
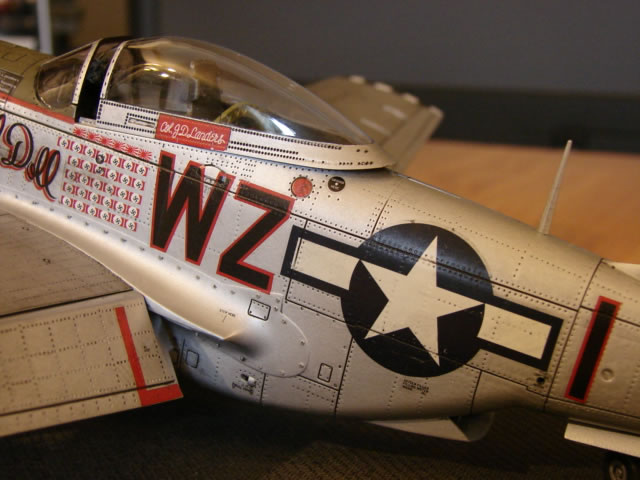
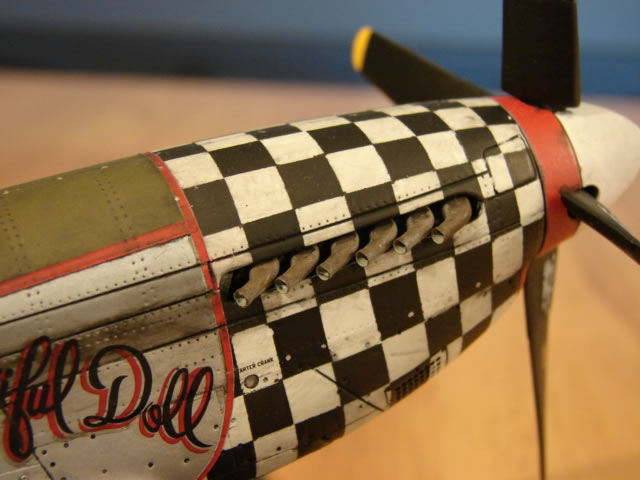
I didn't trust the Hasegawa black/white checker decals to fit over all that compound curvature - they may fit on the Hasegawa model with generous amounts of Micro-Sol, but maybe not the Dragon. So I painted the checkers! Wow- this turned out to be really a tough thing to do and have it look good. I will give myself a "B". The war photo in "P-51 Mustang In Action" (although a bit fuzzy) shows that the aircraft had un-shrouded exhausts, unlike the modern flying replicas and many modeling efforts. So that was an excellent excuse to use the Moskit exhaust stacks, which look fabulous. I dispensed with the idea of showing the engine through the clear fairings that Dragon provides, and tore up the engine something fierce to accept the exhaust stacks. That's what it takes if you want them to protrude through the fairings properly. By the way, this part of the kit (the engine mount and fairings) was tough to build and get right. By the way, I wonder if the little smiley intake under the spinner is right - seems a bit off to me…
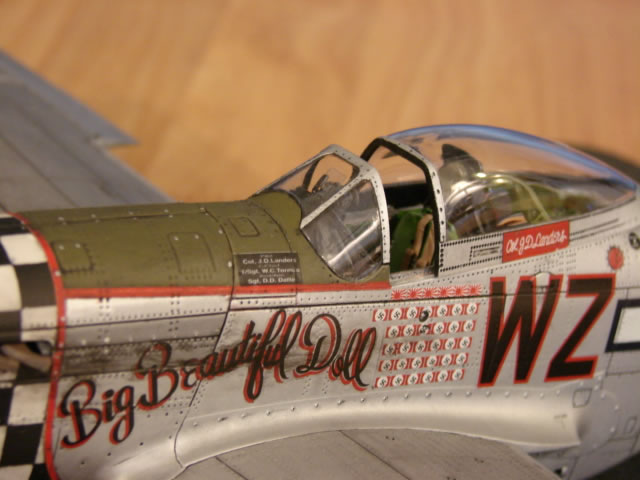
The forward canopy "glass", as anyone who has built this kit knows, doesn't fit. This is a pretty serious flaw. Trimming and filing has to be carefully done. Many other parts fit perfectly, and this one sorely needs to. Why doesn't it? Only Dragon knows. This was one of the most disappointing parts of the entire project, partly because I am just not good enough to perfectly fix it. Anyway, moving on, I did not put that long wire antenna on this model, as I have come to learn that 8th AF units did not use this. Good - that is an annoying detail. I don't mind avoiding it.
Some miscellaneous details - I drilled all 64 holes in the carburetor air filter panels and it turned out fine. I completely redid the oil cooler vent door on the bottom of the fuselage. And I also slipped in a reverse curvature piece of styrene sheet to add realism to the radiator outlet door. Note the obligatory actuator rod. Lastly for the fuselage I will mention that the panels surrounding the exhausts were probably steel instead of aluminum, so the Mustang modeler has to paint them a different hue to be accurate (which I did).
The Tail Wheel
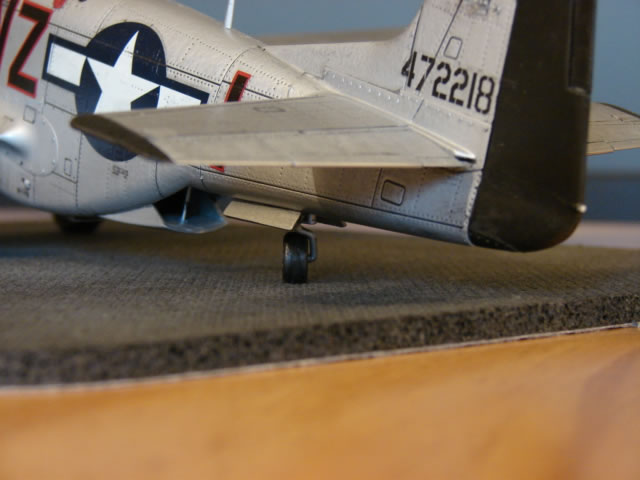
Just for grins, I sawed off part of the Dragon tail wheel, and re-oriented it as if the aircraft had been pushed backwards. I see this alot in war photos. Also, the rubber tire Dragon offers is way too narrow. Dog gone it! It would have been easy to get that right!! So I used the plastic Hasegawa tire/wheel (had to saw it off of the one-piece tail wheel and oleo assembly). It is also too narrow, so I sawed it in half and added some 0.03 inch thick styrene in the middle. Now it looks right. And guess what - the tail gear cutout and doors are too short by approximately a tenth of an inch. Maybe more - I don't remember. So I increased the cutout and used the more accurate Hasegawa doors.
The Tail
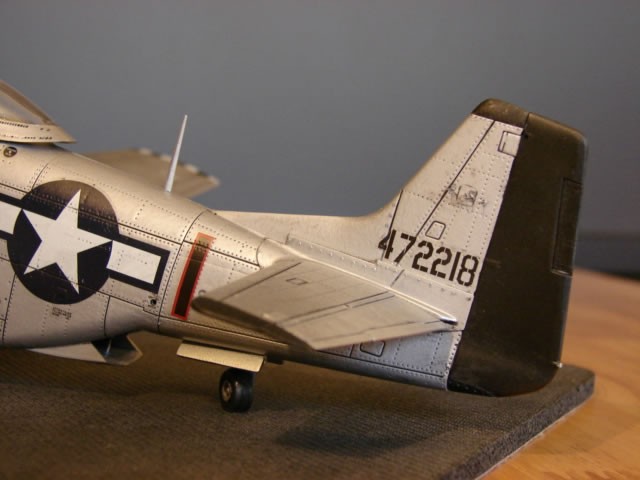
This model has a nice tail. The fit is really good and I love the separate control surfaces and separate trim tabs. Dragon did well here. Please check out the APS-13 tail warning radar on the fin, my own addition. This aircraft was a D-25 variant, and my sources say the D-25's were equipped with this item. The war photo again is fuzzy, but it looks like it's there. I fashioned this out of 0.009 inch guitar string (more finger and thumb punctures).
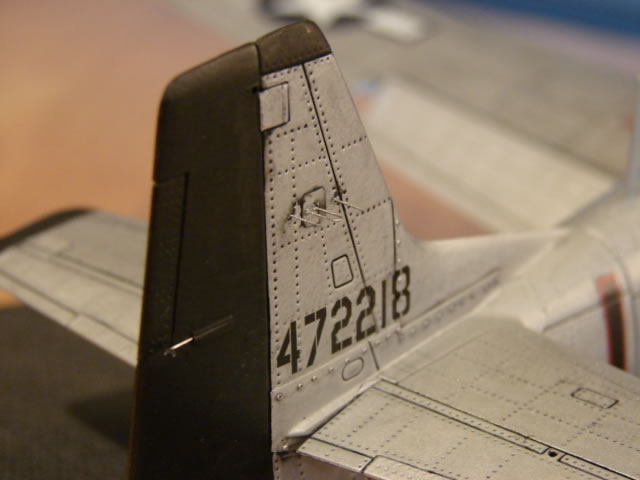
The rudder had two big slots in it to allow the metal hinges. As with the ailerons, I filled them in with plastic stock. The h/stab and elevators were fine out of the box.
In Closing

A more skilled modeler than I could make the Dragon P-51D into a nearly perfect replica in my opinion, with a lot more work than I did however. I haven't seen much in the way of aftermarket stuff yet. The props really need an aftermarket version for instance - no amount of rework gets them just right. Still, the model was pretty fun to make with a lot of rewards. But it leaves me wondering. For the same expenditure by Dragon, they could have done soooooo much better. Easier on the rivet patterns, better (and simpler) landing gear, good wheel well, a windshield that fits, fatter tires, and of course accurate prop blades. Wonder how the 1/32 Trumpeter kits are going to do…
I hope you like it. Here is what I used:
- Dragon 1/32 scale P-51D
- Hasegawa 1/32 scale P-51D (some parts and the B.B. Doll decals)
- Verlinden cockpit set
- Grand Phoenix cockpit set
- True Detail wheels
- P-51 Mustang In Action from Squadron/Signal Publications
© James Wheaton 2008
This article was published on Wednesday, July 20 2011; Last modified on Saturday, May 14 2016