
Building Trumpeter’s SBD-3 Dauntless
By Dennis Robert Ferriol
Nowadays, I rarely build aircraft models. But, the recent Trumpeter release of the SBD Dauntless in 1:32 scale, caught my eye. I had always admired the SBD Dauntless as a kid, specially, after watching the home movie version of “The Battle of Midway”, starring Henry Fonda. For me, it was at that particular naval battle that the Dauntless shined the most since the brave pilots who manned them were instrumental for turning the tide of the Pacific War in favor of the U.S.
Since I planned on doing a Midway plane (which is not an option with the kit’s decals), I also bought the Yellowhammer Decals (Item No. YHD32017), with options to depict the planes flown by Enterprise Group Commander, LCDR. C. Wade McClusky, who sank the Japanese carrier Kaga, and LT. Richard Best, who sank the carrier Akagi.
Construction
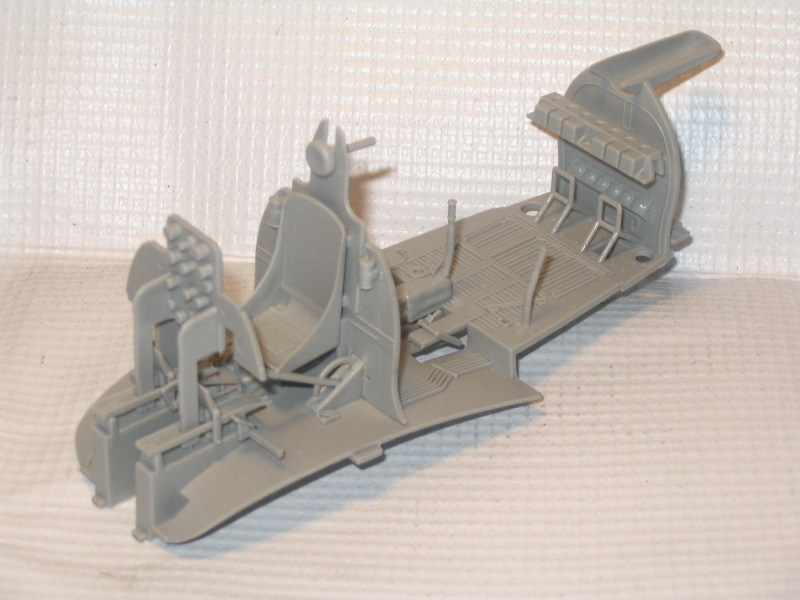
Upon opening the box, I found the entire fuselage to be almost sink-hole free. After studying the instructions, I decided to follow the step-by-step process written down, tackling each of the sub-assemblies. I dry fitted all the parts with each other to ensure that all mating surfaces were aligned and gap-free. Surprisingly, there was almost no filling required.
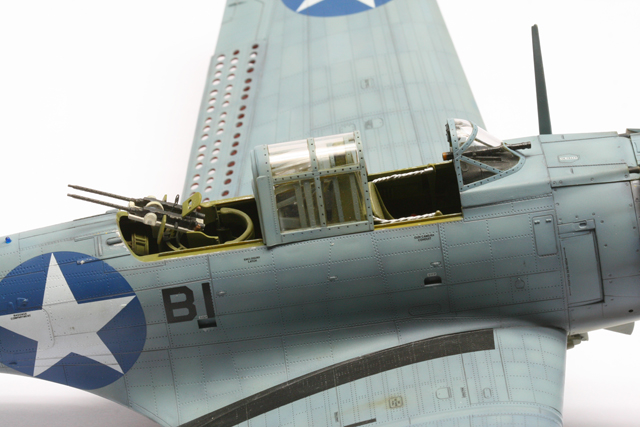
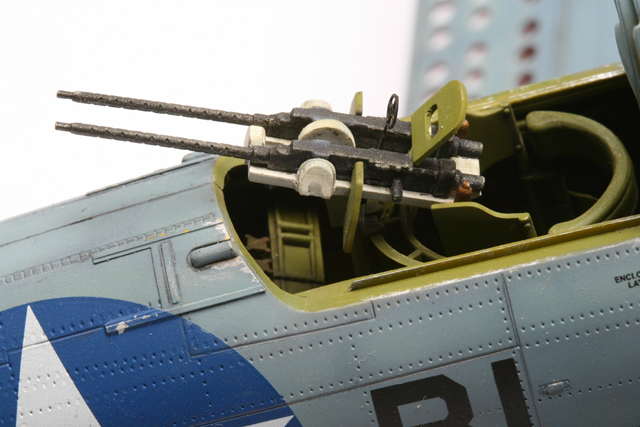
I started with the cockpit which posed no problem, whatsoever. I did, however, cut down the pilot’s map table (Part A3) to depict one that’s retracted and not in use. I also had to cut the rear gunner’s control stick from the main control stick part (Part C19) since the kit provides the second control stick for the gunner as a separate piece installed in its stowage on the fuselage side. I reamed out a hole in the base to make it more accurate. The gunner’s control stick was never installed in position unless it was needed in an emergency. In addition, Trumpeter provides a clear plastic instrument panel with glass over the instrument positions. Instead of painting around the instrument positions which is a bit difficult and tedious, I reamed out all the holes with a No. 11 X-Acto blade, spray painted the clear panel Semi-Gloss Black, sandwiched the acetate film instrument as instructed and put droplets of Future Floor Polish on the instrument openings to simulate glass lenses. This came out better than what I could have achieved painting around that clear area over the instruments. Jumping to the point where the windscreen is assembled in Step 22, I had the ends of the telescope (Part H26) drilled out. After painting this with Semi-Gloss Black, I again used droplets of Future Floor Polish on each of the drilled out ends to simulate glass lenses I also rummaged my spare decals box for a close impression of the details found on the standby compass (Part C6) located on the windscreen.
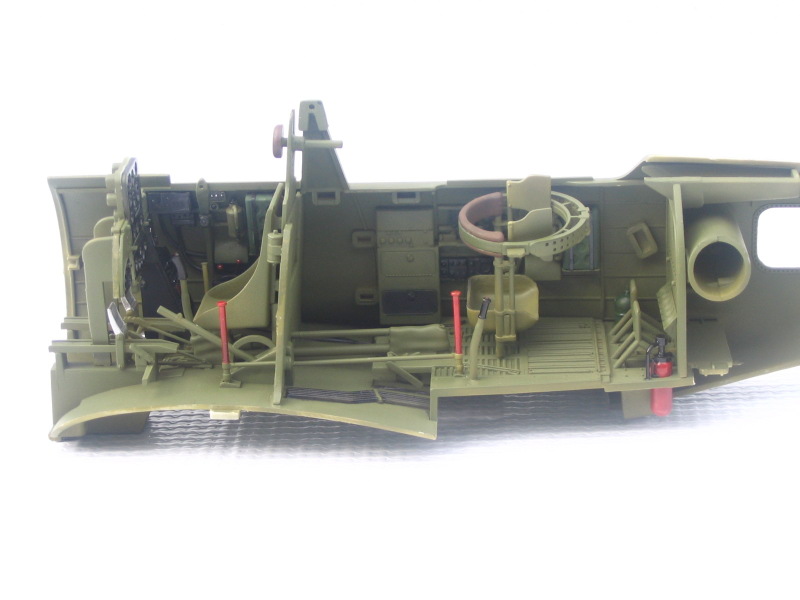
At this point, I painted the whole cockpit with Gunze Sangyo 351 Zinc-Chromate Type I (FS34151) and detail-painted the different accessories. I found the colors indicated by the instruction sheet to be a bit inaccurate so I used as guide reference, pictures taken from Aircraft Resource Center. I next applied a pin wash mixture of Black & Burnt Umber Oils and White Mineral Spirit to give depth, followed by pastels in order to highlight all the cockpit details.
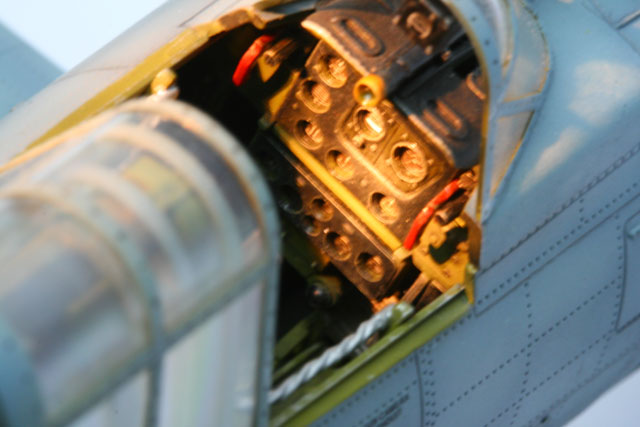
Next stop was the engine block and engine accessory compartment. Again, assembly went on without problems and was very straightforward. The engine cylinders were molded by Trumpeter with the holes already drilled out for the spark plugs to make things easier. I just had to add the wiring harness using copper wire. After assembly, I painted the engine case Neutral Grey (FS36270) then washed it, together with the cylinder shank, with a thin mixture of Burnt Umber Oil and White Mineral Spirit to simulate oil seepage, as well as bring out discoloration. Bolt heads were then painted Aluminum, as with the cylinders. After this was done, a Black Oil and White Mineral Spirit wash was used to bring out the cooling vane detail.
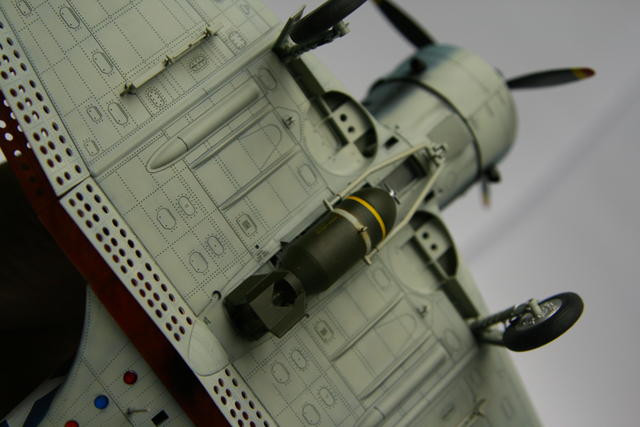
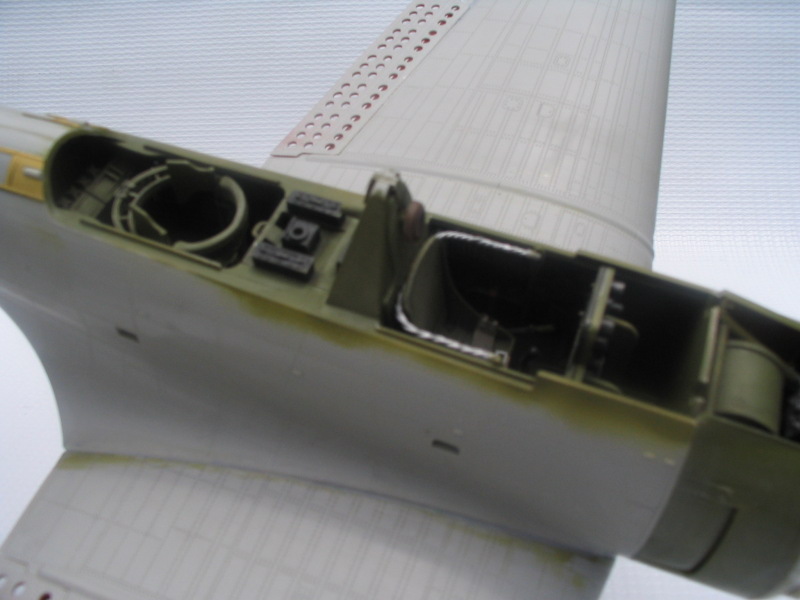
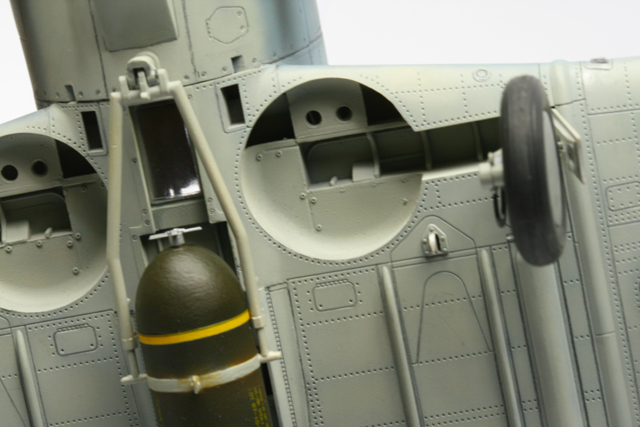
Moving on to the fuselage and wings, I found out too late that by following the kit instructions and assembling the wings as a major sub-assembly before attaching the whole thing to the fuselage will create a slight gap on the upper fuselage-wing joint. If I were to be given a second chance, I would initially attach the upper wings (Parts B1 & B2) to their respective fuselage halves, and then complete it by attaching the bottom wing (Part B12) to the completed fuselage. The slight gap was remedied by applying Gunze Sangyo’s Mr. Surfacer 500 and lightly sanding the joints. Another thing to note while assembling the wings is that Trumpeter molded the dive brakes’ actuator arms (Parts G2 & G3) in the full open position. Since the upper dive brakes were normally retracted to level with the wings surface on real SBDs after they have landed, I fixed this by removing the upper actuator arms and replacing them with styrene rods that were cut a bit shorter. After assembly, the interior of the dive brakes were painted Tamiya Flat Red.
Painting
After putting together all the other small details, I closed up the fuselage halves and prepared the model for painting by wiping clean the entire surface with isopropyl alcohol.
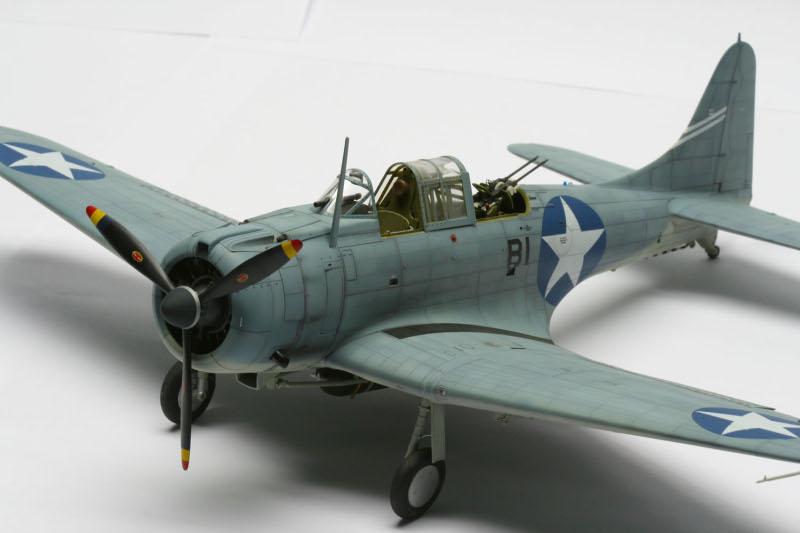
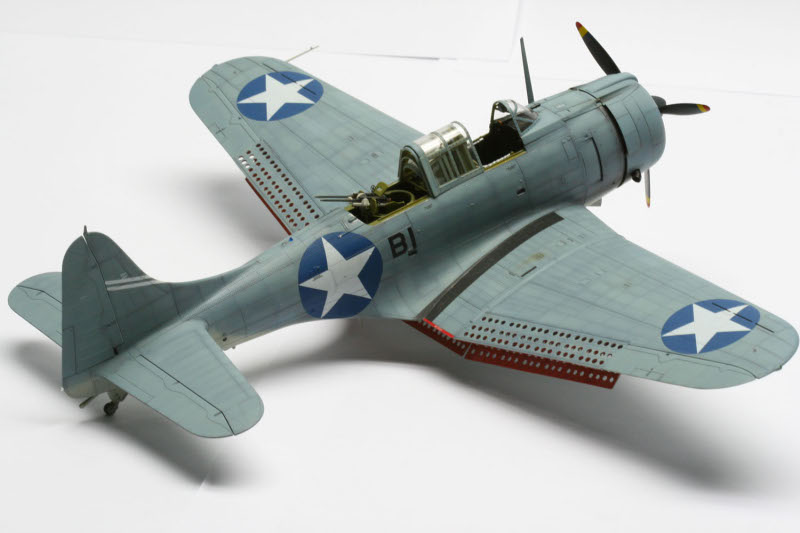
I decided to use the markings for the SBD of LT Richard “Dick” Best, as he flew it on June 4, 1942 at the Battle of Midway. While studying references for this particular plane, I learned that Enterprise’s VB-6 gave up their old SBD-2s after returning from the “Doolittle Raid” mission in April 1942, and received the newly built SBD-3’s before embarking for Midway. In short, they were all practically fresh from the factory. So, early on, I decided to minimize weathering and chipping and just do conventional washes to enhance panel lines and details.
I employed the following colors: Gunze Sangyo 367 Blue Grey (FS35189) for the upper surfaces and Gunze-Sangyo H11 Light Gull Grey for the lower surfaces. After masking the cockpit area, I started by pre-shading all rivet and panel lines with Tamiya Flat Black. Using an 80:20 paint-thinner mixture and doing light mists all throughout the painting process, I first sprayed on the Light Gull Grey on the entire lower surface making sure that the pre-shade color still bleeds through. When this was done, I proceeded to apply the Blue Grey color on the entire upper surface. When the initial base coats were dry, I then used a mixture of Blue Grey tinted with a bit of Light Gull Grey to spray on blotches between the panel and rivet lines. This was done randomly and in an irregular pattern throughout the entire upper surface of the model. Fairly satisfied, I added a bit more Light Gull Grey to the mixture then sprayed this very light color on all fabric control surfaces. This was done since references pointed out that the paint on fabric surfaces of most, if not all Pacific-based U.S. aircraft normally faded faster.
At this juncture, I turned my attention to the canopy. After dipping all the clear parts in Future Floor Polish and giving them ample time to dry to a shiny finish, I masked off all the canopy pieces and windscreen using Tamiya Masking Tape. When this was done I initially sprayed each one with the Zinc-Chromate Type I followed by the lightened base color, Blue Grey. While all the pieces were left to air-dry, the windscreen accidentally landed on the floor of my worktable without me knowing it. I found out too late when my wife entered the room and walked beside my worktable. Just then I heard a crackling noise from underneath and there it was…the windscreen, in 3 irreparable pieces, underneath my wife’s foot. It felt like my whole world had crumbled to pieces, as well. Seeing that the only alternative was to replace the broken piece, I tried e-mailing Mr Jackson Xiao of Trumpeter for a replacement. After a few days with no response from Trumpeter, I lost enthusiasm to continue on with the project and decided to start building another 1:32 kit, Hasegawa’s new P-47 Thunderbolt. It was September 27, 2007 that I told Mr. Chan of Lil’s Hobby Center (a local hobby shop in SM Megamall, Mandaluyong City, Manila) what had happened and right there and then, he called up Mr Xiao of Trumpeter and asked permission to give me the part tree from one of his available stocks. I came home that afternoon with the new part, and a renewed enthusiasm to continue on with the project.
Markings and Weathering
With the painting completed, I turned to the kit’s decals where I used the black part for the upper wing walkways. The rest was stashed for future needs. The next step was to lightly spray Future Floor Polish onto the areas where the decals were to be placed. The Yellowhammer offering was a delight to use. Not only did it give the correct color register for the Insignia Blue national markings, but it also settled perfectly into crevices with ample amounts of Solvaset setting solution. After all the markings and stencils were placed, the entire model was sprayed with a diluted mix of Testors Dullcote Lacquer prior to application of washes. A thin mixture of Black & Burnt Umber Oils and White Mineral Spirit was prepared and then applied to panel and rivet lines. After cleaning the excess wash with cotton buds dipped in clean White Mineral Spirit, I sharpened a No 2 pencil and added more depth to the model’s details by drawing on the panel lines. Next, paint chipping, using Tamiya Chrome Silver was stingily applied on high wear & tear areas like the propeller and canopy edges. Lastly, ground pastels were minimally applied on areas like the engine cowling and exhaust to add more realism to the model.
Conclusion
I can say that building this model was a truly gratifying experience that I would gladly go over again. I’m glad to have built a great kit of a plane that made history as the one which triggered Japan’s loss in the Pacific during World War 2. I highly recommend this kit for excellent value for money.
© Dennis Robert Ferriol 2008
This article was published on Wednesday, July 20 2011; Last modified on Saturday, May 14 2016