
Williams Brothers 1/32 Wedell-Williams #92
By Clint Sims
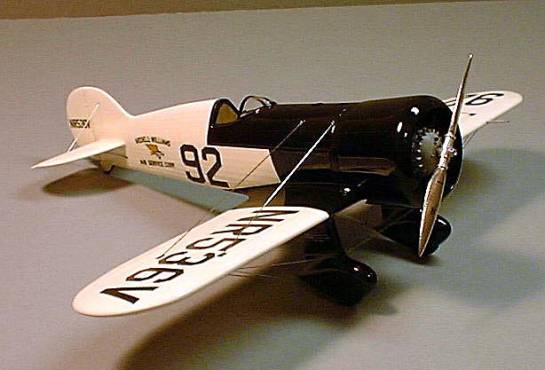
A couple of years ago when I built this kit, I was looking for something I could get done in a reasonable amount of time and still have fun detailing. This is why I choose the Wedell-Williams #92. I knew the paint scheme was not complicated and as with most Williams Brothers kits there is enough detail to get you thinking about how you can make some of the parts just a little better.
I started with looking at the cockpit parts and decided to make my own dash board, seat, gas tank, and rear bulkhead. Using a photo copy of the decal instruments, and the kit dash as an outline, I made a new dash from plastic sheet. The kit dash was used as a base to glue the instrument decal on, then a thin piece of clear acetate was glued at the edges on top of the decal and last the new sheet plastic dash, with holes drilled out for the instruments, was painted flat black with details added and glued on top.
Next was the seat. Since I didn't have any cockpit shots of the aircraft, I made the seat the same size and shape as the kit seat, just thinner, out of sheet plastic. Then I painted it sliver with a black cushion as per the kit instructions.
The floor and cockpit sides were painted sliver as were the insides of the fuselage itself. Since the bulkheads of the actual aircraft were varnished plywood a new rear bulkhead was made from 1/32 lite plywood, using the one from the kit as a template. I have tried to paint wood grain before and it never looks as good as the real thing. To get a different shade of aluminum in the cockpit I used the bottom of a pop can to make a new gas tank. This is visible thru the cockpit behind the dash and it had about the right look which made it stand out from the other silver parts of the interior. After adding seat belts, made from various photo etched buckle parts, it was time to put all the pieces together. The floor, seat, tubing frame sides and rear bulkhead were glued together and fitted in to the fuselage along with the dashboard. The fuselage sides were then glued together.
After sanding the fuselage seam, the wings were attached and the elevators were mounted in the aft location. While the filler on these seams was drying I started on the engine. The engine was built out of the box and painted as per the instructions. The only addition was plug wires and a bit of dry brushing to bring out the details. The engine was placed inside of the cowling pieces which were painted silver on the inside and the cowl was assembled.

The landing gear was assembled next so they could be added to the wings. The joint was then filled and sanded and filled again. This left only the canopy to be attached to the aircraft before primer could be applied. I made a new canopy since I decided to display the canopy open. From what I read and saw in pictures the canopy sides were split at the top and slid down the cockpit side like car windows. The kit canopy was cleaned up and polished since this was going to be the master for the new canopy. After gluing it to a dowel I used the push pull method for forming a new canopy from thermoform clear plastic. The sides were cut from the new canopy and the front section was attached using Testors glue for clear parts.
The only other things left to do was add the extra bump, part no. 31 to the top of the fuselage, fill the vertical panel lines on the fuselage sides, and rescribe them to the angle shown in the instructions for the 92 aircraft.
After all of this, there were two assemblies to primer. The aircraft itself and the cowling with the engine inside. While sanding the white primer to get the finish ready for gloss white I took a look at the prop and decided to see if I could make a new hub from aluminum tubing. I started with four different sizes of tubing and ended up with the hub being made from six pieces of tubing. I then cut the kit prop blades from prop and fitted them in to new hub. The new hub was well worth the effort. The blades were covered with Bare Metal Foil, polished, decals applied, and then given a lite coat of clear. The new hub was masked off since it already had the right natural metal sheen.
After the final primer coat was sanded, the gloss white was applied. The masking for the black came next. The black was sprayed on the cowl and aircraft and allowed to dry. After that decals were applied. Williams Brothers kits always have great decals. I usually try to cut as close to the color as I can to get rid of any carrier film. After the decals dried, a coat of future was applied to the cowl and aircraft. The flying wires and final details were next.
The plastic wheels were chosen over the rubber ones and painted flat black. I then dusted them with a bit of gray and brown chalk to give them a dirty appearance. Next, I made new canopy sides and attached them just above the canopy opening inside the cockpit in the down position. Rudder cables were then made from stretched sprue and installed. Next were the flying wires. I decide to use two different sizes of guitar strings for the flying wires but before applying them I applied small square pieces of black decal to represent the tapped areas where the flying wires enter the wings. The last detail to add was the pitot tube. This was made from brass rod with single copper wire strands added to the top and bottom to represent the sensors that protrude from the front of it.
In the end, the Weddel-Williams kit is a great looking model when done, even in the basic two color paint scheme. With the decals for 3 paint schemes you can decided how complex and colorful your Weddel-Williams kit will be. I used two books for research on this project and they are: Thompson Trophy Racers by Roger Huntington and The Golden Age of Air Racing by S.H. Schmid and Truman C. Weaver. Both are great books.
© Clint Sims
This article was published on Wednesday, July 20 2011; Last modified on Saturday, May 14 2016