
Academy 1/32 F/A-18D
By Karim Bibi
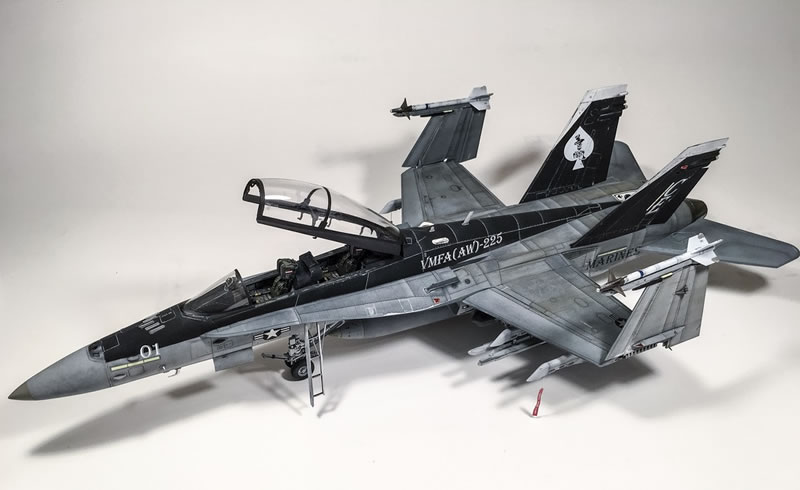
The kit is Academy's F/A-18D "night attack" at 1/32 scale (kit #12103). The kit in itself is really nice as I am sure all of you know. A lot of reviews of it are floating on the net if you want to know more of the good and bad of this kit. One thing of note are the sink marks on the front fuselage halves and on the spine. those need to be filled and smoothed out. I also rescribed part of the kit to properly reflect the aircraft I have modeled. I opened up the meshed areas on the top and bottom part of the aft section of the fuselage and replaced them with fine meshing from an old Tamiya AFV (spares box).
Another area of the kit that is not up to par is the intakes. A lot has been written about them and not wanting to go down the reshaping and sanding route, I replaced those...
Aftermarket that has been thrown on this kit is substantial (and was the start of a never ending spending spree filling up the resin box on the storage cabinet. Thank you eBay!).
The intakes are produced my Rhino and come in white (which is very helpful as you need to only mask the area when its time to paint). The intakes took quite some work to get blended in with the rest of the fuselage, I don't know if it was from my own doing, or if it was because of the misalignment due to the Aires wheel bays. Talking about the wheel bays, I have used the Aires offering for the nose and mains. The mains took some work to get done the nose bay was a drop in fit and only required a bit of sanding and trimming. The problem with the main wheel bays is that Aires has the locating pins for the landing gear legs drilled at an angle which would have the gear skewed. you have to carefully drill the pins vertically and then reinforce the pins when you install the main gear. I used slow curing epoxy to have a really strong bond and have the gear legs aligned properly. I also used Rhino nozzles. I had the Aires closed ones but decided to keep those for the next FA18 build I have someday down the line (to which I already have amassed all the aftermarket I want). Some guys out there say that the circumference of the Aires nozzles is too small, the Rhino ones are a bit bigger. I noticed there is actually a step between the fuselage and the nozzles from the photos I have seen but of course I might be mistaken.
The cockpit is academy, except for the seats which are produced by Quickboost. The seats themselves are very cleanly moulded and you get a paint guide on the back of the QB pack which helps out along with the references you may use. The canopy was another issue. I drilled the rails as I saw in the reference material I had (I used DACO's Uncovering the F18). I also added the cameras on the right and left side of the rail. I used styrene and wiring for that. I used AK's new gauzy glass shine. I wasn't very impressed. The front canopy came out fine with no bubbles (i brushed them slowly off in two dippings) the main canopy was another issue due to its size. Tried to dip in two halves but impossible to get good results. When I tried to removed the stuff that's when things went horribly wrong. I tried lacquer thinners, alcohol nothing...then I tried acetone for the heck of it just to see if it would work (canopy was dump by then) nothing. Received a replacement canopy from a seller on eBay a couple of days later. That one was polished with the Novus system and shined and left as is. I also used Reheat photoetched mirrors as the kit ones looked horribly out of scale. I also used some the Eduard etch on the outside but very selectively as I kept the brunt of it for the next kit.
That's for construction...
Painting and weathering: I used mostly Tamiya and Gunze for the paint. The colours were mixed from the FS callouts using a nifty app I have on the iPhone and adjusted accordingly for real life. I went all out on weathering although I know a lead aircraft would never get so dirty, but I needed the exercise to get back in the grove of things. I am very happy with the results though. I started with Doug's black basing technique to get tonal variation. I also used the salt chipping technique which I find works really well on two tone grey aircraft. Furthermore I used AK's light chipping fluid on selective areas. For panel lines I used Flory Models clay wash and AK's paneliners. General grime and dirt was done using Abteilung oils, AK oils, MIG pigments and Winsor and newton oils.
Lastly the decals, I used Flying Leathernecks's Chesty P sheet which has enough for 4 aircraft. I bought this sheet because it contains the beautiful 'death dealer' aircraft. I used Microsol/Microset combo to get the decals to snuggle down but they barely did, then I used Walther's Solvaset and the Death dealer decal specifically disintegrated in a couple of places so I had to touch those up with paint. Oh well!
Flat coat used was AK's Ultra matte coat.


© Karim Bibi 2016
This article was published on Tuesday, September 20 2016; Last modified on Tuesday, September 20 2016