
How to Scribe a Model
By Chris Kirchhoff
We all know the problem with the raised panel lines on the older model kits. In this article, I will try to explain, how I rescribe a model. It's not that problem, but it needs very much patient. It is necessary to work very slow and without much pressure.
Here is a pic of the tools I use for this.
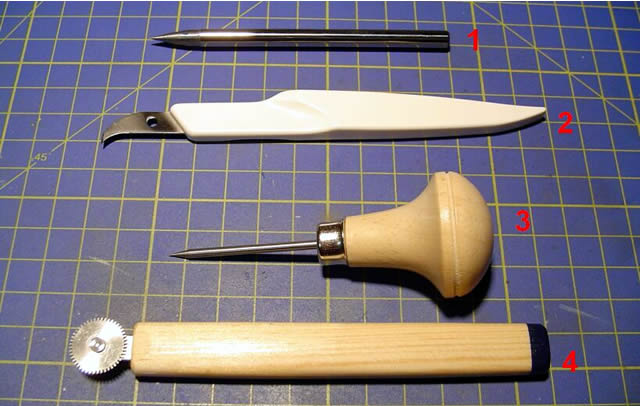
- Tool No. 1: Metal Tip
- Tool No. 2: Hasegawa Trytool Scriber
- Tool No. 3: MDC Riveting Tool
- Tool No. 4: Rosie The Riveter
How to Start
I start with the metal tip, and go without any pressure along the panel lines a few times. Use the raised panel line as a guid. After a few times, I start to add a light pressure to the tip.

The finished part after using the metal tip.

When this is done, I sand the part completly. Starting with 220 grid sand paper over 500 grid to 1000 grid sandpaper. Important is, to sand in 3 different directions, not without a system. With the 3 different directions showen in the pic below, and not much pressure, you will have less scratches on the surface.

The next step is, to use the Hasegawa Scrier. Very slow and without too much pressure.

You can control how wide the lines become, by holding the Scriber in an angle to both sides.


If the Scriber jumps out of the panel line, don't worry! This is fixable. In that case I use a little drop of Superglue, and attach it with a toothpick to the scratched area.

This will be sanded down with sandpaper, and if needed the panel line will be scribed again. Hold the part against the light, to control the lines. That methode makes it easy to watch along the new panel lines.
If all looks fine, I use a 1000 grid sanding sponge to make the sureface smooth.
I can recomment to do only ONE part at the time. Don't work on both parts, because you can watch to undone part as an instruction.
Here the done wing topside.

Last but not least, you can add some rivets with the tools showen in the first pic. I leave that to you.
© Chris Kirchhoff 2006
This article was published on Friday, November 06 2015; Last modified on Wednesday, November 11 2015