
Trumpeter 1/32 The PLAAF Ft-5
By Jason Moores
Trumpeter 1/32 The PLAAF Ft-5
Kit#: 02203
Price: Usd 8.19 @ Lucky Model, Might as well give them away!
Decal: One option "August 1st" Aerobatic team
Notes: Tiger Wings decals used.
by Jason Moores
History
The Chinese foray into jet fighter aircraft is a lesson in reverse engineering. Namely Soviet designs of the likes of the MiG-15, -17. While we may never know the goings on between these two secretive countries, the Shenyang JJ-5 is an all Chinese product as the Soviet Union never produced a duel seat MiG-17. The JJ-5 or Ft-5 for export versions, is a combination of locally built MiG-17 Fresco with the cockpit of the MiG-15uti, also locally built. The Chinese never built the MiG-15 fighter named J-2, with the first Chinese built aircraft type to go into service being the J-5 or copied MiG-17. Interestingly The JJ-5 trainer production started ten years after the J-5 with exports going to Sudan, Pakistan, Bangladesh, Albania, and Tanzania. Powered by a WP-5D turbojet rated at 24.68kN with a top speed 1,048km/h (Mach 0.932) and service ceiling of 14,300m, 974 aircraft were built from 1966 to 1983. The JJ-5 is still used for basic jet training today before going onto the JJ-6 or JJ-7 fighter-trainer. Weapons include an under-nose Type 23-I 23mm cannon and two stations under the wings for 400 litre drop tanks or other ordinance.
The Kit
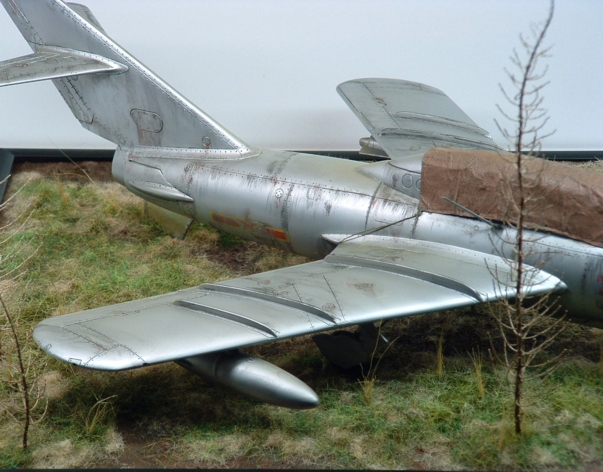
One of Trumpeter's early 1/32 releases before the learning curve kicked in. Packaged in the usual plastic bags in a largish box, there was no evidence of flash on my kit. Rubber tyres and decals for one aircraft are included, that being of the "August 1st" Aerobatic team of China with no stencils or marking other than national insignia and ac numbers. The cockpit and seats are basic in detail with moulded on dials, landing gear is adequate but the gear doors are very thick and some what confusing with no real indication of position on main gear legs. The cockpit tub can be seen from both the intake and exhaust openings. But on the good side the panel line positions look close to what images I could conjure up on the net. The three part canopy is rather thick but clear although the profile seems a bit high in cross section. An engine is included and can be displayed mounted in the aircraft with the tail section siting on its own trolley The fit is quite good, but the panel trenches and rivet holes are on the 1/16 scale side. With ordnance you get two drop tanks for the wing stations. All up a kit that probably wouldn't see the light of day, but I couldn't just throw away hard earned money so I thought I would use it as a test bed for some Alclad.
Construction
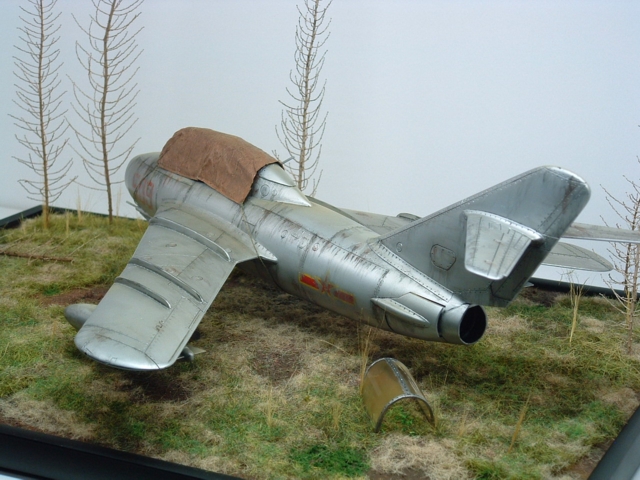
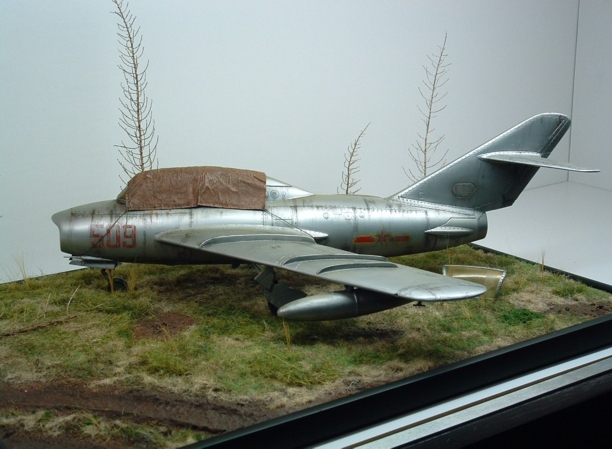
As the focus would be on painting rather than building I only put on the bare minimum in terms of fuselage structure. Then after convulsing over the work need to make the cockpit half decent, I had a brain wave of laying a tarp over the canopy, so no cockpit internals were added and only the front and back of the three part canopy. Some intake trunking using plastic card was placed inside each fuselage half to try to hide the cockpit tub with only minimal results so I didn't bother improving the tail end only including the tail pipe in construction. Some lead weight was added either side of the cockpit tub just in case although this wasn't specified in the instructions until step 13 when it would be all to late. All control surfaces were glued in the neutral position for ease of construction and painting although I have seen photos of parked aircraft where the tail surfaces are slightly in the nose up attitude with airbrakes slightly open.
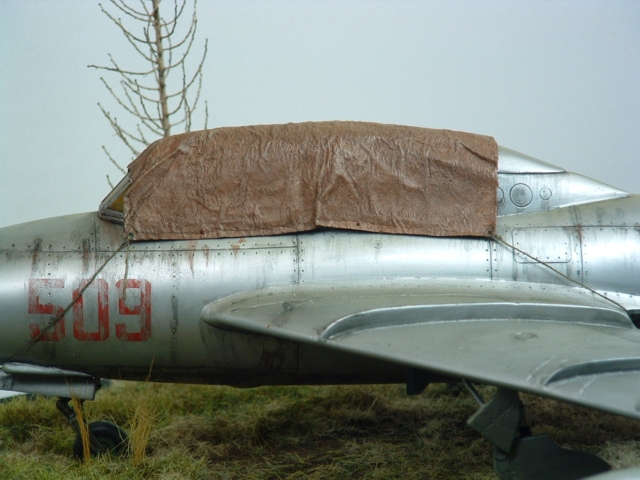
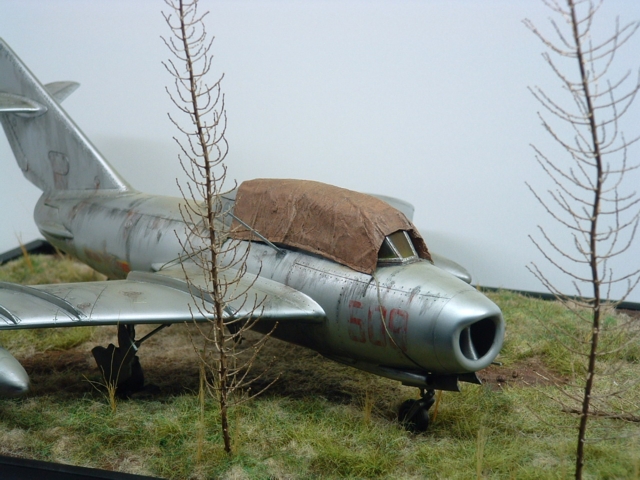
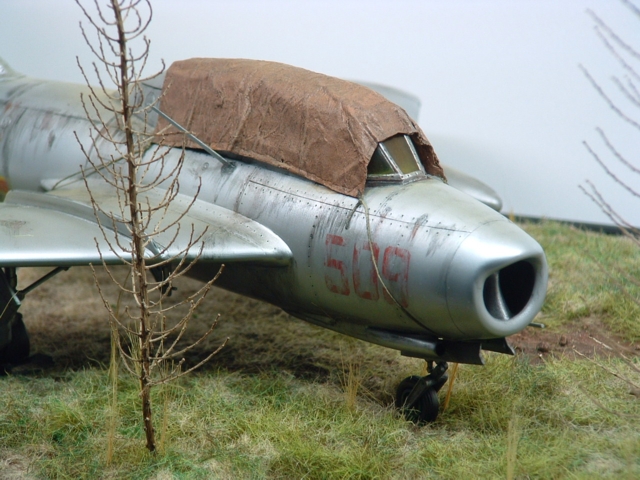
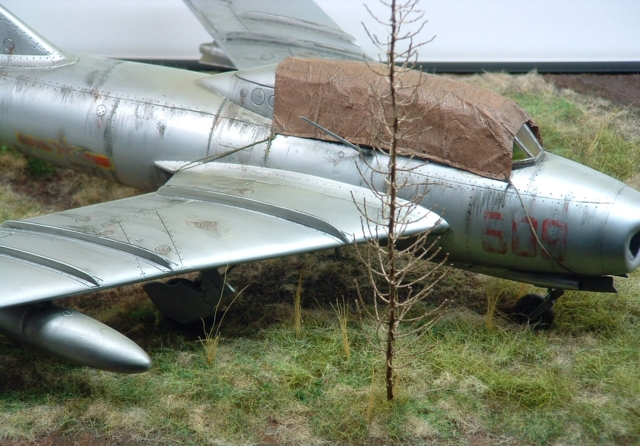
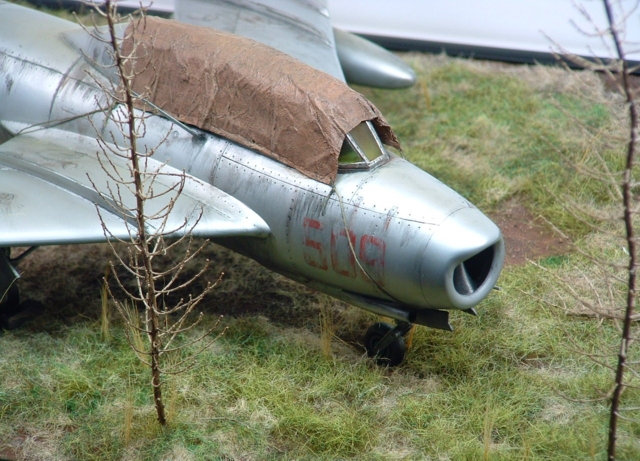
Construction and prep for the BMF was soon completed, and on to the Alclad II . After painting I made the tarp by placing a rectangle of kitchen foil over the canopy and crumpled it into shape. Over that I lay sheets of toilet paper squares and with a broad brush dabbed white glue until the foil was not visible. Then carefully remove from the model and let it dry for a couple of days, then trim back to the foil edge.
Stitching and rope holes can then be pressed into the edges.
Painting and Markings
I used Alclad Grey primer / micro filler first and then Aluminium over the entire model. Panel shading was done with Dark Aluminium. As weathering is my favourite part I wanted to do an "in the back paddock" look. The heavy panel lines and rivet holes lend them selves well to this. I used a semi permanent black marker to highlight, dragging my finger down over the fresh marker to simulate a vertical weather beaten look. Concentrating and repeating on the mid fuselage lines rather than the top or wing surfaces. Once completed I use my preferred wash of Hobby Color H 12 flat black acrylic, thinned with a few drops of white spirit/methylated spirits and a couple of drops of water. Applied with a thin brush and wiped vertically down with my finger or a Q-tip. Also using Hobby Color H 77 Tire black for the same process. Then on to the decals which were Tiger Wings # 32-119 Chinese Insignia. The a/c number Is fictitious and drybrushed with aluminium for a worn off look. The trick I found for a really decrepit finish Is not to finish off with a lacquer or Future coat. The variation between the semi gloss Alclad and flat wash Is quite noticeable to the eye, If not the camera. What you could see of the canopy was brushed with a mixture of gloss lacquer and clear orange to simulate the yellowing of Soviet canopy acrylic, or this may just be a coating they give to stored aircraft? The tarp was airbrushed with MM 1701 Military brown then washed with method above, then drybrushed with a tan color and flat coated. Finally a light misting of sand over the top surfaces to simulate dust.

Conclusion
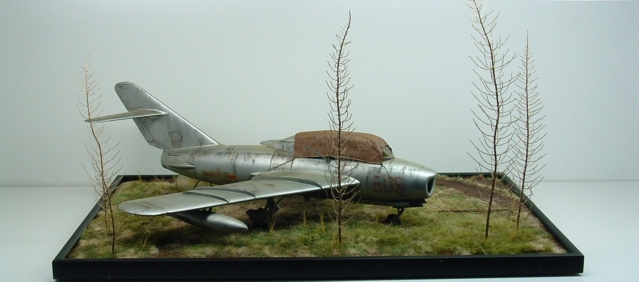
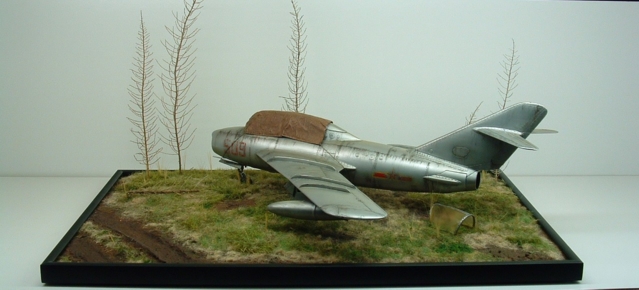
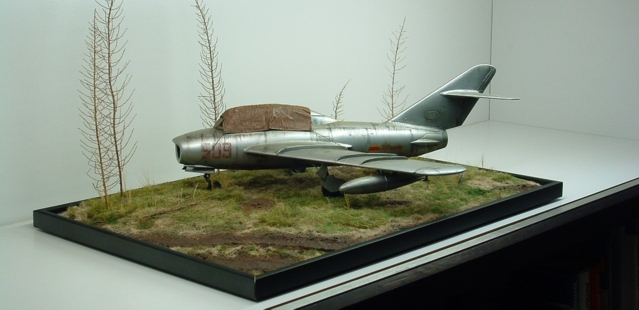
With the look of "in the back paddock" coming up so well I thought I would have a go at modelling the paddock as well, and using that as a base for the Ft-5. This is just plaster of Paris poured over a craft wood base with tyre tracks pressed in it before it set. Then painted with acrylics and various scenic grasses of the train modelling variety. I am super pleased with the end result and as a useful method for an otherwise ordinary kit.
All materials bought with the proceeds of my hard-earned money.
References
- http://www.airliners.net/
- http://www.sinodefence.com/airforce/trainer/jj5.asp
- http://www.globalsecurity.org/military/world/china/j-5.htm
- http://www.historyofwar.org/articles/weapons_shenyang_jj5.php
© Jason Moores 2008
This article was published on Wednesday, July 20 2011; Last modified on Saturday, May 14 2016