
I.D. Models F2H-3 Banshee
By Howard Weaver
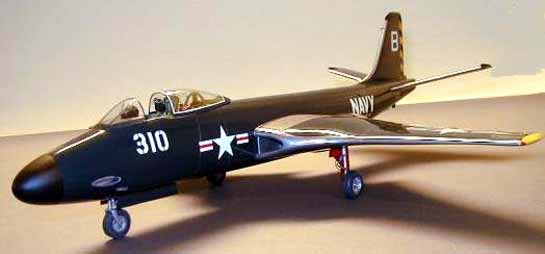
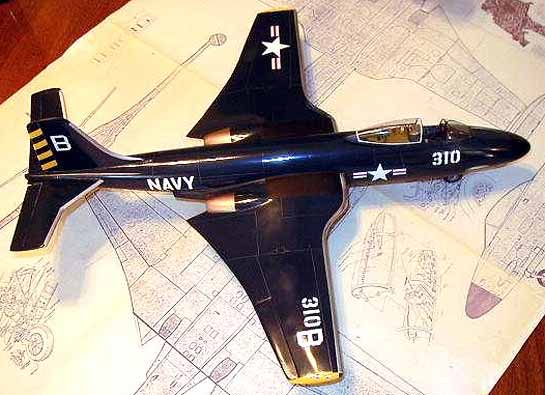
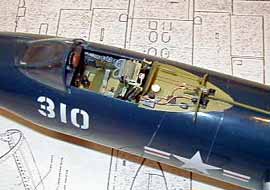
This is a I.D. Models vacuform model, finished in the colors of VF-41. In 1/32 scale, it is a very large model indeed, measuring 18 3/8" long with a 15 3/4" wingspan, without drop tanks. The Dash three was longer than it's predecessors, had a larger wing, and a larger horizontal stabilizer. The horizontal stabilizer also had a great deal of dihedral built into it.

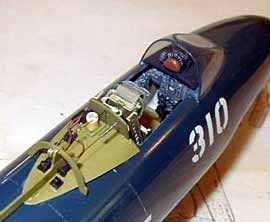
Construction was begun by building up the cockpit consoles, floor, instrument panel, and building an ejection seat. I was fortunate to have a friend that loaned me a copy of Naval Ejection Seats. I can't remember the name of the author, but it was just what I needed to build the seat. Thanks Harold Offield!
Next, the nose gear wheel well was made and installed into one half of the fuselage. A wooden block was epoxied to the top of the gear well and a hole drilled through. This was necessary to facilitate the mounting of the nose landing gear later.
The cannon troughs were installed into the nose at this time. The fuselage halves were now joined using strips of scrap plastic as reinforcing strips The rudder was separated from the vertical stabilizer, sanded down and re-glued in place with a slight offset to the right.
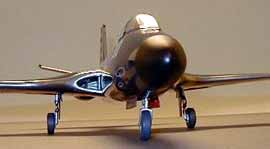
The wings were next. I decided to make the intakes open instead of using FOD covers. The inlets were cut out and round rod glued around the openings and faired in.
The wing halves were fitted together, but not glued together yet. The inside inlet tunnels were fashioned and glued in place into the interior of the wings. The first stage compressor fans were borrowed from a Mig-29 and installed in place inside of the wing tunnels.
The wing halves were now glued together and the ailerons cut out, sanded down, and then re-glued back in place. This gives a nice separation between wing and aileron surfaces. The wings were next fitted to the fuselage making sure that they were positioned correctly and that the correct dihedral was maintained.
The horizontal stabilizer was next. The upper and lower halves were glued together and the elevators separated, sanded down and re-glued in position in a slight downward attitude to show a little offset to them. Holes were cut into the fuselage the correct size to just allow a popsicle stick to pass through. Now a popsicle stick was cut to length, super glued together, using the plan, with the correct diherdal for the stabilizers and super-glued into the fuselage. The stabilizer halves were slipped over these and glued to the fuselage sides. The popsicle sticks give them plenty of reinforcement and maintained the needed dihedral.
You may note that I did not install any fuselage or wing formers to keep the wing and fuselage from collapsing while being worked on. I have found that I.D. Models' plastic is very thick, extremely tough and rigid, and doesn't usually need any additional strengthening.
Two bombs were found in the scrap box, cut in half, and used to form the exhaust housings. The openings in the wings were sanded out, and the bomb halves fitted into place and glued in.
The nose gear and main gear were made from telescoping brass tubing, detailed with oleo scissors, brake lines etc. and set aside for installation after painting was completed. All gear doors were also made at this time.
While trying the gear, I found that the model would not sit on it's gear correctly. It wanted to "tail sit". A hole was drilled into the forward wall of the nose gear wheel well and pieces of solder were cut and pushed through the hole, into the nose cavity, until the desired effect was obtained.
Now white glue was poured through the hole to keep everything in place. After the glue had dried, the hole was closed with a circle of plastic card. Using the plan as a guide, the panel lines were laid out and scribed.
The forward windscreen was cut from the vacuformed canopy and super-glued in place. A small amount of putty was used to fair it into the fuselage.
The entire models' seams were filled, sanded down and primered. Any refinishing was repeated until satisfactory seams were made.
Now the entire model was painted with several coats of AeroMaster flat Sea Blue acrylic. After the paint had dried, several coats of thinned down "Flecto Varithane" was misted on. After the Varithane had dried, the whole model was rubbed out with toothpaste. The surface was rubbed out until uniformly smooth. The wing, rudder and stabilizer leading edges were masked off and painted with SNJ aluminum. The intakes were also painted aluminum inside their openings. The areas adjoining the exhausts, on the tops and bottoms of the wings, were masked off and painted with a mixture of SNJ aluminum, copper, gold, and black. The wingtips, and rudder were masked off, painted first with SNJ aluminum to act as a barrier, and then painted yellow. The decals were from the spares box.
Wheels and tires were from the scrap box, and were enlarged to plan size by wrapping them with plastic card strips, puttying them up, sanding to shape and painting.
A gunsight was scratchbuilt, the cockpit detailed, the rear cockpit deck detailed, seat installed, and the canopy installed in the open position. The tail hook was made now and added.
Well, that's about it. Anyone who has built an I.D. vac will find this as "old Hat".
Those that haven't might find this article useful or entertaining. Till next time, Regards to all, happy modeling.
© Howard Weaver
This article was published on Wednesday, July 20 2011; Last modified on Saturday, May 14 2016