
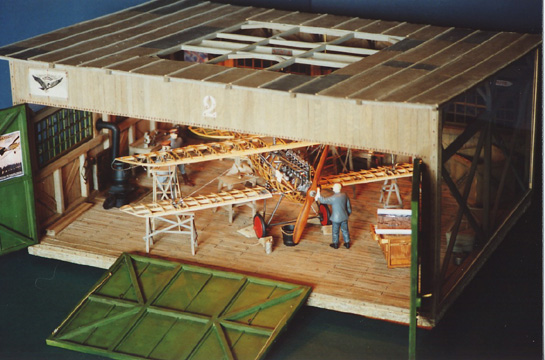
Albatros Diorama 1/16 Scale
By John Reid
The Idea
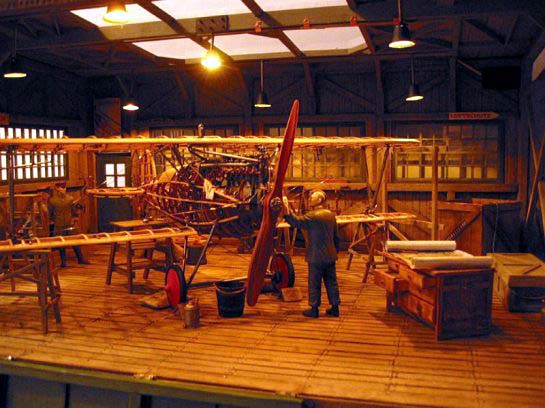
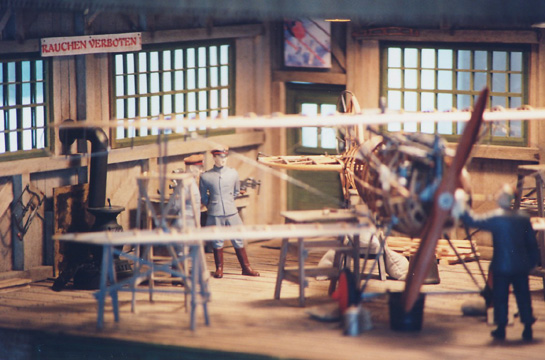
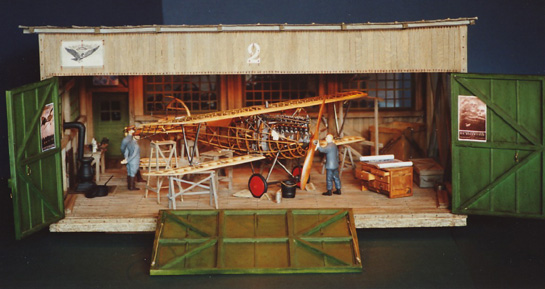
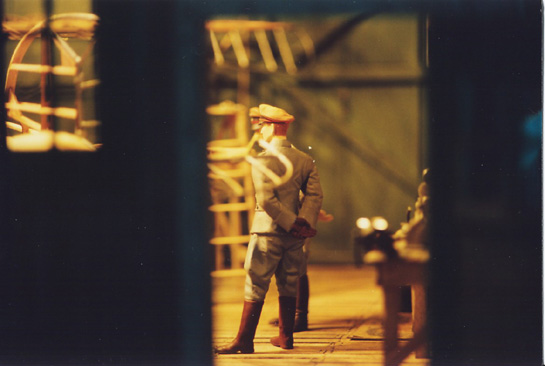
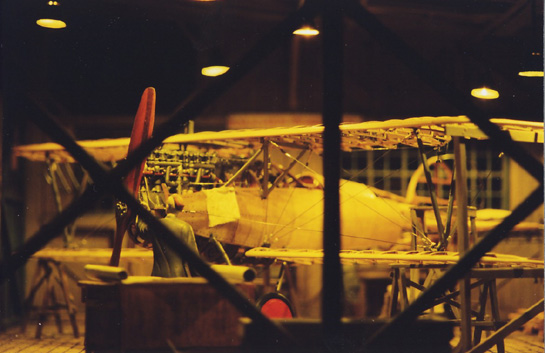
Somewhere in Germany 1918, the German Imperial Aviation Service has decided to have the Red Knight's old Albatros re-engined and recovered. Corporal Schultz is testing the oil system for leaks after having hand-swung the prop of the gleaming new Mercedes 180 hp engine. Both the pilot and chief mechanic seem quite satisfied with the progress so far...
Questions, Questions, Questions
Somewhere in Montreal, eighty two years later, I am sitting in my workshop wondering how I can pull this little scenario off. I know Model Expo has a 1/16 Albatros model on the market but is it too large? How big a diorama would I have to build? What about the 1/16 scale figures? Where can I find all the research material? These and a hundred other questions popped into my mind.
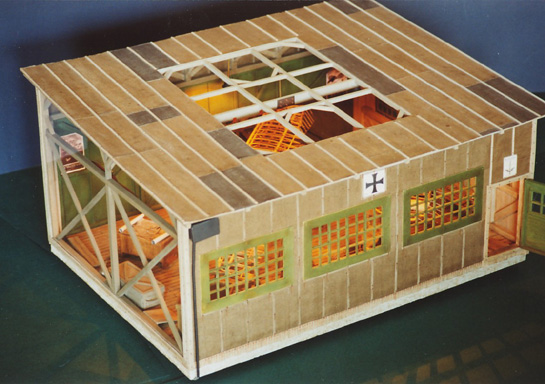
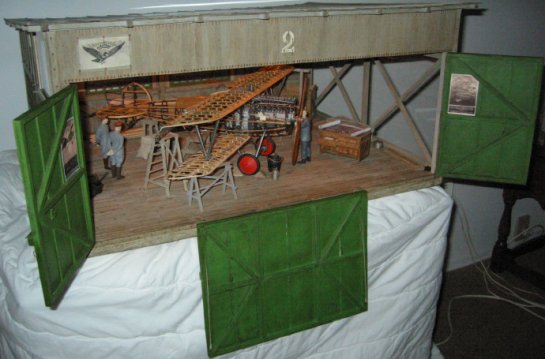
Then I thought, why not make the hangar one self-contained unit acting as its own dust-proof case. I could open up the sides, the roof, and set the windows in plexiglass, thus allowing the scene to be viewed from all angles. I then searched for the 1/16 scale figures and found that both Tamiya and Dragon had many action figures available. I would however have to demote Field Marshall Rommel and put him in the Air Force and in the wrong war (hope he doesn't mind). The World War II Luftwaffe figure became a World War I pilot and a German Infantry figure became the mechanic with oily rag in hand.

Now, on to the model's workshop contents. While I could easily build the furniture from scratch, what about the tools, lathe, oil and gas cans, etc.? Doll house manufacturers sell many of these items in 1/12 scale and tools come in various sizes therefore the difference in scale was not a concern.
That being settled, it was on to the hangar. How would I build it? Of course it would be made of wood, but where would I find all the miniature lumber without it costing me a fortune? Then my coffee habit finally paid off. Why not use wooden coffee stir sticks and maybe tongue depressors too? The local building supply store would provide the scale pine lumber for the studs and trusses. Problem solved. And so it went two retirement years and 1500 hours of shop time later and the project was finally completed.
How it was Done - The Aircraft Kit
Model Expo's Albatros D.V (MA1001) comes in a well packaged, sturdy cardboard box. The contents are well identified in individual plastic packets. The miniature lumber quality is excellent as are the laser cut parts on the plywood boards. The 47 page instruction booklet and 6 plan sheets are very well done but they do need a lot of careful study. The illustrations are clear, however, I do differ with the order in which the aircraft is constructed. They recommend building the wings and stabilizer first. I did the fuselage first. I find that having the fuselage completed gives me an added incentive to go on during the not so interesting tasks, such as building up the wing ribs, etc.
A lot of time was spent cleaning up the Britannia castings. Some of them were slightly bent and there was some pitting and rough spots on the metal. With careful re-aligning, filling with epoxy paste and sanding smooth, the problem was soon remedied. The only real problem was with the turnbuckles since many of mine were poorly cast. I probably got a bad batch.
The instructions suggest using the kit supplied metal colored thread for all the rigging. I, however, replaced this thread with .006 mm diameter music wire.

Method of Construction
The fuselage is built on a kit supplied jig. Construction is easy if you follow the steps carefully. No major problems were encountered in fitting any of the wooden parts together. I used both wood glue and super glue. Some filing was required on the metal parts in order to make everything fit together properly.
If you want to stain the wood, I recommend that you do it before assembly. In fact, I even stained and sealed the wooden wing ribs before removing them from their laser-cut plywood boards. I used an alcohol-based permanent tan colored stain, Primacolor PM-70 (sand). I then spray lacquered the wood using Watco brand semi-lustre.
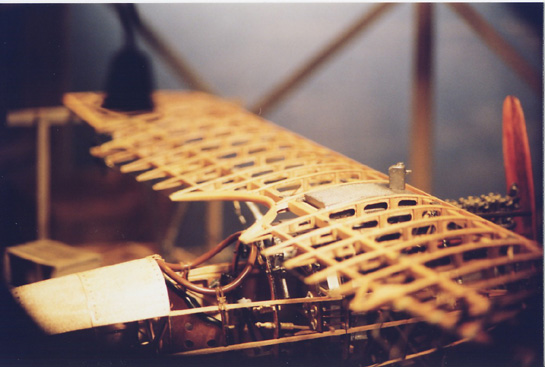
The wings and stabilizer went together easily by carefully following the plans.
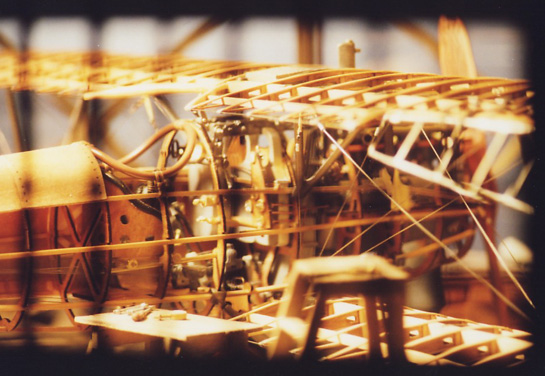
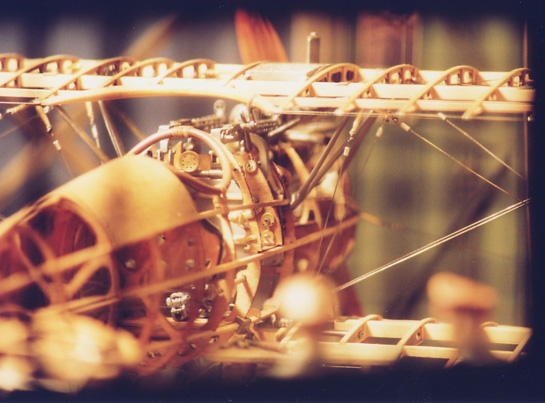
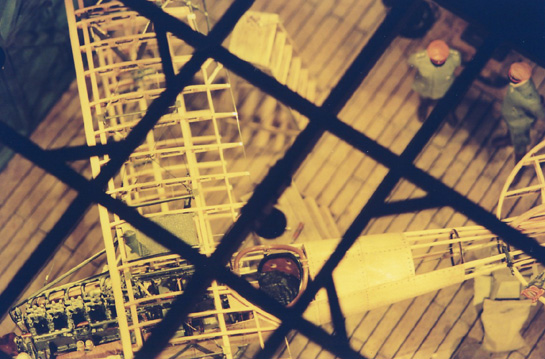
The Mercedes 180 hp, 6 cylinder engine, is a kit in itself with over one hundred Britannia castings. I did however find some of these parts a little difficult to handle, such as installing the small springs to the rocker boxes. Other than the usual de-burring of parts, the engine went together with super glue and five-minute two part epoxy.
All the metal parts throughout the aircraft were degreased, sealed and primed before painting. I used Windex ammonia window cleaner as a degreaser. It is important to remove any residue mold release agent (used during the manufacturing process) or any oil from your hands. I sealed the metal using spray lacquer or brushed it on using a solution of 2/3 laquer and 1/3 laquer thinner mixed in a small jar.
I sprayed or brushed on a thinned down coat of Gesso over the lacquer (50% water 50% Gesso). Gesso provides a good tooth for paint to adhere to and has been used by artists and craftsmen for centuries. I use the Liquitex brand 5308, available in any art supplies store.
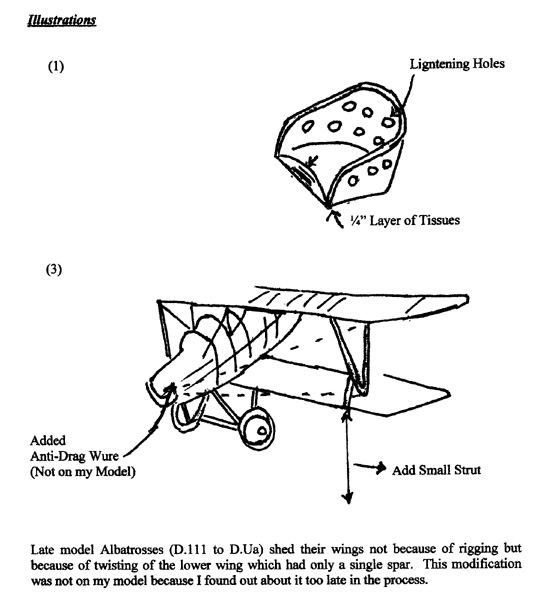
I made my own pilot's seat from 1/32 plywood. I bore out lightening holes in the back of the seat and made a seat cushion out of Kleenex tissues. I took a stack of tissues about ¼" thick, drew the seat pattern on the tissues and cut it out with an x-acto knife. Using a mix of 25% carpenter's glue and 75% water, I soaked the seat cushion thoroughly and then put it in the microwave oven for approximately 30 seconds. The cushion puffed up into a nice looking seat which I then painted to look like leather.
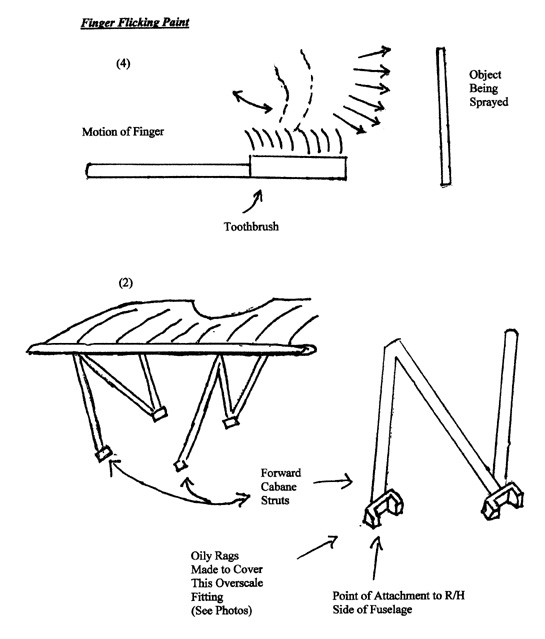
There is one area at the bottom of both forward cabane struts that I thought looked bad. I found them to be obviously out of scale, so I covered these areas with oil stained rags made out of the glue and water soaked tissues. I draped these tissue rags so that they look weighted and dried them in place using a hair dryer.
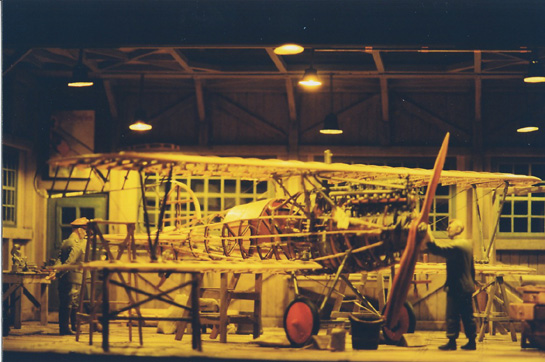
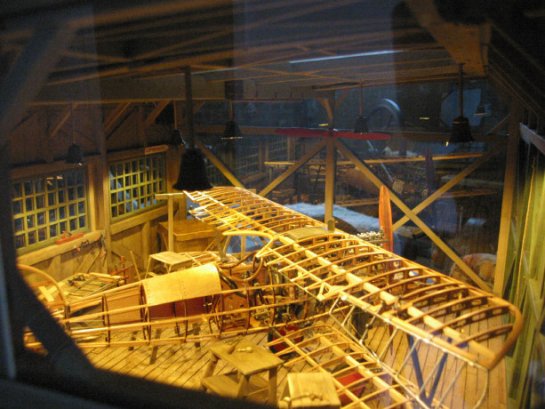
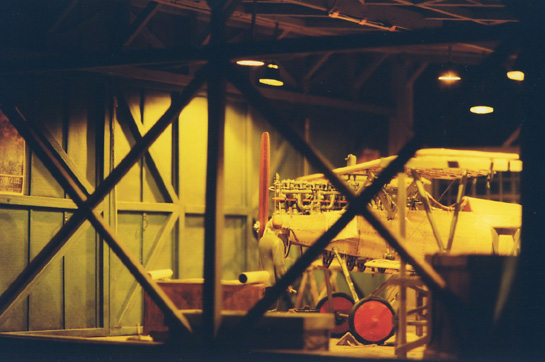
The Albatros D.V is well represented in this kit with only two areas in question. The kit was missing a small auxiliary strut that goes from the leading edge of the lower wing and then back to the forward inter plane strut. The other is in the rigging (Ill. 3). There seems to be another anti-drag wing wire going from the nose of the fuselage to the top of the outer wing interplane strut.
Because the aircraft in the diorama is being depicted as "under construction", the amount of details you put in is optional. However, I prefer to put as much detail as possible and I decided to partially skin the monocoque type fuselage using 1/32" plywood and simulating the screws with dots from a graphite HB pencil. I hand carved a cherry and walnut laminated wooden propeller and tail skid using the kit supplied items as patterns.
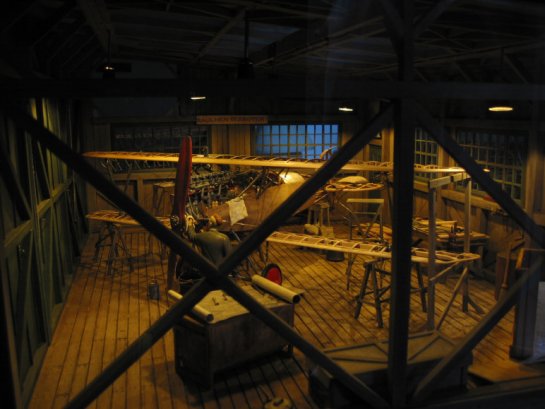
The Hangar
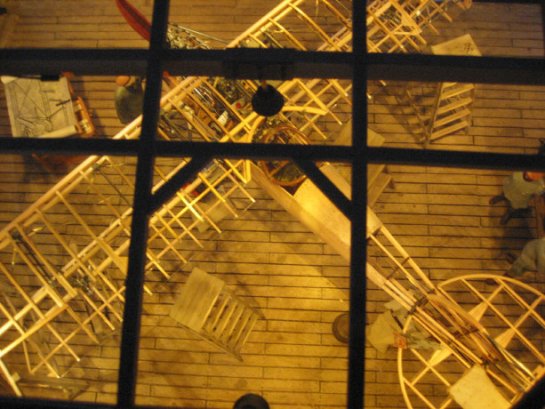
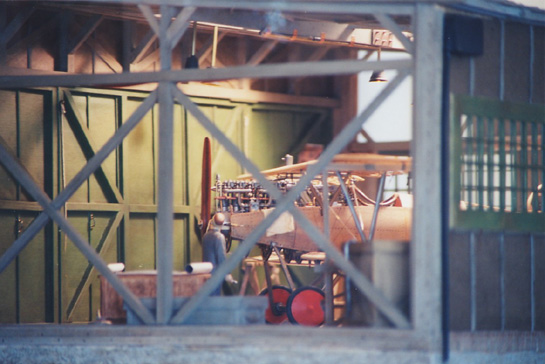
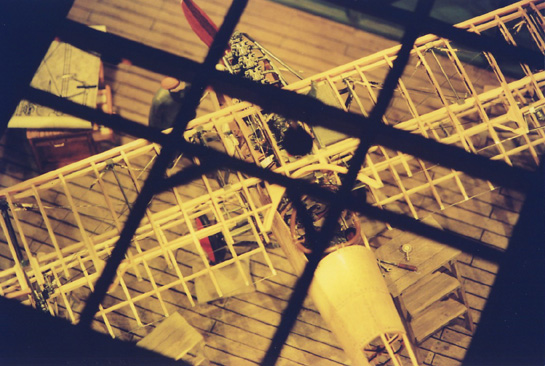
The hangar is made completely of wood. The frame was constructed much as you would a real hangar. Joists, studs and trusses are of cut-to-scale pine lumber and the floor and walls are made of wooden coffee stir sticks and tongue depressors whose ends have been cut off at 90o. Everything was glued together using Lepage's carpenters wood glue. The simulated nails are ½" sequin pins available from any dressmaker's shop. The windows are 1.5mm sheet plexiglass sandwiched between two built up window frames, thus avoiding having to cut individual window panes. The lighting is a standard 12.6 V (1.2 amp) system, wired the same as a model railroad layout, using a transformer for power. I used amber model railroad bulbs and some old Christmas bells as lampshades (See Shep Paine's How to Build Dioramas, pages 120 - 126).
I weathered all of the wood in the following manner. The stir sticks are made of hardwood (birch, I believe). In order to soften the wood to make it more porous, I boiled the sticks for 15 minutes, then on the dry, raw wood, I painted washes of a mix of Nimbus Grey tinted with a small touch of Payne's Grey. When these were dry (I used a hair dryer to speed up the process), I brushed on one or two very thin washes of Raw Umber. Using an old stiff bristle toothbrush and a very small amount of the same thinned Raw Umber paint, I finger-flicked (my term) a fine spray of paint over everything to give it a weathered look (Ill. 4). This same method was used to weather the hangar furnishings. In order to make the blueprints on the tabletop, I photocopied a rigging plan of the aircraft to scale and then lightly washed Ultramarine Blue paint on the drawing side of the plans. I then rolled them up to fit the tabletop.
The heating stove is a 1/12" scale Chrysnbon Inc. Furniture Kit F260. The legs were cut off in order to bring the stove to 1/16" scale. I painted it flat black using Carbon Black.
I use the Jo Sonja brand of acrylic paint because it is a gouch-acrylic, water-based paint that dries absolutely flat. Adding varying amounts of water-based varnish to the mix gives me complete control of the degree of shininess of any surface. As an added touch, I placed metal filings around the lathe, wood chips and oil stains on the floor as well as a few bird droppings on the roof. In future hangar dioramas, I will probably add a few bird nests in the rafters and a couple of mice running around the floor (just kidding...I must be going over the edge!)
The Figures
Other than modifying the uniforms from World War II to World War I, there were no major changes to the positioning of the figures' anatomy. The uniforms were altered by simply cutting off unwanted parts with a number 11 x-acto knife or building up some areas with A + B epoxy putty. It was mainly a process of simplifying and changing the style of the uniforms. The figures were both glued and their feet pinned to the hangar floor. Sheperd Paine thoroughly covers figure modification and figure painting techniques in his book on How to Build Dioramas. Figures used were Tamiya's Rommel Kit 36305, Tamiya's Luftwaffe Pilot Kit 36302 and Dragon's Signaler Kit 1608.
Composition
My primary objective in doing this diorama was to tell a story, to capture a moment in time, to take the viewer back to a different era and thereby create a three-dimensional work of art. It was my intention to have the aircraft as the focal point. This is the reason why I left it in pretty much pristine condition in contrast to the general griminess of the hangar. All the figures are positioned looking towards the aircraft in a relaxed stance in order not to draw attention away from the main subject.
The placement of the ladders, saw horses and furnishings is such that nothing is placed 90o to each other. Try to avoid lining things up in too much of an orderly fashion.
The diorama was lit much like a stage. The lighting emphasizes the aircraft itself which downplays its surroundings.
The use of color should also be taken into consideration. Grey is a neutral color and does not draw one's attention. Red and green are opposites on the artist's color wheel and therefore can be used to create color harmony.
In my work I am not a rivet counter, however I do like to have lots of details to keep the piece interesting. I try to be as accurate as possible, however I will use artistic licence for effect. Before and during a project, a lot of my time is spent researching the aircraft, hangar types, uniforms, tools, etc.
In retrospect, I am quite satisfied with the results of this, my first aircraft diorama. Many thanks go to Shep Paine for his inspiration and to Mark Miller for his wonderful website on the Albatros.
Biography
I am a retired pilot and flight operations officer. I spent twenty eight years in aviation doing everything from sweeping hangar floors to flying instructor.
In the 1960s, I helped my father restore a full size 1929 Curtiss-Wright Travelaire bi-plane D4D (CF-JLW) which now resides at the Reynolds Museum in Alberta.
I have spent the last seventeen years in the visual arts, teaching woodcarving and making decorative birds of prey sculptures.
During my working years, as a hobby, I constructed a 1/72 scale model of H.M.S. Victory over a fifteen year period and 6,000 hours of shop time.
I have been married to the same women for 39 years as only she (Micheline) could put up with me and my hobbies.
I presently have a Newport 28-1/16" diorama underway and am also working on a Wright Brothers Flyer. I hear through the grapevine that Model Airways has a 1/16" scale Jenny in mind, Hmmm! Now if I can only keep this 62 year old body in shape!
Dedication
There is no glory in war but there is honor. This aircraft model is dedicated to those airmen of all nations who fought honorably in aerial battles of the past, in the hope that there will be no more.
References
Books
- Albatros Flighters in Action Squadron/Signal Publications 46 1115 Crowley Drive Carrollton, Texas 75006
- Knights of the Air Time-Life Books 541 North Fairbauks Court Chicago Illinois 60611
- How to Build Dioramas Sheperd Paine Kalmbach Books
- How to Photograph Scale Models Sheperd Paine and Lane Stewart Kalmbach Books
Movie
- The Blue Max CBS/FOX Video Industrial Park Drive Farmington Hills, Michigan 48024
Sources
Models and Furnishings
- Model Airways Kit MA 1001 Albatros DU 3850 North 29th Terrace, Suite 101 Hollywood, Florida 33020
- Tamiya Kit 36305 Feldmarschall Rommel
- Tamiya Kit 36302 German Luftwaffe Ace Pilot Tamiya America Inc. 2 Orion Aliso Viejo, California 92656
- Dragon Kit 1608 Signaler Dragon Models Ltd. 603-609 Castle Pear Road Kow Nam Industrial Building 10/FL, B-1, Tsuen Waw, Hong Kong
- Chrysnbon Stove Kit F260 Chrysnbon Inc. P.O. Box 13 Western Springs, Illinois 60558
- Multi-Minis Doll House CD Catalog Hobby World 5450 Sherbrooke Street West Montreal, Québec, Canada H4A 1V9
Internet
- Mark Millers Museum Site http://www.pilots-n-planes-ww1.com Virtual Art Museum
- Holcomb's Aerodrome http://www.airminded.net/
Modeling Supplies
- A + B Epoxy Paste Hexcel Resin Chemicals 20701 Nordoff Street Chatsworth, California 91311
- Jo Sonja Acrylic Paint Chroma Inc. Lititz, Pensylvania 17543
- Liquidex Gesso Binney and Smith Inc. Easton, Pensylvania 18044-0431
- Spray Varnish Flecto Co. Inc. Oakland, California 94608
- Carpenters' Glue Lepage's Ltd. Brampton, Ontario, Canada L6T 2J4
- Prismacolor Permanent Markers
- Sequin Pins Symak Sales Co. Inc. Montreal, Quebec, Canada H4R 1C1
- Music Wire K & S Engineering Chicago, Illinois
© John Reid
This article was published on Wednesday, July 20 2011; Last modified on Saturday, May 14 2016