
Hobby Decal | 1/24 P-51 Mustang Stencils
Reviewed by Brad Hagen

There are only two 1/24 Mustang kits available, the old Airfix version or the new Trumpeter kit. I haven't seen the decals for the Trumpeter Mustang, but the decals for the older kit were really lacking. Hobby Decal has come to our rescue with a complete set of stencils for the large-scale Mustang. If you read my review on their 1/32 Mustang stencils, this review is pretty much the same as it is the same set, only enlarged and this set comes on three sheets.
When I found out I was going to get this set of stencils for review, I was expecting stencils for the propeller, the data on the side of the fuselage, and some no push; no step stencils. My jaw really dropped when I opened up the envelope and saw just how extensive the stencils set is, there are stencils for 65 to 70 positions on the Mustang, I never realized there were that many stencils on the Mustang!
Hobby Decal does their stencils as dry transfers which hasn't been common in aviation modeling, but has been very common in armor modeling for years and they have used them to get excellent results on their models.
Dry transfers are definitely different than decals and need a different approach. Hobby Decal has a stiff tag board insert in the ziplock bag that the stencils are in that has instructions in eight steps on how to apply them and if followed should give excellent results.
On the plus side they can be put on without having to clear coat your model first and they won't silver, you also don't need to put a top coat on after them like decals. If you are using the stencils in addition to decals then you'll need to go through the clear coat process and the stencils can be put on at any time, if you paint your markings like some modelers are starting to do, then the dry transfer stencils will save you that step. They also seem to look more realistic than decals.
There are some minuses as well. If you don't use a clear coat you will need to be careful in handling as the dry transfers could scratch. You also need to be very careful while you are putting them on as you only get one chance, if you put them on in the wrong spot or crooked, you can't reposition them like you can with a decal. Also, putting them on a curved surface isn't impossible, but it can be a challenge.
The stencils are crisply printed and are very easy to read, my scan is not clear and is not representative of the quality of the stencils. As I stated above, the stencils are very extensive covering all of the markings on the Mustang, they also include the propeller logos and the red L on the port flap.
At first I was concerned about where all the stencils should go as there wasn't a placement guide with them, then I remembered that the placement guide is on their site (placement guide), there are three pages for each plane showing both sides, the top, and the bottom. Some modelers may have preferred a placement guide included with the stencils, but they're easy to use either from your computer or downloading the photo (they're also working on Adobe files for each of the placement guides) and by doing it this way they have been able to keep the cost down per sheet because the dry transfers are more expensive to produce than waterslide decals.
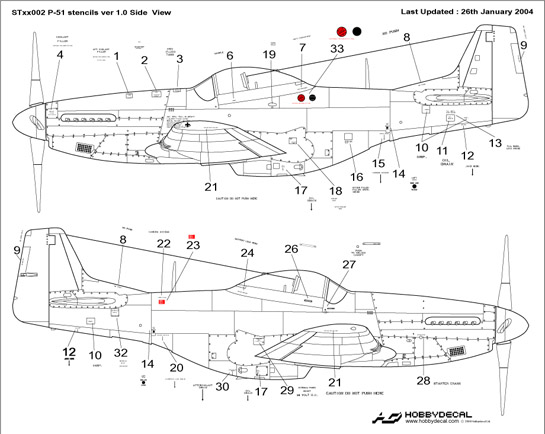
Looking at my references I was only able to find one discrepancy on the top view of the placement guide, the black and white stripes are shown in front of the flaps and should only be visible on the curved part of the flap when the flap is lowered. It is in the appropriate position, but should have a note stating not to use them if the flaps aren't lowered.
Pre/post shading and different types of weathering are really becoming normal, the stencils will really help make your model stand out. They have a gallery on their site which shows how well they look on the models.
They have stencils for a small range of World War II planes in 1/24 scale (Bf 109, Spitfire, Hurricane, etc.) and they are planning a lot more releases in the coming year. Hobby Decal is also looking for your input for which models you would like stencils for, they have an area on their site for that it or you can just e-mail them.
The cost isn't that much different than a set of decals and with some care taken while applying them can really improve the look of your model.
Thanks to Hobby Decal for the review sample.
© Brad Hagen 2004
This review was published on Saturday, July 02 2011; Last modified on Wednesday, May 18 2016