
Montex | Super Mask Special Edition K32122 MiG-3 (early) Conversion Set
Reviewed by Ray Peterson

A Quick History of the Early MiG
The MiG-1 and MiG-3 family were the result of a 1938 request for proposals for a high-altitude fighter. The MiG prototype, the I-200, was accepted for trials as it was considered to be the most likely to reach production the fastest. At least 4 prototypes were built, I-200 no.1, I-200 no.2, I-200 no.3, and I-200 no.4. From the second prototype, the I-200 no.2, the MiG-1 was born. It was rushed into production, Stalin already was very nervous of Hitler (rightly so!), and he feared the threat of German high-altitude bombers.
The rush to get the fighter to the front line, including factories working four shifts of non-stop production, created real problems for the pilots in the field. Workmanship was shoddy, and flight problems quickly surfaced. The problems got so bad, and so many accidents happened, an enquiry took place. Suffice it to say, people were shot, people were sent to Siberia, although Mikoyan managed to stay out of harms way. MiG had been working on the problems in the meantime. The 4th prototype, I-200 no.4, incorporated several design changes and became the MiG-3. Even with improvements, the fighter did not meet expectations. Built as a high-altitude fighter, its engine did not work well above 15000ft. At lower altitudes, its high-loaded wings made it not very maneuverable. It did have better aileron control than the Bf 109 at speed, so a tactic similar to what the US Navy had to use with its Wildcats was used: stay at speed; dive and use hit and run tactics. It also had a weak armament, two 7.62mm and a single 12.7mm under the cowl firing through the propeller arc. After a production run totaling about 3100 fighters, production was cancelled, not because of a better fighter, but because the MiG used the same engine as the Il-2, and priority was given to Il-2 production. Attempts were made to fit a radial engine to the MiG airframe, but results were unsatisfactory. A final attempt was made for a radial version with a complete re-design with help from wind tunnel testing, resulting in a prototype aircraft that could out-fly the La-5FN. However, MiG facilities were being threatened by the Germans, and the NKAP did not have anywhere for the MiG group to go. One of the Lavochkin production lines would have had to been converted, and the NKAP refused to lose any production of Lavochkins, so MiG production ended.
The MiG-3 is considered to consist in two versions, early and late, although there was no official Soviet designation between the two. It has long been asserted the early version was the “short-nosed” MiG-3, and the later version the “long-nosed" variant. However, recent research by Alexey Matvienko, Alexandr Ruchkovski, and Evgeniy Arsen’ev, found that all MiG-3s had the same length of 8250mm, and only the MiG-1 was of the shorter, 8155mm length. It appears the change came with the I-200 No. 4 prototype as MiG realized early they needed to move the center of gravity further forward. So by moving the engine forward, thereby lengthening the nose, they did just that. Therefore the differences between the early and late versions’ engine cowlings were more a function of easier access, and also coinciding with a new engine (AM-35A) and reduction gearing. For more information, please see the references listed below.
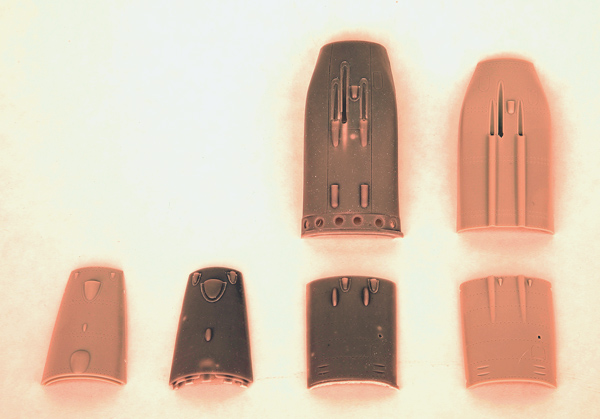
Finally, let’s get to the kit! The Trumpeter kit is of the ‘late’ MiG-3. Montex has now given us the option of creating the ‘early’ MiG-3 with this conversion set. It consists of 30 resin parts, including new top, sides and bottom cowling pieces; a new set of exhausts, air filters, and a new set of tail wheel doors. Also included is one half-sheet of instructions (basically a few simple diagrams) plus the famous Montex masks for 3 paint schemes. These schemes include two Soviet aircraft from early Summer of 1941, plus one captured machine in Soviet markings.
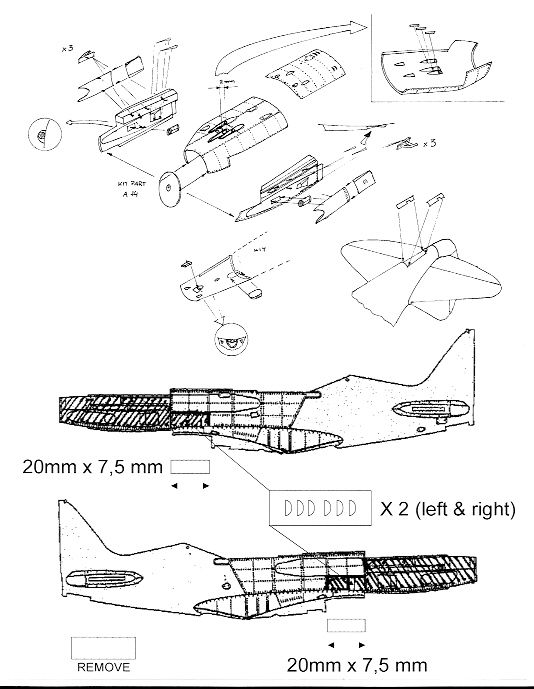
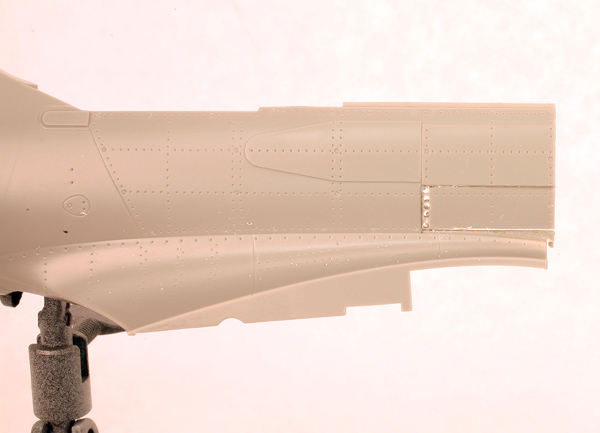
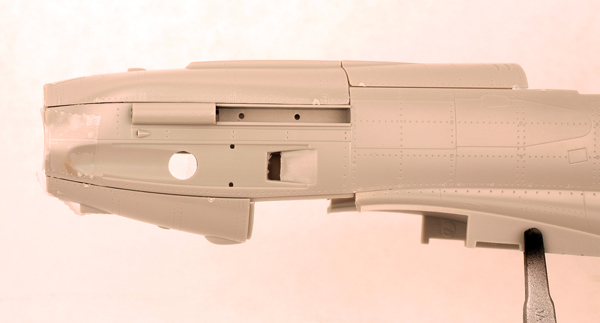
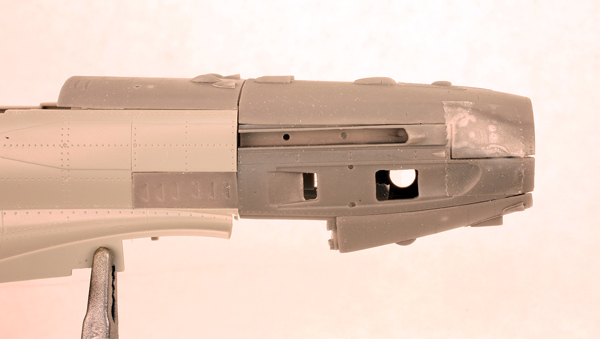
The cowling parts look very good and very accurate, based on the drawings of V. Voronin, in reference no 6. In the pictures, the Montex parts are the darker grey ones. The only thing I found missing is three tiny vents in the narrow panel below the exhausts. The conversion requires cutting the kit side cowlings from the fuselage which is pretty simple as the major cut falls on a vertical panel line. Not as easy is removing the small rectangular panel to be replaced with the vented item provided by Montex. What I did, after removing the side cowling, is to mark what needs to be removed, drill holes along the short vertical line then scribe then cut along the two horizontal lines. The first cuts were made slightly smaller than required and filed to the correct size. One note: the kit is a little off. According to the drawings, the bottom of the vented panel should be along the wing root, but the Trumpeter kit has the wing root curve down away from the panel instead of continuing straight then curving down after the panel.

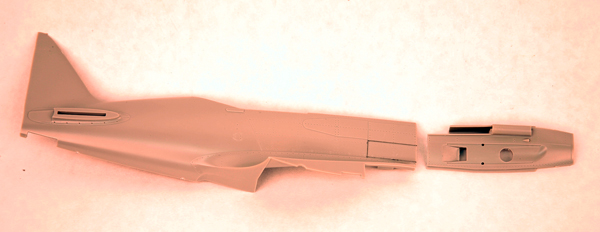
After the cuts are made each side, the panels are assembled pretty much the way the kit panels assembled. I am showing the major kit nose pieces versus the Montex conversion pieces side by side so you can compare them. The new pieces fit pretty well – I only have them taped together – but they will need a little filing and working to get them to fit better.
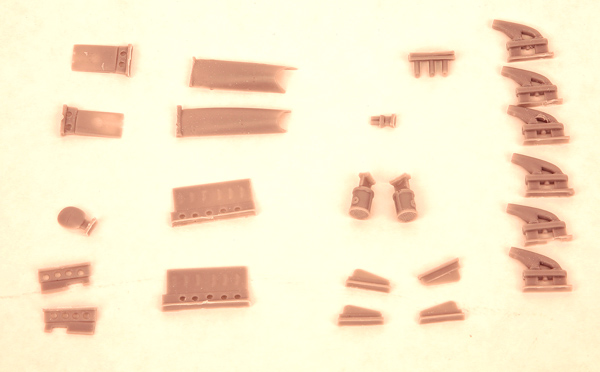
The other parts are pretty straight-forward, the exhaust stacks look pretty darn good, as do the intake ducting, and new filters. The tail wheel doors look OK, maybe the opening should be enlarged a bit. One thing to note: the instructions show them installed upside down! The slot is there to allow the tail wheel to stick through when retracted so keeping that in mind should keep you out of trouble. The kit also includes two triangular pieces to place alongside the oil cooler exhaust door, but according to Reference No. 5, these should not be there. So you may not want to use these. Also included are some resin stubs for the gun blast tubes, they aren’t bad, but these may be better represented by metal tubing cut to size. A small pair of tubes and an additional bump to place under the lower cowl round out the parts included.
So are we done? Not quite yet. There are a few other modifications needed to create an early MiG-3 that Montex doesn’t mention.. Most all early MiG-3’s did not have the leading edge slats in the wings, so those should be glued shut and the panel lines filled. The pitot tube should be cut from the mount and moved to the leading edge of the wing. Also, a new panel should be engraved in the lower wings. This was an armament access panel for an optional 12.7mm gun pod that could be mounted below the wings, and would actually make for an interesting addition to the early version, if one had the notion. According to Reference No. 5, the chord of the horizontal tail planes need to be reduced a small amount. This would be about an hours work or less with a file and sanding stick. Lastly, the wing root ducts should have a grille added; late versions had a solid shutter that closed on the ground to keep foreign matter out. I am not sure if the Trumpeter kit has that shutter or not; if it does, it should be removed.
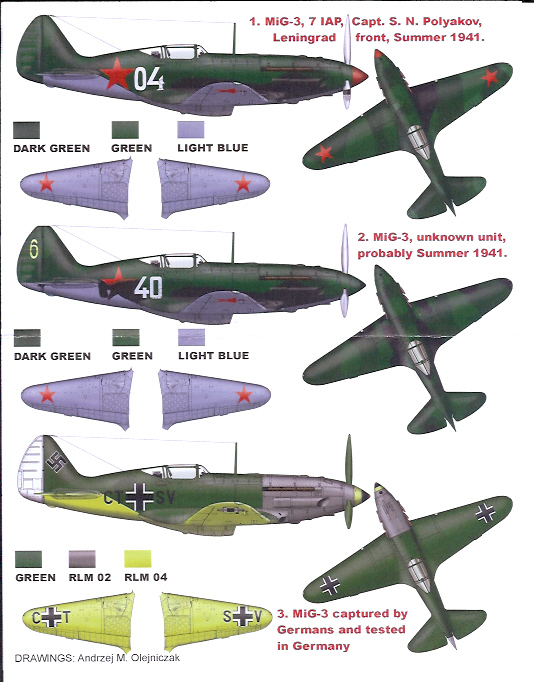
The schemes include masks for national markings and call signs for a couple of interesting two-green schemes for early June 1941. Note that “04” has stars on the top wings. These were to be removed by NKAP directive in June 1941, to be replaced by an extra star on the tail. Not included, a black and green scheme was also common on these early fighters. All these schemes coincide with color profiles in the Mushroom Models book (reference no.1). Masks are also included for the inside and outside of the kit canopy.
In summary, Montex does all the hard work in converting the Trumpeter MiG-3 to an early version. I do wish they had mentioned the other work needed to complete the conversion, no additional parts are really required (except maybe an alternate of horizontal stabilizers). However, with a little additional modeling effort, a very nice model can be built. Highly recommended.
Thanks to Montex for providing a review sample!!!
References
- “Mikoyan Gurevich MiG-1/MiG-3”, by Massimo Tessitori, published by Mushroom Model Publications. This is the best reference out there on the type, with great walk-around photos and detail drawings. It includes the updated research on the MiG.
- “Soviet Air Force Fighter Colours 1941-1945,” Erik Pilawskii. A great piece of research on Soviet fighters and their camouflage schemes and colors. It is based on the ‘old’ conventions, but one should visit the VVS Fighter page for updates, which is...
- Updates to SAFFC, http://vvs.hobbyvista.com/Research/SAFFC/New/Part1/index.php . Contains new research and errata to Soviet Air Force Colours.
- Modelling the VVS 1917-1950, http://vvs.hobbyvista.com/. The best site for Soviet WWII modeling, especially check out Peter Vil’s build of the Trumpeter kit: http://vvs.hobbyvista.com/Modeling/MiG/MiG-3/Trumpeter/Vill/index.php.
- Soviet Warplanes.com, http://sovietwarplanes.com. This is a page hosted by Massimo Tessitori himself, with a wealth of information on the MiG-3 and other Soviet fighters. There is a page specifically for backdating late model kits of the MiG-3 to the early version: http://mig3.sovietwarplanes.com/mig3/short.php.
- “Soviet Fighters of the Great Patriotic War: MiG-3, LaGG-3, La-5” by V. Voronin & P. Kolesnikov. This 1986 Russian publication, all in Cyrillic, has the most incredible set of detail drawings of these fighters I have ever seen. Many of the drawings of the MiG-3 are now included in Reference 1.
- “Early MiG Fighters,” Squadron Signal Publications. Some nice pictures and paint schemes, historically it is based on the ‘old’ conventional material.
© Ray Peterson
This review was published on Saturday, July 02 2011; Last modified on Wednesday, May 18 2016