
Pacific Coast Models 1/32 MC 200 Saetta
By Piet van Wykde Vries
As a South African, I have always had a great interest in the air battles of Northern Africa during WW2. The proliferation of schemes and odd tropicalized subtypes alone make for fascinating history. Add to that the unforgiving terrain, the open desert in some places touching the bluest ocean imaginable, under a sky as clear as crystal, and you have a setting for war that seems more comfortable in a science fiction or fantasy book, rather than in cold hard reality.
Italian aircraft have thus far, in my favorite 1:32 scale, been mostly the stuff of dreams, the domain of a few insane scratch-builders and vac junkies. This was a real pity, since there was oodles of fun to be had with these beautiful, and sometimes odd designs, not to mention the schemes. I think the Italians were the only WW2 nation to give the German mottlers a serious run for their money in the area of sheer artistry.
So when Pacific Coast released the first 1:32 Plastic/PE/Resin/Vac kit of an Italian plane, the MC 200 Saetta, I felt compelled to leave my safe injection molding world and venture out into the desert of multimedia.
At that stage I had never even touched resin before, only seen PE parts at Hobby shops, and only read about vac formed canopies in the tortured journals of crazy people. I was justifiably afraid, but with the advice of a few friends from Large Scale Planes, I felt confident that I could overcome my usual glue spraying and paint tossing, and build a fine kit.
I ordered this little gem from Hannants , and within 10 days had in my hands an unassuming box with some of the nicest artwork on it imaginable. Inside was all the little pieces advertised, a set of stunning decals, a bag of resin and some grey stuff that was perhaps the weirdest looking plane to ever shoot down another. I took no more than three steps back, made a running jump and was into the world of 1942 before the first part was snipped from the runner.
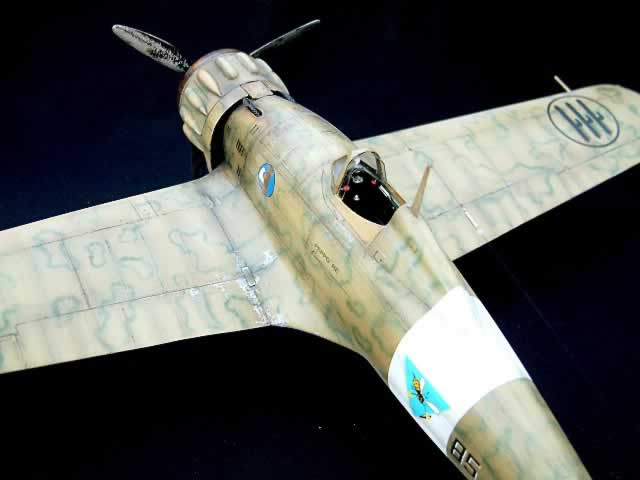
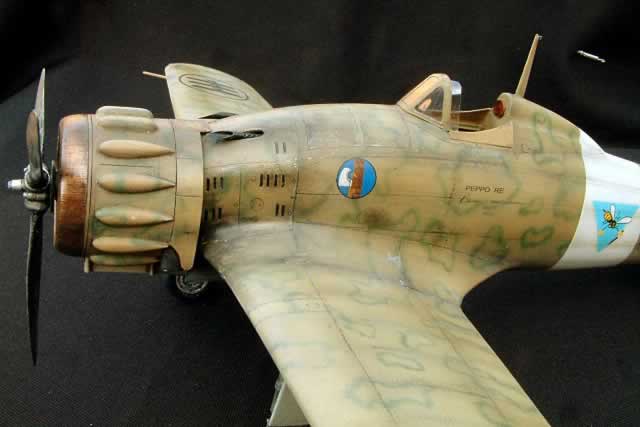
Now came the time for my first big blunder. I handed over the decals to my wife to, as is my habit, allow her to choose a scheme. (I have found involving her in the hobby in such a small way buys a lot of goodwill when it comes to spending more time and money on plastic!) The scheme she chose was, predictably, the one with the "cute little fly on", the smoke-ringed MC 200 of Giuseppe Re. This was a blunder because not only were smoke rings out of my level of skills at the time, but also since this particular model of Saetta had a canopy different from the one in the kit. Some scratch-building or serious modifications would be required, and that was another thing I had not done before.
And so I built this kit, making, like most first timers, almost every mistake imaginable. Choosing the more difficult scheme, model, not sanding and fitting properly, rushing, using wrong glues on PE and resin parts, not fitting properly, breaking off little pieces by clumsiness, losing others to Felecia (My pet Black Hole)…did I mention NOT FITTING things properly?
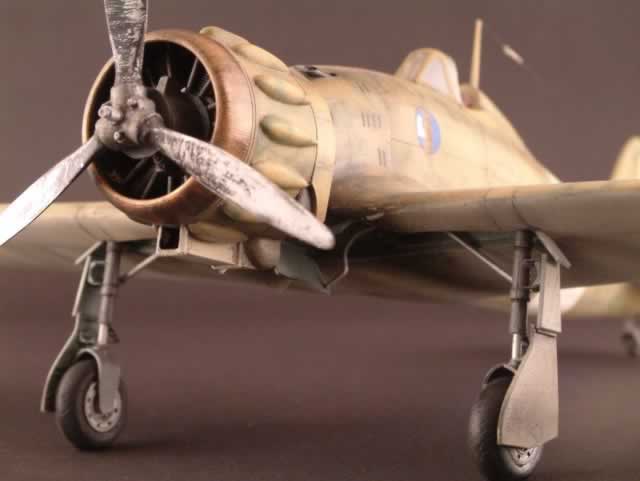
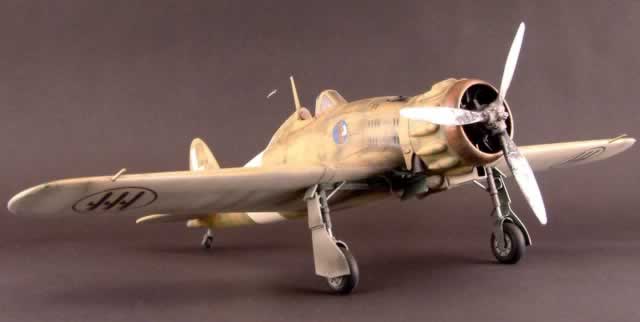
This kit, as I have now found with many such smaller industry kits, is not a perfect fit. But, Pacific Coast seem to have avoided most of the other pitfalls stepped in my other such manufacturers on their first attempts, like over-heavy panel lines and over riveting. This kit is a ggody, and if you take your time with this one, she'll go together like a dream, but don't take any fit for granted. Test fit everything 5 steps ahead until it all works! Some of the plastic parts will require a bit of sanding and thinning to work, but generally the fit of this kit is not bad. Some parts worse and other s better. The resin power egg fits especially well. It fits so well you can literally snap it together without glue!
Areas to watch out for though are the wheels, which will require some thinning, the gear bays, which will need a bit of sanding, and the cockpit sidewalls, which you will need to thin to allow easier fitting of the PE instrument panel later on. Apart from that, Bob's your uncle!
Of course I knew none of this at the time, and on several occasions almost messed up this kit beyond repair. The propeller hub I ruined using several different styles of Kung Fu, and what is there today is just an attempted save. The wheels I completely destroyed in ways not utilized since I was a toddler. The landing gear…what can I say. Gather experience with PE elsewhere before going here!
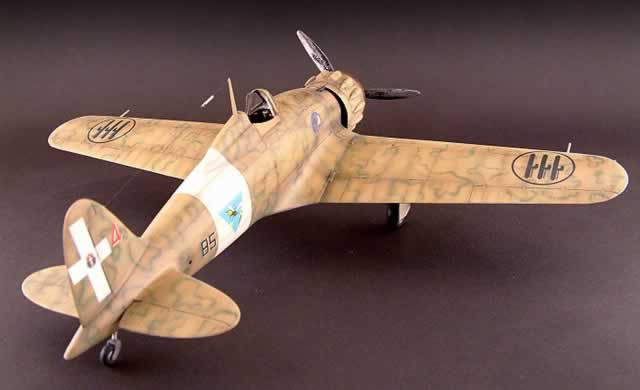
I replaced the wheels with wheels from an abandoned 1/72 B-29 kit. Sacrilege I know, but they fit, and the Italian boffin at the hobby shop did not even notice…The riveting I did less than 10 minutes and a half litre of sherry after getting Rosie the Riveter. They are completely fictitious, and in fact, border on the highly creative with a smidgen of self-reinforcing delusion thrown in. Not so some of the areas where I sanded away and rescribed panel lines in an attempt to hide areas where I super-glued myself to the fuselage. Those are just sad.
The canopy was, as far as first attempts at scratching goes, fairly OK. It looks good from odd angles, but revealed it's crookedness when viewed from straight on. Next time I'll do one with the canopy supplied in the box! I added, in selected fits of bravery, a few levers to the cockpit and some rods to the engine. I also re-did the headrest, to replace the one I ruined when trying to scratch the canopy sides the first time…
The antennae cable and spring was also an experiment for me. The spring is way oversized, but by that stage I just wanted my mummy, so I left it alone.
So as you can gather, building this kit was an exercise in errors for me. So it came as a surprise when I got the camo down on the first try, and the decals with even less trouble. Just as well I suppose. The finish saved the model for me. When done I sat back wide eyed and shaken, perhaps with a little PTSD and a mild concussion. I looked a lot like one of those little girls coming off her first roller coaster ride, and, like her, my horror stricken face slowly dissolved into a widening grin, followed by uncontrollable hopping around screaming "Again! Again!". This kit reminded me why modeling was such fun to begin with.
Now that I have learned a few things, I can't wait to do another. I would recommend this kit to anyone. Even a rank amateur like me, with no prior experience in these materials, could get this one together to a minor head turning level. The local hobby shop asked to loan it to display for a few months and that's always a good sign I suppose. (Not that they will stock it the cowardly bastards! We HAVE to make a plan to get this line onto South African shelves!)
Since then I have seen build-ups of this kit on the internet that are simply breathtaking. In the hands of a real pro this kit will be a show stopper. In my own ten thumbs it turned out to be, sitting on my shelf alongside the Hasegawas and Trumpeters, three steps back and a running jump more than OK.
© 2006 Piet van Wyk de Vries
This article was published on Wednesday, July 20 2011; Last modified on Saturday, May 14 2016