
Airfix 1/24 Hawker Hurricane
By Martin Planes

I first built this kit when it virtually came out over 30 years ago! I was twelve years old then and I still remember thinking at the time what a very impressive kit it was. With the advance of technology and the value of time and experience on my side I am pleased and surprised to say my view has not changed.
The level of detail is astonishing for such an old model and I have built it almost OOTB apart from the addition of the excellent Waldron Seat harness and buckles set. I did purchase this again with some fond memories but a few trepidations. The engine is a little beauty and apart from a few omissions for clarity or moulding feasibility's at the time makes up into an impressive little model on its own. I finished this in Warbird Acrylics German black and then dry brushed in a dark grey with all aluminium piping painted but then washed in a diluted mixture of dark earth and tan which gives a very convincing just rusting effect!
A personal note here: I don't 'silver up' my engines. They don't look right in any scale even in my chosen scale of 1/24. My advice is be confident in a good old black engine and then get your ref books out and shade away. They will always look far more realistic especially if you are producing battle weary Second World War aircraft.

Looking at photographs old and new I noticed that the oil tank directly behind the engine seemed to be a much lighter colour almost an orange. This was confirmed by looking at restoration photographs of the Shuttleworth Hurricane and others. I am not 100% sure but I think some Hurries had their tanks covered in the Irish linen which covered the fuselage which when doped was almost ox blood in colour. This then faded and became a sort of bleached orange which I mixed until I got a colour I was happy with.
The cockpit area is reproduced in keeping with the real aircraft with a wealth of detail and a dream for the super detailer. The cockpit cage was duly assembled and apart from a few more levers and switches made from the spares box nothing else was added apart from the seat harnesses and belt from Tamiya masking tape. This was then finished in Tamiya interior green (which I find a more realistic shade for RAF fighters in this scale) and then weathered slightly in a lighter shade of same and lightly dry brushed in aluminium.
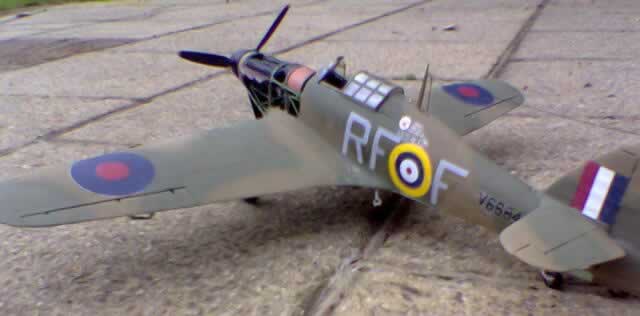
I did not use any commercially available instrument sets because when I played around with the moulded one I was surprised at the level of detail that was very finely present on the instrument panel itself. I used warbird acrylic 'German black' and then very carefully dry brushed the dials in white which even showed a very fine L and R for the turn and bank indicator! I spent a lot of time on these areas I hope the photos do them justice. Perhaps I should invest in a digital camera one day?

The fuselage went together reasonably well apart from the engine framework and cowling cage, which after a bit of persuasion with super glue eventually bonded together. This was then duly sanded and finished in 'interior green'.
The next stage was then making up the eight browning machine guns which you can show both compartments open. I chose just to show one of them off and again they are surprisingly well detailed. Once this stage was over it was time to mate the wings to the fuselage...oh dear!
To my surprise when I did my first dry run their was a hideous gap between the wing root and the fuselage of at least 2mm. I don't know why this occurred because the actual dihedral looked fine. Anyway this was duly filled and sanded with good old squadron green putty. The undercarriage is nice as well and again with a nice covering of aluminium and then washed over with some black ink it looked a treat. She really is a big model and I was seriously toying with putting her in a diorama but when your working in this scale the model is usually impressive enough. It was then time to start spraying.
I have a standard Badger 200 airbrush and use a Revell Amiga compressor. It probably is not the most effective of brushes but with a little patience I am pleased with the overall result. The Hurri was first sprayed underneath 'Lifecolor' Sky Type and then the Fuselage line and leading edges masked and then the whole top sprayed in Dark Earth. I then took a deep breath and free hand sprayed the camouflage pattern in Dark Green. In this scale I think the effect does look quite realistic. I then used an old sheet of Microscale red decal film which I cut to size and covered the gun ports. I thought this was a nice touch as during the war they used red tape to cover them before combat to see if the guns had been fired. Then it was time to apply the markings...oh dear!
I had decided to make a different example to that available from the Airfix kit and was pleasantly surprised to see some markings commercially available in this scale from a Polish company called 'Techmod'. Not surprisingly both examples available are of Polish Battle of Britain squadrons. This was fine by me as I have always envisaged the hurricane as the 'league of Nations' of fighter aircraft and the poles used it to great effect to get their own back against the Nazis.
Unfortunately I found these decals very difficult to achieve what I would call a realistic finish. Even using good old Microscale 'Sol and Set' they still 'Silvered' up and they had the most ghastly glare of a shine to them. This I managed to rectify by giving them a coat of matt varnish but they still don't look right to me. (Does anyone know a good tip to coat decals in matt varnish without them Whitening up') I then finished the model by lightly brushing Aluminium over the panels to give it a little beaten up appearance and 'Smoked' gun ports.

Overall I am pleased with the result but disappointed with the markings as I was very pleased with the airbrush effect I managed to achieve for the camouflage. My next project in 1/24: the mighty Stuka.
© Martin Planes 2006
This article was published on Wednesday, July 20 2011; Last modified on Saturday, May 14 2016