
Transforming a Spitfire: converting Hasegawa's Mk Vb
By Mark Proulx
For the Spitfire addict we must surely be in the golden age of 1/32nd scale model construction. We have a multitude of aftermarket conversion sets that enable us to build virtually any variant of what is arguably the most beautiful aircraft design of World War II. Spitfire conversion sets have been marketed by PPM, Paragon, Warbirds Productions and the subject of this article, the offering from HighFlight. At the time of the construction this was the only Mk IX conversion kit available.
The Hasegawa Spitfire has been around now for quite some time and this is a tribute to the kits accuracy and appeal. Unfortunately, raised panel lines do show the kit's age. Optional parts include two canopy and propellor variants, a tropical filter and external fuel tank. There is no doubt that a very nice Spitfire Mk V can be built straight out of the box!
The HighFlight conversion kit was released many years ago allowing the builder to create a Spitfire
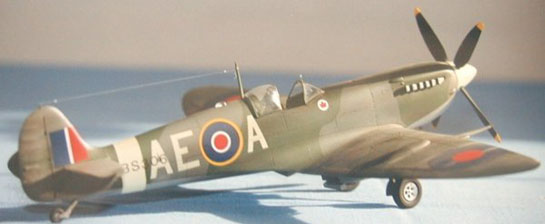
Mk VII, VIII or IX. I chose to build what I feel is the most beautiful of the Spitfire designs and construct a Mk IXc from 402 Squadron RCAF. So lets open the box and see what HighFlight has in store for us!
My first impressions of the conversion kit was that HighFlight did a great job on casting the resin parts. All were finely scribed. This is always a good indication of quality work in my regard. Resin parts included two underwing radiators, exhaust stacks, spinner, pointed rudder and a nicely cast single solid resin nose piece. White metal propellor blades and detailed instructions finish off the items supplied in the kit. Surprisingly, no cannons or there associated blisters were included with the kit. There will be more on that issue later. As with all Spitfire conversion kits, no decals were supplied.
Construction of the model starts with the same format taken on my Mk XIVc Spitfire which I have discussed previously. The first order of business is to rescribe the fuselage halves before removing the kit nose section. This supplies some sturdiness to the fuselage halves as you scribe. Once the scribing was completed I removed the nose section from the fuselage as indicated in the instructions. The cockpit interior was then completed straight out of the box. Waldron buckles were slid over paper cut to the proper width to represent the Sutton Harness. Black thread that was coiled over solder and glued to represent oxygen hose. Copper wire was used to portray the various wiring bundles that were visible in the Spitfire cockpit. Finally the interior was painted British Interior Green. A wash of Raw Umber was then applied to "dirty" up the cockpit. Various boxes and details were then painted flat black. To complete the cockpit a light dusting of Rub N' Buff silver was used to show faded and scratched paint. More severe scratching was added using a silver pencil. Now glue together the fuselage halves and add the HighFlight resin nose section. If you took your time cutting up the fuselage your patience will be rewarded here. For strength I used epoxy to attach the resin part. The fit of the resin replacement nose was perfect and even picked up on a fuselage seem! That would be one less gap to worry about. My references showed that a small blister needed to be added to the right side of the replacement nose near the front. This was done by adding a small drop of epoxy on to the nose. A toothpick was then used to move the epoxy into its proper teardrop shape. As I was constructing an earlier Spitfire, the resin replacement rudder was relegated to the parts bin for use elsewhere.
The next item to modify was more of a challenge as we move to the wings. The first item to accomplish was to remove the cannon blisters from the wing upper surfaces. This was required as the Hasegawa wings represent the earlier "B" variant not the required "C" version. This important area of the conversion was not mentioned anywhere in the instructions! The hole left in the wing was replaced with a piece of .040 plastic. Gap filling super glue was used to secure the "patch" into place. Now the upper surface of the wing was sanded smooth and a new Mk IXc wing was rescribed. Check your references! New cannon blisters were carved out of a block of styrene and added to the wing. They were attached to the upper surfaces of the wing as my references dictated. Keep in mind the version that you wish to build as there are many variations in this area. That completed the required changes to the upper wing surfaces.
The next area to be addressed was the underside of the wing. As laid out in the instructions, the wing undersurface radiators were first removed. Then, as with the upper wing, a piece of .040 plastic was placed into the open holes. The "patch" is then sealed into place with super glue and sanded smooth. Now, replace the radiators with the two items supplied by HighFlight. Use putty to fill in the remaining gap around the radiators.
Not surprisingly, the next items that needed to be corrected are also not mentioned in the instructions. First, the two large blisters on the underside of the wing were removed. This was found on the Mk V only. As with the other wing areas, a .040 piece of plastic card was superglued into the holes that resulted from the removal of the blisters. Additionally, don't forget to fill in the gap for the landing lights as these were found in this location on the Mk V only. The vents that were found on the outboard wing were also a Mk V item. These were removed and filled with gap filling super glue. Sand the entire wing underside smooth and once again checking your references, rescribe. The smaller blisters that were prominent on the underside of the Spitfire Mk IXc wing were now carved out of a piece of plastic, sanded to shape and attached. The wings were glued together with no significant problems. New cannons were cast from the items supplied in the PPM conversion kit and then glued to the wings.
The addition of cannons and their blisters is the major oversight and shortcoming of this conversion set. At no time were these items mentioned in the instructions! Of course the variations in cannon arrangements are a major feature of each Spitfire mark and I was disappointed at the poor research in this area. Be prepared to do a little work here. Thankfully, all the other conversion sets on the market have not overlooked this important item.
The horizontal stabilizer was completed out of the box. The only change here was to remove and drop the elevators. Once again check your references here as the elevators did see some changes in there service life. The wings were attached to the fuselage and a liberal dose of Milliput was used to fill in the remaining wingroot gap.
What we are now left with is a very accurate looking Spitfire Mk IXc! The model was first primed to check for any problems that may have been overlooked during construction. With that done the model was then sprayed in its RAF Day Fighter Camouflage Scheme using Humbrol paints and a Paashe airbrush. A final coat of varnish was applied and then a wash of Raw Umber laid overtop to weather the aircraft. A silver pencil was used to lightly scratch up access panels and wear mark locations.
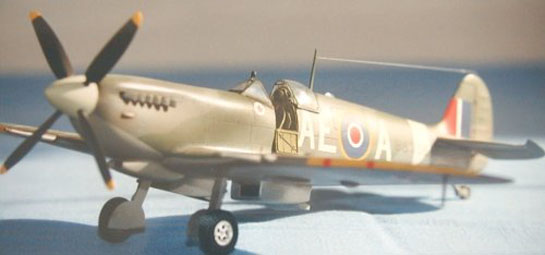
The superb HighFlight resin spinner was painted Sky. The white metal propellor blades were first painted yellow. The tips were masked off and the blades sprayed flat black. Finally, the propellor blades were attached with epoxy to the spinner and the whole assembly was glued to model. The landing gear was sprayed and attached straight out of the box with the addition of wire to represent brake lines and valve stems in the kit's five spoke wheels. The resin exhaust stacks were painted steel and added to the nose. Once again the fit here is great. Paint, polish and attach the proper canopy at this time. I scratchbuilt a new mirror from plastic strip. Gear position indicators were drilled out of the wing and portrayed with a piece of wire painted red.
Among the last items to complete was the addition of the appropriate markings. Hasegawa roundels and fin flashes were used throughout the model. The fuselage codes were cut out from a clear piece of decal film that was painted Humbrol Sky. That ensures that the spinner and codes are the same shade. The serial number comes from Letraset. Solid Yellow MicroScale decal was used for the leading edge of the wing. The RCAF squadron insignia was scrounged from the spares box.
Finally, add the antenna mast, pitot tube and open cockpit access hatch. The antenna wire is invisible thread which I find works well for scale effect.
That completes the latest addition to my Spitfire collection. With the great amount of aftermarket conversion sets out there I can assure you that this will not be my last! The HighFlight set surely captures the elegance of the Spitfire Mk IX and fits together very well if only they would have supplied all the replacement parts. Now, if only we had the same amount of 1/32 scale decals to choose from.
© Mark Proulx
This article was published on Wednesday, July 20 2011; Last modified on Saturday, May 14 2016