
Aurora 1/32 B-25J
By Luca Pennacchietti
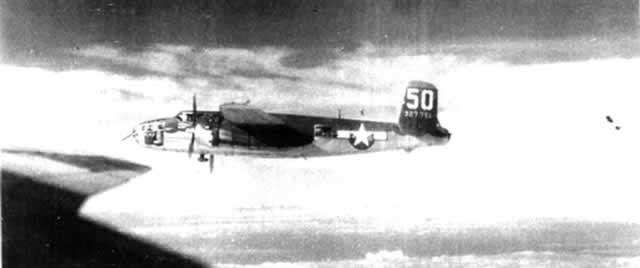
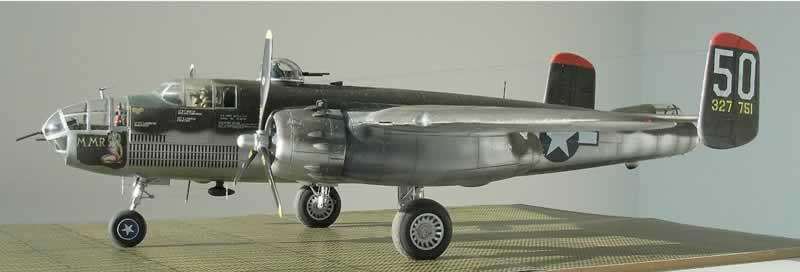
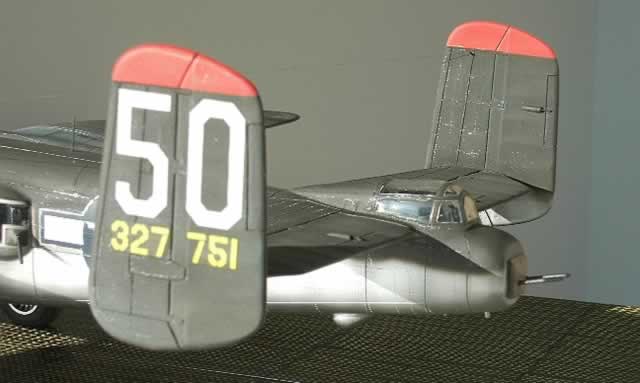
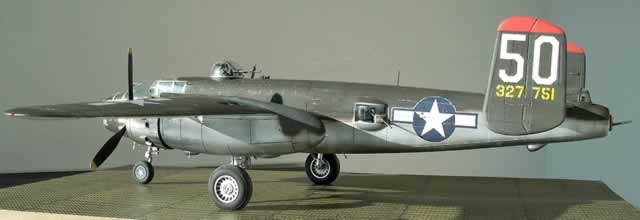
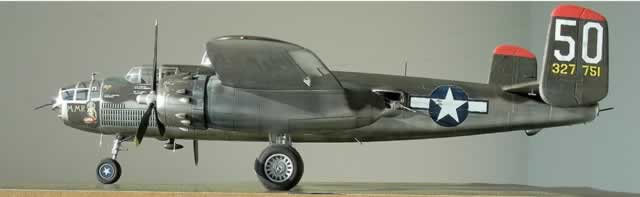
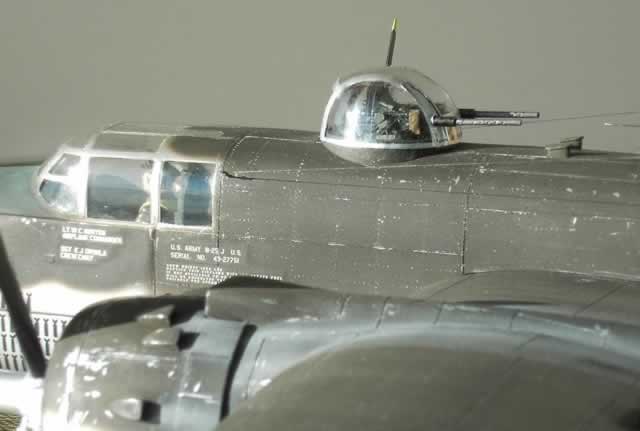
This model reproduces a B-25J based at Falconara, near Ancona, in Italy, just at the V.E. (May 1945). It belongs to the 12th AirForce, 321st BG, 447th BS, as indicated by the individual number 50. Squadrons of this Group previously had white Roman numerals on the tail.
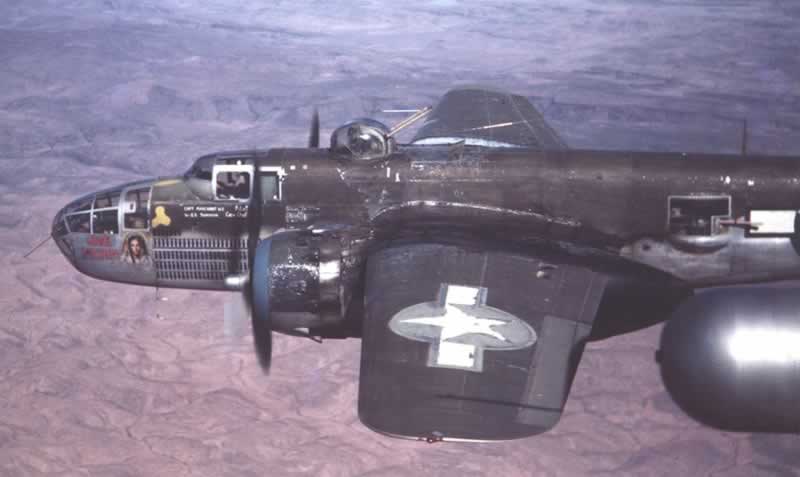
My late father, who was 14 in 1945, used to tell me about the military aircraft that he saw flying off Falconara's airfield. He has always had a special feeling for the B-25 and only in recent years I was able to discover which Groups they belonged to. I was lucky enough to find this beautiful pic over the Internet,
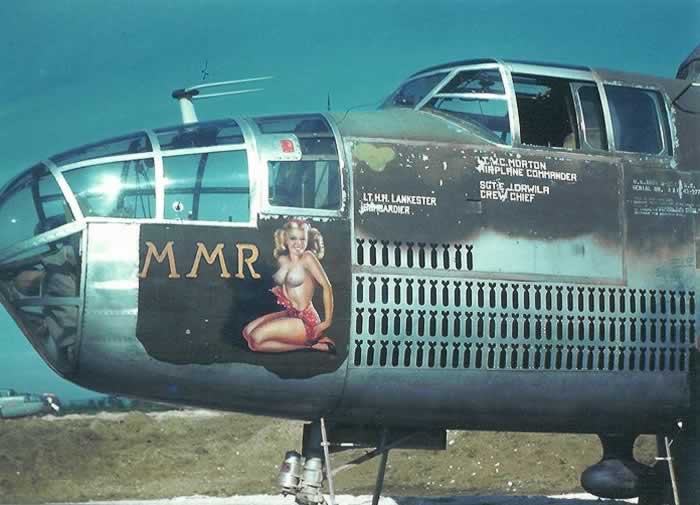
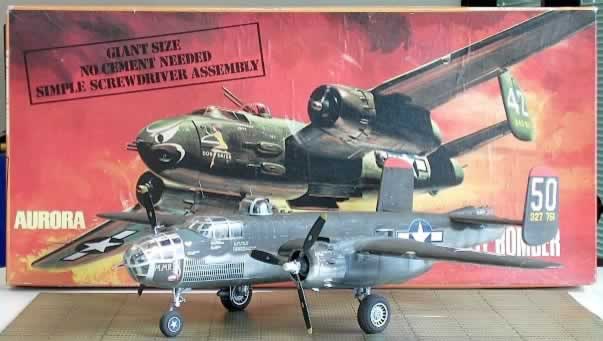
and I soon understood that this pic and most of the other ones available in the site were all taken at Falconara, my hometown, most likely at the end of the war by an unknown airman who wanted a souvenir of Group's aircraft. Fortunately, Mr. Donique Taddei, author of the book "USS CORSICA" (which I highly recommend), kindly provided these 2 other pics of the same aircraft, which helped much into building and finishing the model.
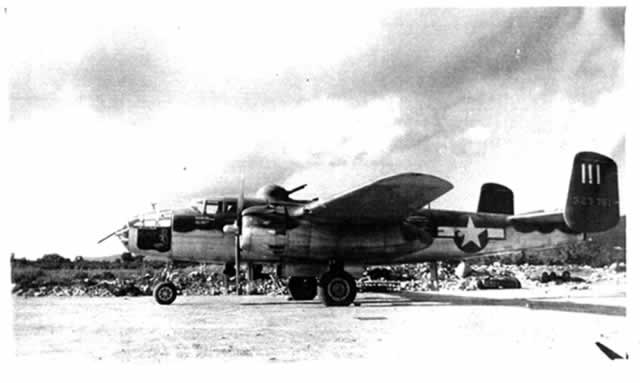
This additional pic shows "Ave Maria", of the same BG, and the overall weathering of the dark drab finish is evident.
It took me about 250 hours spread over a 6 months period to build this model, but I really think this is a 'must do', a belated tribute to the man who taught me the art of modelling and made me love military aviation. At least after 60 years this B-25 is back to Falconara! To read about the model's building, please look at the 2 articles already hosted on LSP:
http://www.largescaleplanes.com/Works/LucaPennacchietti/B-25/B-25.php
http://www.largescaleplanes.com/Works/LucaPennacchietti/B-25_2/B-25.php
The Build - Part One
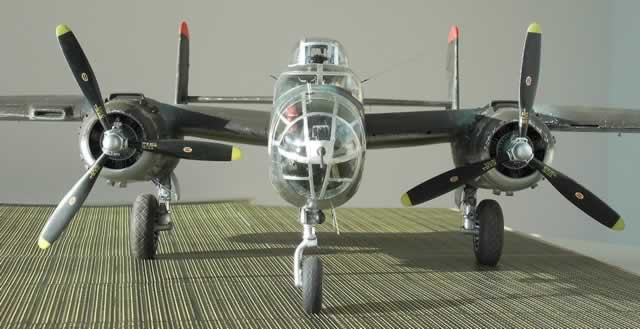
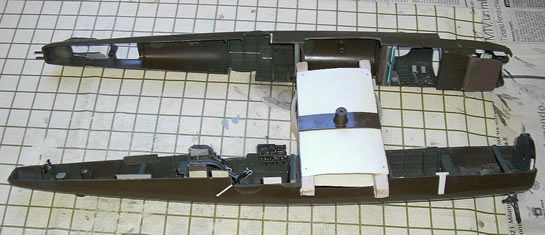
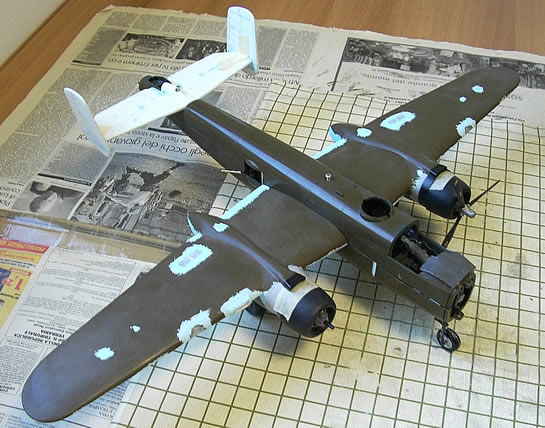
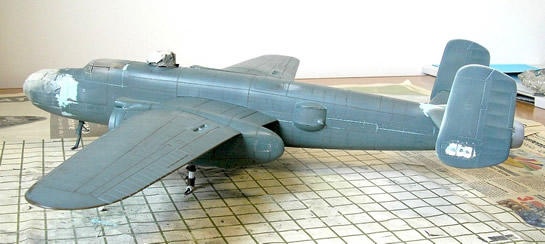
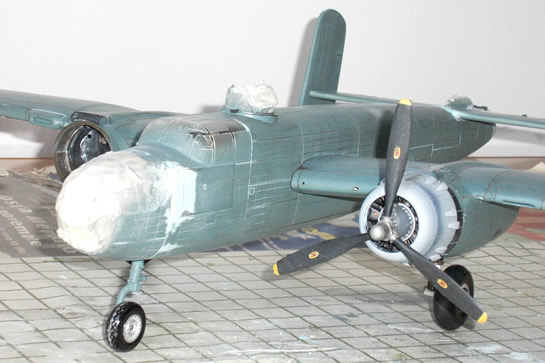
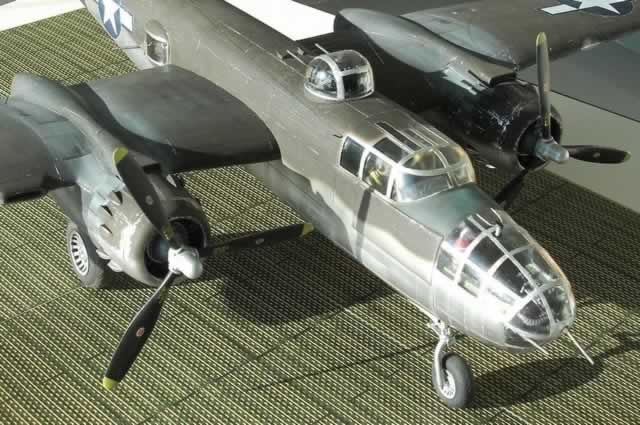
The fuselage is not finished yet and you can still see the lead weights in the cockpit I just placed to avoid the model to it down for the pics. I made the internal structure by paper card, the guns are resin copies of the one from a Sherman in 1/35 (I still have to replace the barrels) while the ammo feed lines are from the guns of a Monogram 1/24th Huey (7.7 miniguns).
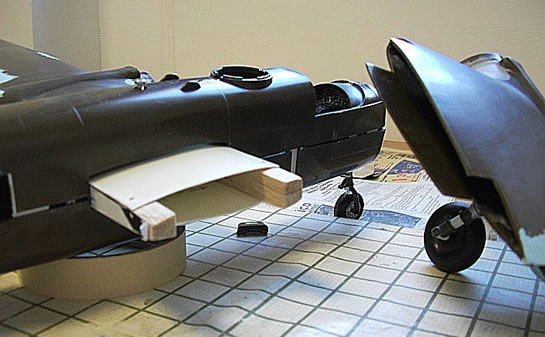
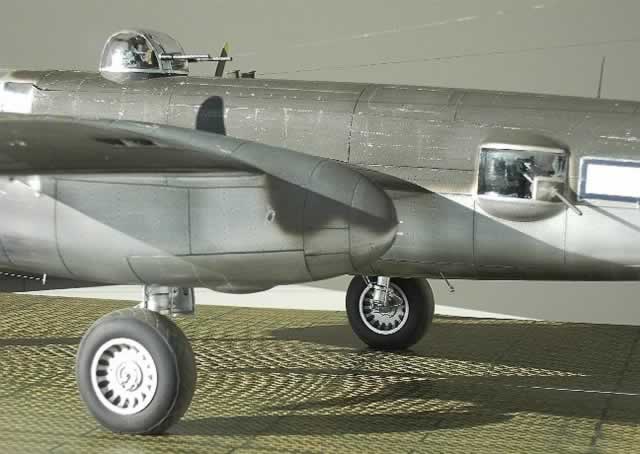
Landing gear are the metal wires supplied with the kit covered by plastic rods. Main wheels are provisional, nose wheel is the main wheel from a 1/48th B-25.
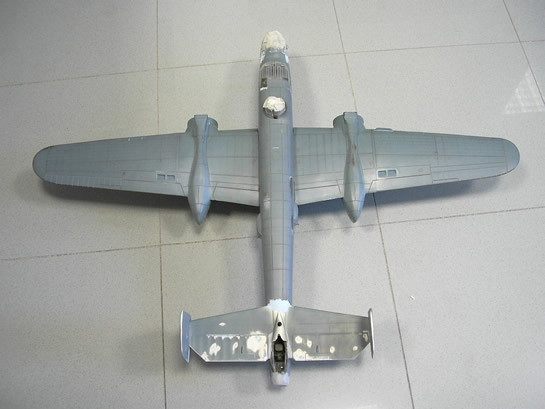
Aurora molded the upper half of the wings as a single piece but I simply haven't the space to store the model once completed. So I made a structure to hold the wings in place, it's made of balsa and plastic. It is held by a long screw. Wings simply slip over it into the fuselage. No glue required, and are removable.
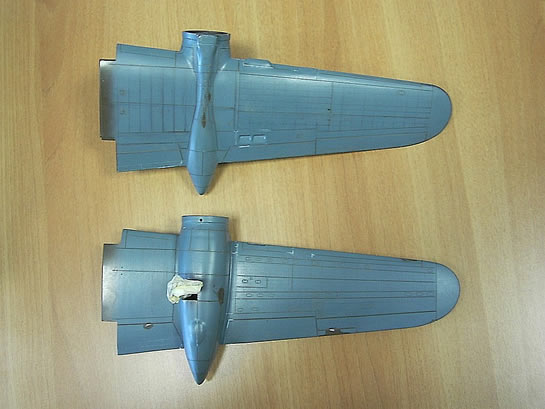
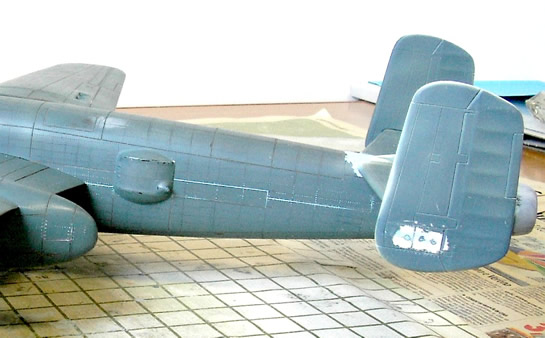
Tailplanes come from the Combat Models vac of the B-25 (actually copy of this same kit). They are thicker then those supplied by Aurora which are way thin!
All clear parts (not installed yet), including the bombardier nose, come from Guillows B-25, though they look about 1/28th scale.
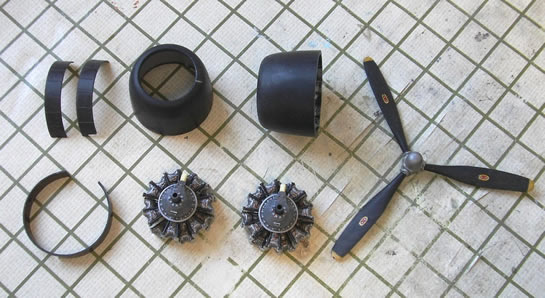
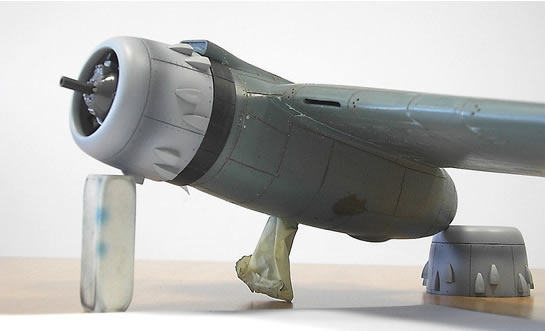
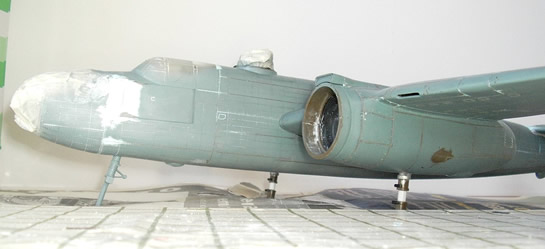
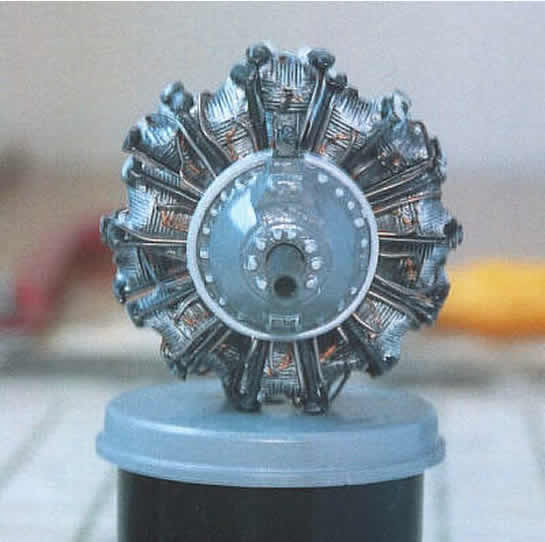
Engines are from Engines & Things (not completely painted), prop is from Revell's Corsair (I'm currently looking for another one...). Engine cowls are from Aurora but have been shortened and slightly reshaped. I added the landing lights on wing leading edges and also scoops and exhausts for the radiators (from Guillows). Wings have been sanded but not rescribed yet. Putty is still to be sanded.
The Build - Part Two
After the two fuselage halves have been glued together, extensive filling was needed along the seem. In fact I needed to raise the height of the model where the glass nose was to be attached, and this ended into a gap between the two halves. After filler has been sanded off, I scribed all the panel lines and made all the rivets by a riveting wheel sold by MicroMark. It actually leaves dashes instead of dots unless you carefully sand the sides of the wheel itself. The final effect is much interesting. The B-25 had overlapping metal panels covering the fuselage as you can see in this outstanding pic:
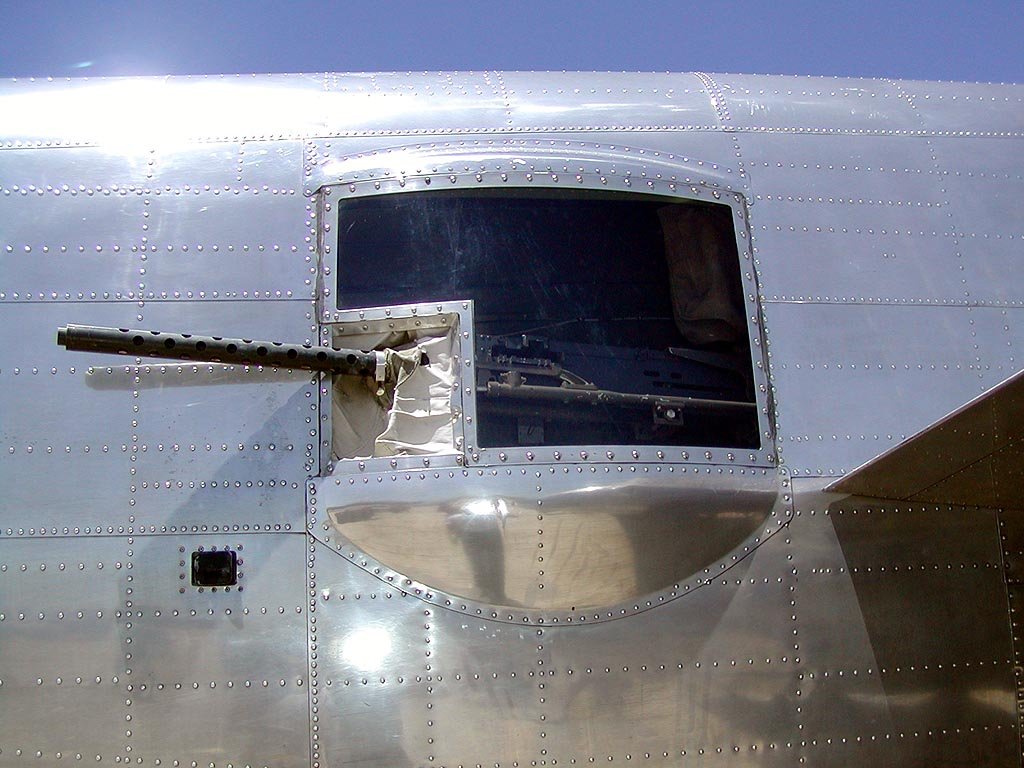
Both raised or recessed panel lines are inappropriate to replicate this. However I didn't want to go any further from scribing lines as I usually do.
A note to all modelers wanting to build a detailed Mitchell, in any scale. I have the Squadron In Action and the Detail & Scale books, plus many other books, booklets and magazines on this airplane. NONE of them has correct representations of the panel lines! I said NONE! You MUST check pics of actual aircraft to understand where they are. Especially about the whole fuselage (because of the overlapping sheets). I found big mistakes! I spent about 50 hours researching, drawing and scribing panel lines and rivets (and still have doubts)! I can tell that the Monogram 1/48th scale model is a source for correct panel lines planning much better then books. For example, it seems that almost nobody has ever drawn an additional glass below the nose on earlier Mitchells, though it's pictured at page 43 in D&S N°60. It's also visible in wartime pics. Again the ventral opening panel to allow panoramic photos aft of bomb bay is on the wrong fuselage half. And again at page 77 it is written that "each of the elevators had movable trim tabs that were controlled by actuators on both the upper and lower surfaces", and there are 2 pics one from above and one from below proving this....Hummmm, two actuators each tab simply cannot work! The view from above is of a wartime machine, the view from below is an airplane in a museum....Checking wartime pics, there are no actuators on the underside of elevators! They reversed the elevators on the museum machine and thus you think they are on the underside as well! They are only on the upper surface. I can't understand how these mistakes may happen on a well-known airplane of which so many survive all around the world.
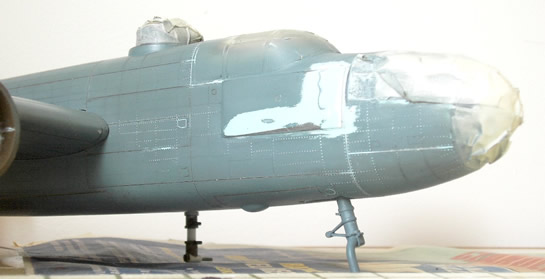
Starting from the glass (clear vac) nose provided by Guillows in their balsa model of the Mitchell, I made some resin masters to vac my own nose. Unfortunately Guillows is more about 1/30th scale (if not 1/28th) the 1/32nd and making some resin copies of its inner face allowed me to reduce the size. I own a Mattel vac machine and the usable area is small. My glass nose is thus made of 4 parts, joining together where the struts are on the real aircraft. In these photos this area is covered with tape. Of course everything in the bombardier compartment has been made from scratch, apart the seat on the bulkhead and the machine guns. More later on this.
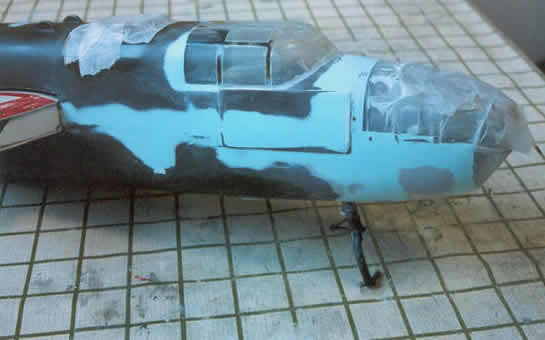
The canopy is the Aurora piece, brushed over with much Future. All clear areas again are covered with tape. Inside, I put two pilot figures because I wanted to add life to the model.
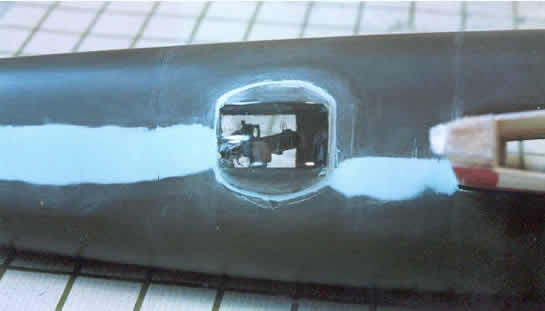
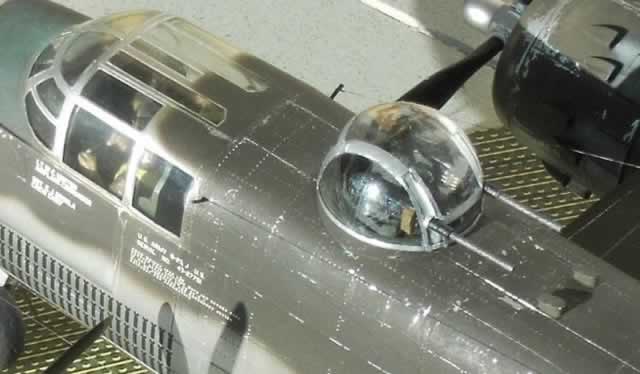
Waist guns glasses are vacuformed over a resin master got from Guillows' parts. You can see the photo-etched gun sight in this pic taken earlier during building:
The rear gunner clear parts are still missing from the model. Tails are still not glued into position
Engine, cowling and propeller are simply taped into position.
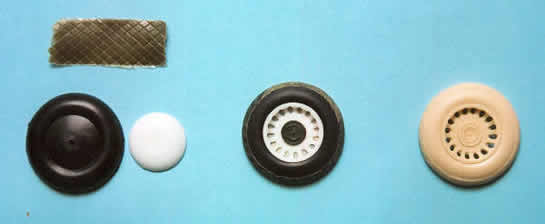
The resin half wheel is just to show the final effect. It's a resin copy of a master made out of half the Guillows' wheel, half a P-35's wheel and some thinned plastic copies of Monogram's Mi-24 cabin ceiling used as tread.
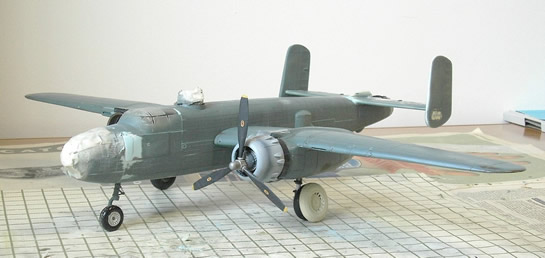
The Final Result
The hard stand of PSP (Perforated Steel Plates) is simply drawn on PaintShop and printed on heavy card stock by a color laser printer. It's flat but effective, still better then a plain table!
All markings were drawn by me by MS Paint and MS Word. No sophisticated software! Then they were printed on both clear and white decal paper by a color laser printer.
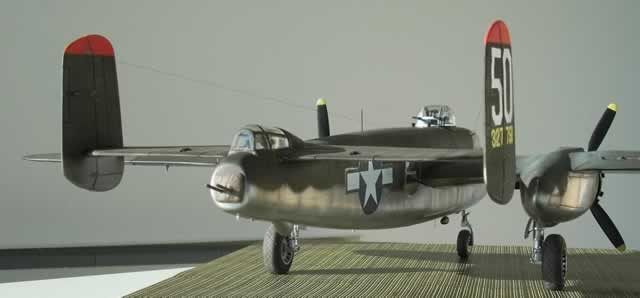
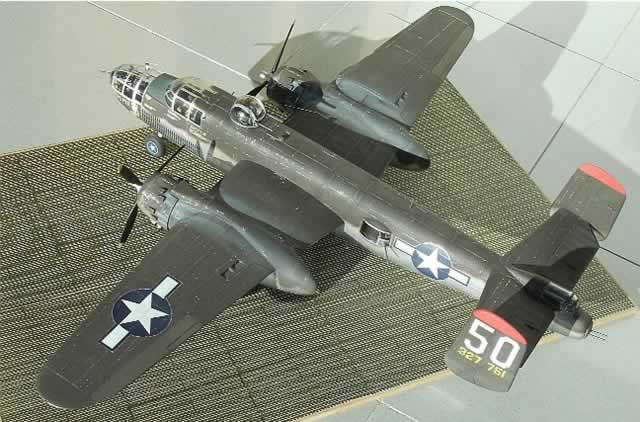
Undersides of the aircraft were left bare aluminium while upper-surfaces were painted olive drab at the depot before the aircraft being assigned to the Squadron. There was a thin unpainted line all around national insignia since Stars were covered before applying the camouflage green at depot level.
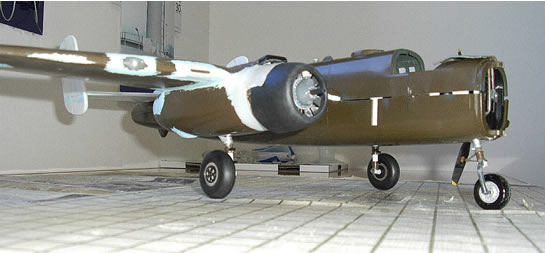
After the model was painted gray to scribe the panel lines and rivets, I painted the whole undersides glossy black. This was a base for Alclad's Polished Aluminium which was airbrushed in a light layer. Some Alclad's Aluminium was then airbrushed to give a different shine to some areas. Most of the under-surface were then polished with a polishing paste, others with SNJ's powder.
Engines stains were made by airbrushing light gray, black, light gray again and by using some white chalk powder. I also used some Gunze's acrylic 'Oil' to underline some panels around the cowling and to simulate some leaking. Upper-surfaces were first painted Humbrol's Polished Aluminium, then airbrushed with Molak's (an Italian firm) LG-81 green (a Luftwaffe shade!). I think it the best brown-green around to paint this model according to the pic of "Ave Maria" you can see above. I've read that the Olive Drab used late in the war was different from the shade of the early years, and more durable. Scratching the upper-surfaces with a wooden tool made the underneath metal to show.
Two pilots have been placed into the cockpit. I liked to add some life to the model this way. Both have been modified. One was the pilot of Revell's Bell 47 helo, the other was the commander of an Airfix Crusader III tank!
The black ADF antenna was provided by the Aurora kit... what a luxury!
Though early in its life this aircraft had a visible hub in the front wheel, there's a pic later on showing a cover with a white star. The blue background is a guessing from the black and white pic.
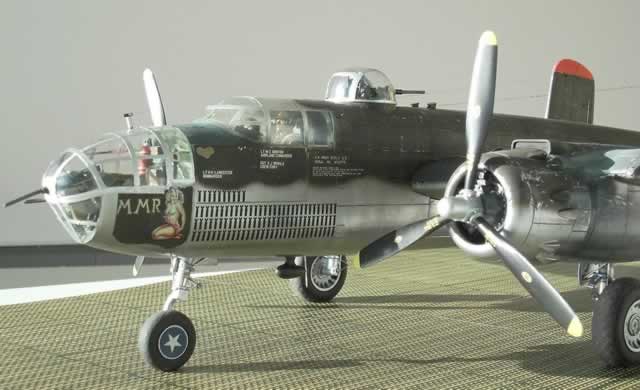
Engine, propeller, cowling and main landing gear are shown here.
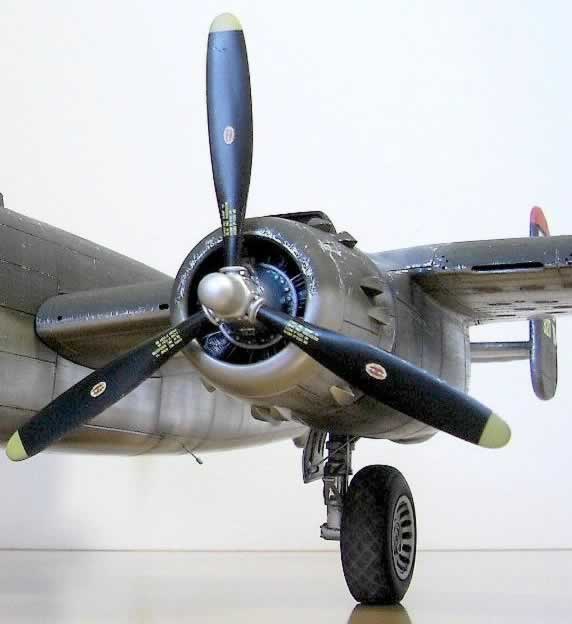
Propeller comes straight from a Revell Corsair F4U, the exhaust shrouds are plastic copies of the shroud you find around the first exhaust in a Bf 109.
Panel lines were not underlined with a wash. The dark color they show in these pics is a mix of the shadow and of the dark green kit's plastic scribed.
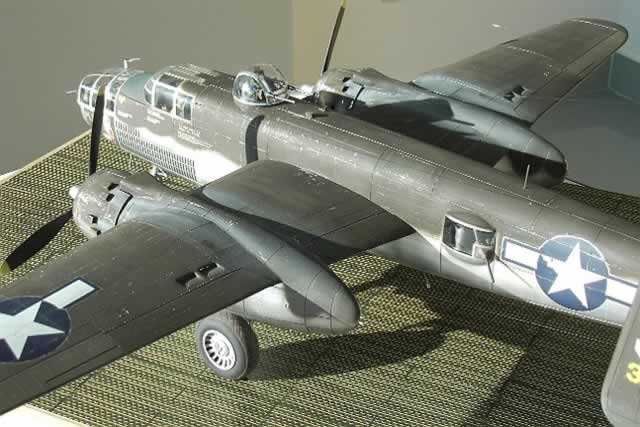
Aurora provided its B-25H with the flat turret dome of earlier B-25s. I couldn't use it. I've made a resin master out of the I.D. Models B-17 upper turret and vacuformed mine with Mattel's vac machine. The clear reinforcements on the side are thin stripes of clear decal.
I made all the inner structure for a total of about 40 single pieces.
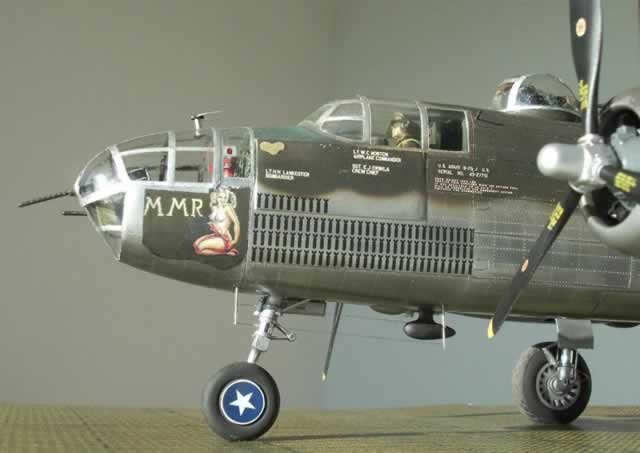
Inside the nose compartment I put the fire extinguisher, some ammo boxes, the ammo belt to the machine gun. Not visible in this shot, I've also used Revell P-38 Drop Snoot's Norden bombsight.
It is to be noted that there were a myriad different arrangements for the interior of the nose compartment with thousands little variations.
Color pic of the real aircraft shows that the fuselage in front of the cockpit was of a different color, perhaps the original anti-glare green, with lot of fading. In the end, I used 3 kits to make this model, they are (were) made by Aurora, Combat Models and Guillows. I couldn't do without any of the 3, since one or two aren't enough to do a good job. Aurora provides general parts, Combat the tailplanes, Guillows' many vac parts all over the airframe. I also used Engine & Things' R-2600 resin engines.
Given the high cost of the Aurora kit (I bought mine on eBay), this model ended up costing about 500USD. Sure I can't effort another such expensive model!
However I think that the about 250 hours spent building this model were of high satisfaction, mostly because of the link with this aircraft my father and my hometown had.
The sources I used include:
- Squadron Signal - In Action Series No. 1034: The B-25 Mitchell in Action.
- Squadron Signal - Walkaround Series No.12: the B-25.
- Kalmbach: Detail & Scale No.60: the B-25 in detail and scale.
- Osprey - Combat Aircraft No.32: B-25 Units of the MTO.
- Trafford - Mediterranean Mitchells.
- Lots of pics, articles and data from various books and magazines, too many to account for.
- Monogram 1/48th scale model of the B-25J.
- Maybe the best source of all: Internet! A repeated search for pics let me find most of the info I needed.
In general, beware of restored aircraft since they often show detail that weren't on the wartime aircraft. NONE of the above sources has correct representations of the panel lines!! I said NONE! You MUST check pics of actual aircraft to understand where they are. Especially about the whole fuselage (because of the overlapping metal sheets on the real aircraft). I found big mistakes! I spent about 50 hours researching, drawing and scribing panel lines and rivets (and still have doubts)! I can say that the Monogram 1/48th scale model is a much better source for correct panel lines planning then books.
Moreover in Detail & Scale book, at page 77, it is written that "each of the elevators had movable trim tabs that were controlled by actuators on both the upper and lower surfaces", and there are 2 pics one from above and one from below proving this...Hummmm, two actuators each tab simply cannot work! The view from above is of a wartime machine, the view from below is an airplane in a museum...Checking wartime pics, there are no actuators on the underside of elevators! They reversed the elevators on the museum machine and thus you think they are on the underside as well! They are only on the upper surface. I can't understand how these mistakes may happen about a known airplane of which so many survive all around the world. And again the Osprey book is full of mistakes…
The enamel paints I used are:
- Humbrol 75 for all fuselage interiors. Though not a perfect match for NAA Green, it's close enough.
- Humbrol Polished Aluminium for aluminium uppersides under the camo green (to save on Alclads!)
- Molak LG-81 for the camo olive drab, unfortunately OOP, weathered with shades of brown and green chalk powders.
- Alclad Aluminium and Polished Aluminium for all undersurfaces. Touches of SNJ powder.
- Humbrol 33 Flat Black for tires, weathered with brown and white chalk powders.
Decals were placed into position with the aid of white glue. They have been carefully trimmed. No clear cote paints were used on the model, no Future, no setting solutions... I'm quite sure they would have ruined the good effect of Alclad paints and of the chalks I used to weather the model.
Special thanks to Michele Magi, owner of the digital camera I used to take most of the pics, to Dominique Taddei for the info he provided, to David Reinecke and Sam Uberman who provided the two propellers and to my wallet for the more or less $500 spent for this model! Thanks a lot for your interest into this model. If you like to reach me for any comment or question, please email me.
© Luca Pennacchietti 2006
This article was published on Wednesday, July 20 2011; Last modified on Saturday, May 14 2016