
Vac 1/32 Do 217J-1 Nightfighter Build
By Larry Hawkins
As for all vac kits it's basic, and the more I build of them the easier it gets.
First like all the others I have done is to cut out and sand all parts to shape and right contours and such. After this was done, I started on the fuselage and putting in the cockpit and added the usual stuff, seats, equipment, instrument panel, the rear radar set and misc. box boxes and etc. Cut out a few bulkheads to give the fuselage strength as to the balsa strips that were added to the edges of the fuselage and were sanded to the very edge of the fuselage before the cockpit was added to the right side of the fuselage. When all was set I glued the cockpit into place and zapped it with accelerator for the glue. After this was done the other half of the fuselage was aligned to the right side and again glued in to place.
Before I did all the above I had already cut out the vac formed canopy piece off the fuselage. But after all this was said and done, I went for the wings and cut, sand and set them up for gluing, and again sanding to shape. Then the tail section was next in line and the pieces were sanded down and set to be glued and sand to shape and places that needed to be cut out, there were two vents on the tail plane that had to be cut out as to the plans. I set the tail plane in to position and they too were glued into place as to the plans and set to the angle they're suppose to be.
I let it set for a couple of days to get some more info from some other guys who sent me some intel. After this was gone over, the wings were attached and they were glued into place, but before this was done, I added two pieces of balsa wood supports for the wings to give them strength and so it will not let the wings fold up if the balsa was not put in, if you know what I mean about vac kits. They need it or it's going to look funny.
After all this was done I proceeded to add the clear piece over the opening and that was glued into position, masked off and gone over with spot putty around the edges of the canopy and left to dry over night. When this had dried, I then wet sanded it to make it smooth and blend in to the fuselage sides.
The next thing I did was to convert the Do 217 to a Do 217/J-1 from the pictures I found on the web. I didn't use the kit nacelles, I choose to rebuild the nacelles for the J model out of autobody putty. It took some work but after a few days of sanding and resanding it finally started to look like nacelles for this type of A/C. I had a spare sheet of JU-88 vac parts that was given to me by a guy that didn't need them. I used the cowls from this sheet for the BMW engines to be fitted to the nacelles. I had two Hasegawa Fw 190 engines lying around and were added to the cowls before they were glued into place, they too were sanded and shaped to fit the nacelles right.
I then started adding mixed putty to the areas of the tail plane joints and the wing joints as well. There were gaps which always show up when building vac. Let the putty dry for two days so it can cure right then sanded them to the contours of the fuselage and sanded smooth. The nacelle bottoms were then cut out and added an inner wheel well and glued these into place. All the landing gear legs were then scratchbuilt and added to the wells. I used solid rod for these and used R/C wheels and tires. These are available where R/C planes are sold and come in handy. All I do is measure the diameter of the plans and go to a shop and get what I need. Of course the German A/C has the smooth tread on most of their A/C but when I need the diamond tread for the American A/C then that's a problem. The only thing I did with these was to make new centerpieces for the wheels and that was it. The tail wheel was also scratched and I used a 48th scale wheel and tire that came from the Monogram 262. Here also I scratched the wheel well and added details to the gear doors and when I started painting them, they were painted RLM 66.
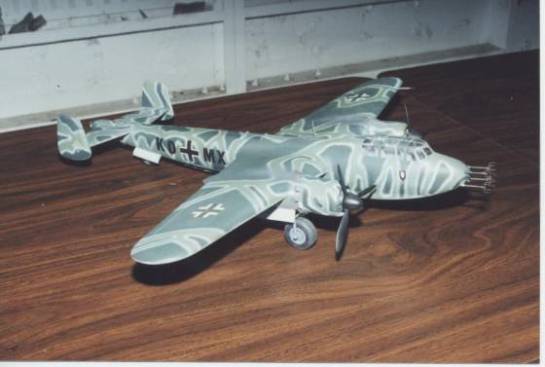
After this was done I went over the whole plane and gave it a light sanding using an old scuff pad that I use when painting cars. When it was ready for the paint, I primed the whole plane and let it set up for three days to give the primer proper drying time for it, there are times when primer, regardless of how many coats you put on it, the primer may eat and seep into the paint. It has happened to me and it can cause problems when you're 99.9% done. I then went on to mix up the paint for the scheme I picked out from pictures that I had on hand. I choose the RLM colors of the dark green and the medium green splinter pattern. These were applied free hand with a Badger double action airbrush. It comes in handy when you're doing finely detailed paint jobs.
This paint job was a little to say the least more intense than the others that I had done on German A/C that I have done in the past. It had a lizard like pattern on the sides and top of wings and tailplane. But when all was said and done it turned out better than I first thought.
After the plane was left again to dry for a couple of days, I went to the decal box and dug out the white cross and etc. for the markings. Since there is no 32nd German lettering, I used the vinyl type lettering that u get at the stores where they sell office equipment. There about as close as to this type of lettering that I can get. When all decals were in place and all were dry and the lettering was also in place I gave the entire plane a coat of flat that model master makes.
Finally I added the antenna wire from stretched sprue. But before this was done and the decals were added, I scratched the FG/202 radar antenna from staples and plastic rod and glued into place. Now it was done to my satisfaction. It took 3rd place at the contest in Topeka, KS. On April the 7th of this year. My thanks to Howard W Qeaver and his tips for using balsa strips and to Ted Nolde from Topeka. I put credit where credit is due. Thank you all.
© Larry Hawkins
This article was published on Wednesday, July 20 2011; Last modified on Saturday, May 14 2016