
Figure Sculpting 101
By Suresh Nathan
Introduction
One of the things that is conspicuously absent from most large scale aircraft displays are figures, specifically pilot figures. That's not surprising given the absolute scarcity of these figures on the market.
Fig 1
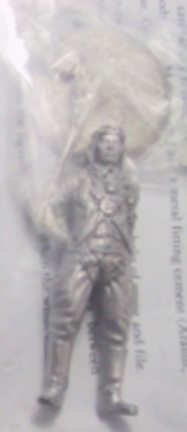
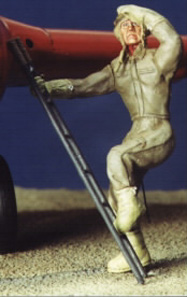
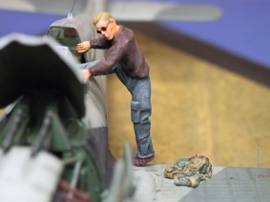
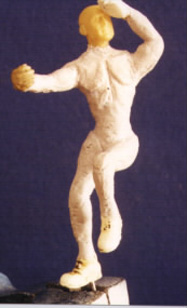
Even if one is fortunate enough to get one of them, chances are it will be so common that one display will rapidly look like a clone of the next. The logical solution would be to sculpt one(!). Believe me it isn't as difficult as it may seem (Fig 2,3).
Raw Materials
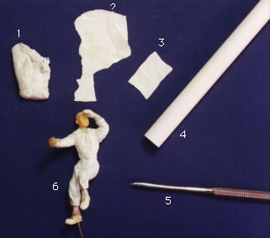
These are surprisingly just that-most things you'll actually find round the house (Fig 4).
1 & 2. Epoxy putty: I use two kinds- a generic industrial kind that's used for the musculature and anatomical work and Milliput for the clothes. I like Milliput because in the initial stages at least one is able to blend it using water.
3. Flux: This is used to prepare a joint for soldering.
4. Hand vise: To allow mounting of your precious work
5. Soldering iron: Mine is gas-powered and offers the option of a blow torch.
6. Soldering clips: These are used in the soldering process to divert heat away from previously soldered joints to prevent them from inadvertently disintegrating.
7. Sculpting tools: The top-most tool allows for rolling. The next two are general shaping tools. I have a number of these but to be honest they are quite expensive and may not be worth the expense when a toothpick mounted in a pin vise would do.
Other Stuff
These items are not absolutely necessary but do make things easier (Fig 5):
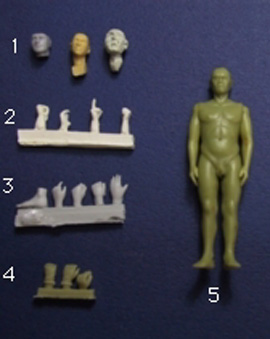
1. Heads: From left to right: The much-maligned stock figure head. Many beginners shy from it because they seem simplistic. It is perhaps intriguing then that even fairly experienced sculptors like Bill Horan actually prefer it because the basic features allow for more customization then the resin third party head seen next to it which tends to be a little small for 1/32. When you get a bit more experienced (and masochistic) you might want to move towards the ultimate form of customization - sculpt your own head (far right)
2, 3 & 4. Hands: These are worth buying but again if you're feeling bored you might want to sculpt a few and cast them for future use- as I did here (2). A better alternative would be the set from Historex (3) or Verlinden(4). I don't encourage recasting these but if you are contemplating this do understand that the practice may not be all that much cheaper.
5. Academy figures: This rather menacing looking figure may seem amenable to reposturing and clothing. However, by the time you get to that stage it may be easier to simply sculpt. I use them to get my proportions right.
Right, enough of that. On to the good stuff!
Method
The first thing to do is to create a wire armature out of paperclips (Fig 6).
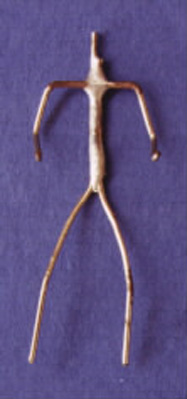
I usually compare this to the Academy figure until I get the proportions right. This then becomes my master for future endeavors. Solder is used liberally for the joints by a process of tinning- attenuating the joint solder onto the rest of the armature like a skin.
Next the armature is bent into the desired posture (Fig 7).
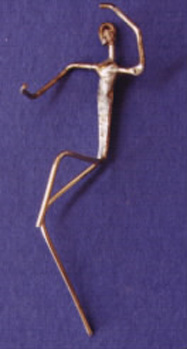
Be careful when handling the joints as they break frequently. This is easily remedied by remelting the solder.
The head and hands go on next. These are secured with cyanoacrylate glue (Fig 8).
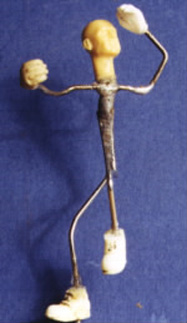
It is these two steps that give the figure their uniqueness.
Industrial epoxy putty is used for the underlying musculature. (Fig 9)
This may seem a bit daunting at first but studying sculptures and anatomical drawings does help.
You're probably not going to get it right the first few (dozen?) times but general proportions are sufficient as most pilot figures are completely clothed anyway.
Clothing the figure is in two parts. Don't try to do everything at one go or you'll end up with a mess. In the first step (Fig 10):
- Mix the Milliput as instructed.
- Coat it with liberal amounts of talcum powder and roll it out with a suitable tube (4).
- Suitably shaped sheets are cut out and applied to the figure. The seams are blended in with water and a suitable tool (5). These steps need to be completed in about 15 minutes as Milliput becomes "unblendable" afterwards.
- Take a breather.......:o)
6. Form the various features and folds with a tool. The Milliput is by now no longer tacky. The process therefore involves a bit of pushing and coaxing (you'll understand when you do it yourself). After about an hour, you should slice off excess cloth to form the collars, seams and cuffs.
The next step (Fig 11) is where the details go in. This is probably the most enjoyable part so take your time and put in as many details as you want.

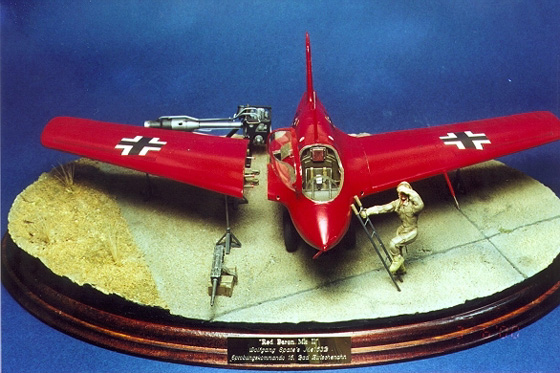
Finally, let your warrior (in this case Wolfgang Spate) take pride of place next to his winged steed (Figure 12).
Final Words
The article isn't comprehensive nor is it intended to be. Various basic skills like casting and soldering sound difficult but are easily mastered. Sculpting isn't for everybody but sometimes there's that one particular project that you feel wouldn't be done justice to unless graced by its pilot. Have fun!
© Suresh Nathan
This article was published on Wednesday, July 20 2011; Last modified on Saturday, May 14 2016