
How to Apply Decals
By Chuck Sawyer
The following tutorial on the application of decals is for all modeling skill levels, from Beginner to Advanced. I consider myself “Advanced”, because I have made just about every mistake imaginable and have ruined many a decal, but I have also discovered and developed a number of techniques to “save” the decaling process, which may be new to some. Whenever I attend a modeling contest, the one thing that strikes me as the most obvious modeling mistake continues to be silvered or poorly applied decals. In most cases, this is totally unnecessary with a little extra care as outlined below, which I will break down into 5 points. Before I start, I know all about using Future/Pledge as an alternative agent to adhere decals to a model with no worry of silvering. This always comes up in a decaling discussion, however in my opinion, this method also creates a lumpy and sticky mess and you lose the ability to move a decal shortly after application. Further, Future/Pledge won’t suck a decal down into fine detail below it, as you will see below, so I’m not a fan of this method of decaling. To each their own.
1. Before You Begin
Almost nothing in modeling can create as much satisfaction and at the same time, frustrating stress as the application of decals, sometimes in the same session. To reduce the number of decaling challenges, I try to do the following before I begin.
1. I know that everybody knows this already, but I can’t emphasize this enough: Make sure you have a VERY smooth gloss coat on your model to begin with. An orange peel paint job = an orange peel gloss coat, which can cause you a lot of trouble with silvering later. Get the paint smooth, followed by a good couple of coats of a clear gloss finish like Future/Pledge or Tamiya X-22.
2. Book yourself several hours of time when you won’t get interrupted, likely over 2-3 days. For some reason my wife has the uncanny ability to distract me every time I try to decal, which drives me absolutely nuts. It’s not her fault of course, so negotiate or find some time when you can focus on the task at hand with no interruptions. Decaling takes a long time if you want to do it right.
3. If you can, have two sets of decals available, so that you can make mistakes with an easy back-up at hand. If the decal sheets are slightly different, this can also provide an alternative so that you can pick and choose the best decal for the application at hand. Nothing is worse when decaling, than to screw up a decal of a limited-run OOP decal sheet that cannot be replaced. Trust me, I know this pain too well.
4. Also if you can, test a few of the decals that you may not be using on a piece of plastic to get a feel for the properties of the decal sheet. The best decals are super thin, yet tough and they won’t break with handling. The worst decals are thick and shatter easily and should be avoided altogether, although that option is not always available. Some decals come off the decal sheet easily, while others seem to take forever, so it’s good to know ahead of time what you’re going to be dealing with. See Types of Decals below.
5. Find a soft chair or other contraption to hold your model at 90 degrees to being flat or inverted. Gravity is your friend, so you want your decals to always be flat as they are applied with decal solutions.
6. Have your references ready. The decal instructions (which are usually bad) and other reference pics should be easily at hand so that you know what decal to use and where it belongs, exactly.
7. Decals come off the paper backing the easiest in very warm water. If you can find one, use an electric coffee mug warmer like the one below. Using very warm water, a good decal will slide off the decal sheet and conform around irregular surfaces in less than 10 seconds.
8. Have a desk lamp or other direct source of light that can cast shadows across your model. You want your work area bright, but you also need a light source that will help detect imperfections from an angle. I also have a good flashlight at hand for the same reason.
9. Have a needle in a pin vice ready. Many decals can have bubbles underneath, so you need to poke a tiny hole in them for the air to escape. The pin vice gives you way more control than just using a needle without one.
10. Along with the needle, have a new #11 blade ready in a knife handle.
11. Have two small but soft paintbrushes ready for the application of Microset (MT) and Microsol (MS), or equivalent decaling solutions, with one marked with masking tape so that you know which brush is used for which solution. You do NOT want to mix these brushes up! MT is a vinegar-like mild acid that softens decals and allows them to slide easier than straight water, while MS actually melts the decals. More on that later.
2. Types of Decals
Decals come in a wide variety of quality and ease of application, which I categorize into only 2 groups: Good ones and Bad ones. Good decals are super thin, they slide of the cardboard backing easily with warm water and you can move them around, sometimes even roughly, without them breaking apart. They are clear and sharp and also settle down onto the gloss surface firmly with MS and do not let air underneath. Bad decals do almost none of the above so they should be avoided at all cost. After countless hours of careful model assembly and painting, one or two bad decals can ruin the entire build. For example, on my current F-15C build, the Tamiya kit decals are poorly printed, are very thick and they tend to shatter when I pull them off the backing. I don’t care what subject you have in mind, do not use bad decals. They are not worth it and you will be sorry if you do. Some decals will not react to decal solvents at all. Many of the yellow decals in the Academy F/A-18 kits are bullet proof from reacting to solvents and I have actually placed one of them in a cap of 100% MS for 10 minutes and it came out like it went in: Hard and rigid. This is why I always source a good set of decals before I begin a model—and I try to buy two sets.
A quick comment about dry transfer decals. In general, they look excellent on their plastic backing and if you can get them off the plastic in one piece, they can look terrific. The problem is getting them to rub off on a shiny surface, because they don’t want to stick and often break up as you try to apply them. I have tried many different methods and rubbing tools to apply these decals and overall my luck has been abysmal, especially on curved surfaces, so I now avoid them. That doesn’t necessarily make them bad, but I’ll bet you will have similar luck.
3. Basic Decaling
So you’ve booked off two hours and are now ready to decal, with some or all of the above tips handled. Proceed as follows:
1. Keep the MT and MS readily available but apart from each other so you don’t mix them up.
2. Keep the decal sheet away from the MT and MS, just in case you spill one of the bottles like I did 2 weeks ago, ruining the entire decal sheet.
3. Flip the model over and start at the bottom. If you screw up some decals early on, it won’t show as much later, if at all.
4. Start with a small decal first, like a “No Step” or other small stencil to get a feel for the decaling process with that particular decal sheet.
5. Cut off the decal sheet only those decals that you are going to be using over the next 5 minutes or so. That way, you won’t lose tiny decals as you are distracted. Check the edges of the decal for carrier film. There should be a small lip, but if its too wide, trim some of it off, because you want as little decal film as possible. Leave a sliver of extra film, however, because the film is the thinnest part of the decal and the ultimate seal against air getting underneath. This also applies to complex decals where they may be in one piece and difficult to apply as one. Depending on the decal, you might want to cut it in segments, making it easier to handle and apply.
6. Using MT, wet the area to be decaled with a drop or two of solution with a soft paint brush.
7. Using tweezers or even your fingers, slide the decal into the warm water until you can see that it is fully soaked, then pull it out near the location of application.
8. Using the paint brush, gently push the edges of the decal to see if it will move. If it will, slide it onto the model. If it won’t, give it a few more seconds. After several decals, you will be able to predict how long this decal sheet takes to release the decals, which can be a few seconds to almost a minute.
9. Position the decal to the EXACT location and angle you want, using both your wet finger and the paint brush. When you are happy with the position, use a Kleenex or toilet tissue to wick off the extra water by positioning the tissue at the edge of the decal, not on it. You don’t want to risk moving the decal and you don’t want any crap from the tissue getting under the decal. A note on tissues. Do not use “Extra Soft” or other chemically treated tissues. They might feel good on your nose and other parts, but they do not absorb water very easily.
10. Gently rub the decal with the brush to ensure there are no air bubbles left underneath.
11. Let the decal sit there for at least a minute to dry, which means that I usually go on to the next few decals.
12. Using MS with the OTHER paint brush assigned to this solution, gently cover the decal with the solution without rubbing. Make sure this takes 6-7 seconds or less and do not soak the decal. You want just enough solution to fully cover the decal.
13. Now the part that almost everyone already knows about. The decal will start to distort and wrinkle, very badly in many circumstances, and tempt you to do something about it. Don’t do it! Don’t look at it or even think about it for at least ½ hour. The MS solution initially makes the decal expand, causing it to wrinkle, before it finally contracts, hopefully sucking the decal down to the finish underneath and conforming to most of the surface if it is irregular. Many modelers do not apply MS if the decal appears to be lying down properly to begin with. In my experience, most decals will pop up slightly as they dry, creating that dreaded silvering, sometimes days and even weeks later. This is especially true of small decals of stencils, etc., that have a large outside perimeter to surface area ratio, allowing unwanted air underneath from just about every angle. Melt the decal down with MS now and you likely won’t have to worry about it ever again.
14. As you apply decals and MS, you can sometimes move fairly quickly in an assembly line fashion, with the first decals dry and smooth, the middle decals still wrinkled from MS and the latest decals about to be treated with MS. Try to do only one surface at a time, in this case the entire bottom of the model, then let everything dry for at least an hour or two before you even think about handling it. A finger print on a drying decal will ruin it.
15. When the decals are dry, use the direct light source to check for flaws and silvering by shining the light at an angle to the decal. If the decal hasn’t settled down quite enough, add some more MS and let it do its thing for another 15 minutes or so. Again, add MS sparingly and don’t soak the decal.
16. Decals should conform to all surfaces underneath them, so rivet and panel line detail should show as well. If the MS has not sucked the decal down into the rivet or panel line sufficiently on its own after drying, which is usually the case, use a #11 knife blade to scribe along the panel line, slicing the decal. This procedure is tricky and you obviously have to be very, very careful and steady handed. I usually use the weight of knife as enough force downwards to slice the decal rather than put any more force on it. The edges of the cut may be a bit ragged, but no worries. Apply another coat of MS along the panel line cut and leave it again for 15- 30 minutes. The decal will sink down into the panel line and the decal will “heal”, rejoining itself with the fusion of the decal parts. Do the same with rivet detail underneath, using a needle in a pin vice, then adding MS to the hole in the decal.
17. When the bottom of the model is dry (minimum 1 hour), tilt the model either completely over to the top or on its side, using a soft chair or other contraption to hold the surface you want to decal horizontal. I use my desk chair that has fabric covered arms. The bottom of the chair will hold the tip of one wing, the back of the chair the bottom or top and the arm the front or rear of the fuselage, assuming the model is big enough. Apply decals as above, let it dry, then turn it again like a rotisserie.
18. When all of your decals are applied and you are happy with all of them (unlikely, so see below), wipe off all decal solvent residue with a soft, wet and lint free cloth. Let dry.
19. Spray another “spot coat” of clear gloss to each and every decal to seal them in. What you want to do is to seal the edges from any further lift and resultant silvering, but also to smooth out the edges of each decal so that it’s hard if not impossible to see the decal film at all. You want this coat to be thick, so spray the decals in two sessions so that the gloss coat dries properly.
4. Problem Decals
While it would be great if all decals laid down and behaved perfectly, that is rarely the case on large models like jets in my experience, because you have both numbers and size working against you. There’s always one or two decals that give me grief, so I’ll go over the usual suspects from mild to severe.
1. Bubbles. After the decal has dried completed, there are sometimes the odd air bubble trapped underneath, leaving a bulge in the decal. The fix for this is simple: Poke a hole in the air bubble and add more MS. If you’re lucky this may take only one treatment, but I have actually had to do this up to 10 times on the same decal before I was happy with the outcome. Do the same for panel lines and rivet detail that hasn’t shown through.
2. Wrinkles that won’t go away. These are a real pain and are usually associated with two layer decals, especially yellow ones like formation lights. I think this is because the outside yellow decal reacts to MS while the underlying white decal barely does, so the two layers wrinkle at different rates, leaving a bit of a mess. At this stage, you don’t have much to lose because if the decal won’t behave, you need to replace it- hence the desire to have two sets of decals. I react to this problem in 3 stages:
Stage 1
Add more MS and play with it. As the decal softens, you can poke holes in the wrinkle with a needle to release air pockets and as it dries you can use the paint brush to actually push the wrinkle down. This procedure is super dangerous without experience, but after doing this many times, I now know when to let the MS just sit and when to play with the wrinkle. Don’t touch the blemish while the decal is wet, but after it has dried for about 5 minutes, you can use the paint brush. If it’s sticky at all, back off and let it dry some more. When you get the decal to look a bit better, let it dry for at least 12 hours. You will be amazed at how much a wrinkle will shrink if you give it enough time to dry. This might take 2-3 iterations over 2 days or more, but my luck with repairing badly wrinkled decals is about 60-70%.
Stage 2
The wrinkle in the decal is still there and you are totally F$%#d! No you’re not. You still have 2 options before going to Stage 3: Paint or Repair. In both cases you will need to sand down the wrinkle with fine #1500-2000 grit sandpaper to remove the raised flaw, then wipe the area with a damp cloth to remove any solvent residue. You need to be very careful when sanding to not destroy the good portions of the decal and focus only on the flaw.
Since many decals are mostly black and/or white, the flawed area can be painted again with the appropriate paint color, usually with a paint brush. Do not use masking tape if you can help it, because it will lift the remaining part of the decal. I try to use a lacquer paint for this task, because it’s super thin and won’t build up, leaving a lump like enamel or acrylic paint would. If the color of the decal can’t be matched very well, repair the decal instead.
To repair a decal I use another identical decal (again, the need for 2 decal sheets) and cut out just the portion I need to facilitate the repair, then apply the new decal over the affected area. Done properly, you would be surprised how seamless it actually looks, especially after a thick coat of gloss coat later. Since the affected area reacted poorly to MS in the first place, don’t add any more and let the gloss coat seal the decal in.
Stage 3
Since Stage 1 and Stage 2 didn’t work, you really are totally F$%#d, but don’t panic yet, because you are going to completely remove the decal and replace it. Using Scotch Tape (or similar), place the tape over the decal and burnish it down over the entire decal as much as possible, then lift it gently from the sides, taking the decal with it. This method rarely lifts the entire decal the first time, but after 2-3 tries, you can usually get about 90% or more of the decal off, even after drying and often a gloss coat. For tiny residual decal film that won’t lift, I apply MS to a microbrush and work it, which usually gets the remainder off. If that won’t do it, let it dry then lightly sand it, which will hopefully work only on the gloss coat before you erode into the actual paint underneath. Wipe the area clean with water, then apply a replacement decal. Since something wasn’t right with the first decal at that location, use MS very sparingly if possible. Re-apply a good gloss coat and let dry.
5. Silvered Decals
So you’ve followed all my tips above and after everything has dried, you still have one or two decals that have silvered. This has happened to me after the decals were sealed in with gloss coat and the final dull coat applied. Clear dull coats usually give decals a much different look than with a gloss coat, which both hides decal edges, but sometimes reveals that not all is well underneath a decal. The fix for this is simple but crude: Using a new and very sharp #11 knife, poke some holes into the decal with the tip, then ooze in some more MS. Surprisingly, unless you slip or are sloppy, you won’t see the cuts with the naked eye, whereas with a pin prick, you might due to the extra width of the needle. With the MS trapped underneath the decal, it should pull the decal down, leaving a bit of gloss after it dries. Now lightly sand the decal with #1500 grit sandpaper. Yes, sand it, because it should have some clear coat protecting it and you want to remove any lumps and especially the edges of the decal. Reapply dull coat and you should be ready for the model contest, where you just dodged a big deduction!
Unfortunately, I don’t have some before and after pics of my decaling sequence since I wrote this tutorial after the fact, but I can show some examples of my current and a past models below with corresponding comments.
Here’s the core of my decaling operation as noted above:

And here’s how I get this big bird on its side, allowing an almost horizontal surface when applying decals to the sides:

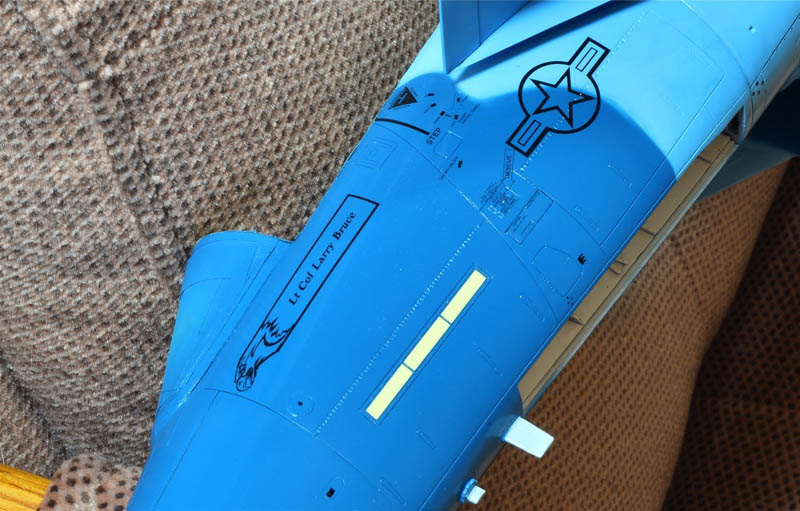
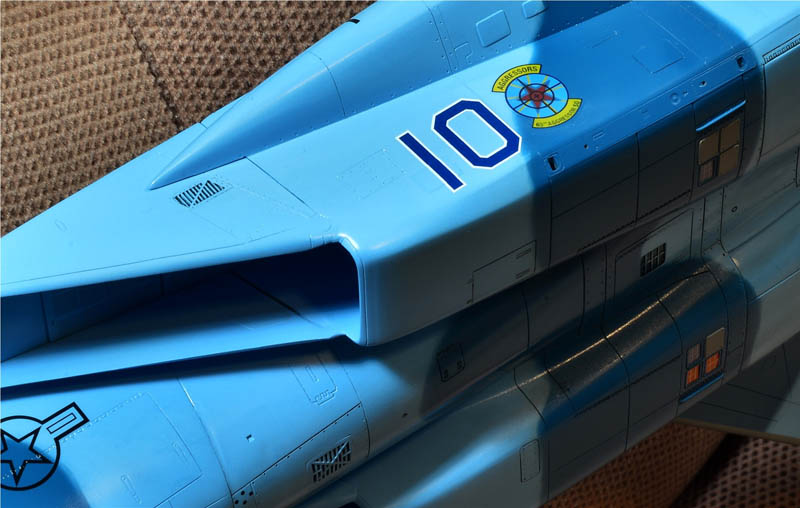
Now some “walkaround” close-up pics. Note how all panel lines and hinge detail show through the decals cleanly with no silvering. Excuse the dust in the following photos!
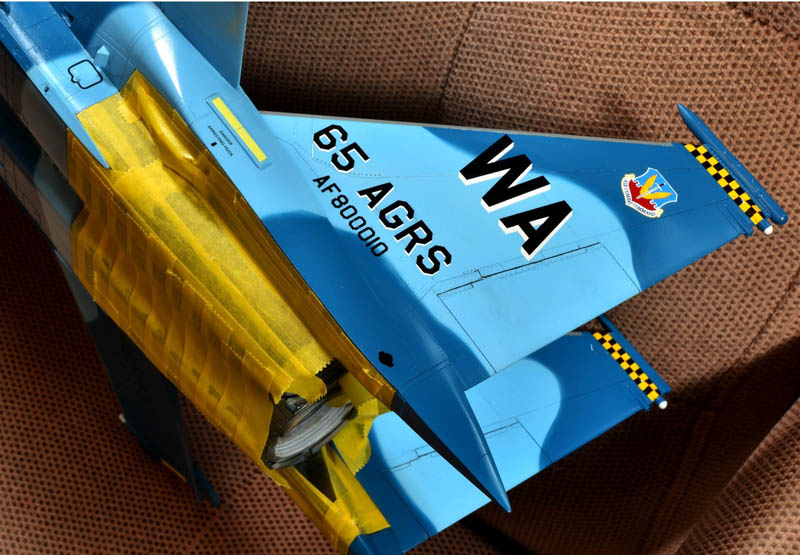
Those “Taxi Cab” emblems of Nellis AFB at the top of the stabs were very tough to do, so I had to use just about my entire bag of tricks to make them look accurate:

That big fuel door decal was surprisingly easy to do:

But the formation lights on the wings were very tricky to apply. Here's how I did them. Start at the top of the wing and get them centered, then let them dry a bit so that they won’t move too easily. Apply a very thin coat of MS to just the outside edge of the wing, allowing the decal to become flexible and ultimately sag a bit. Using a paint brush, gently coax them downward, then flip the model over and finish the application underneath. Once you’re happy with the decal position, add some MS to the entire decal to seal it against the wing.

The other side. Note that I’m adding a little bit of “weathering” to the flap hinges. Not much, but some, and also note that all the “No Step” stencils have no edges, thanks to another coat of X-22 gloss coat:

And underneath, confirming that the Two Bobs formation lights fit just about perfectly:

Those very thin lines on the top of the intakes are decals:


Metallic Finishes
Generally speaking, I try to avoid spraying any clear coat on Alclad metallic finishes, because no matter what you use, a clear coat of any kind will knock down the shine. That's why this Eagle build has no clear coat on the rear titanium panels. Small stencils can be applied directly to the Alclad without a clearcoat, but you must use Microsol sparingly. Some high shine Alclad finishes like Chrome, Polished Aluminum, Airframe Aluminum, etc. are all alcohol based and very fragile, because they don’t “bite” the primer coat like the other Alclad lacquer products and decal solutions are not recommended according to the Alclad website.
For larger decals you really have no choice but to spray a high gloss clear coat, to achieve the very same thing as a regular paint finish. While the metallic finish does not need to be shinier than it is already to apply decals, it should be protected, especially if it's a high gloss finish. The final "spot coat" of clear coat seals the edges of the decals and smooths out the edges, reducing their ability to reflect light.
Here are some examples. For my Mustang build, I was trying to create a war weary fighter that was a bit on the dull side, so the reduction of shine was not a big factor. For this project I used Alclad's lacquer clear coat, ALC 310. Avoid the acrylic Alclad Aqua Gloss, ALC 600, because it's crap that is hard to spray and takes a long time to dry. After the decals were dry, I sealed them in with the clear coat, followed by a dull coat.


For my P-38L, I was trying to replicate a museum hanger queen, that was polished and very shiny. I used Tamiya's acrylic X-22, which is now my go-to gloss finish for everything. It sprays easily with a bit of Tamiya lacquer thinner, dries quickly and also dries very hard.

There's a fairly wide carrier film behind this big stencil, but you can't see it with a good coat of X-22 sealing in the edges.

And one last pic of my F-4E build, to show how things might look after a good coat of dull coat lacquer. All of those decals were huge and all of them had problems, with one decal painted and one “repaired” with another decal. If applied properly, all of your decals should look like they are painted on, not stuck on.

© Chuck Sawyer 2017
This article was published on Tuesday, November 07 2017; Last modified on Tuesday, November 07 2017