
Embossing - A Simple Technique to Engrave Details on Brass Sheets
By Rogerio "Rato" Marczak
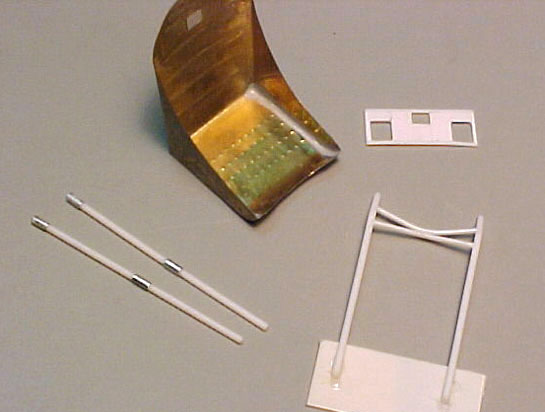
This 1/32 P-40 pilot's seat was scratchbuilt using the embossing method
What's Wrong with Photo-Etched Parts?
Everyone knows very well the problems associated with many detail parts that come with injected 1/32 kits. They may be way inaccurate - in shape and dimensions. Even in the most recent releases, when the outline of the parts is generally correct, a simple check with a caliper will show that the thickness of many parts is out of scale. In this article we explore a good example: WWII aircraft seats. In most cases those seats were manufactured with steel sheets. To save weight, the sheets were 2 or 3 mm thick at most, so the stiffness of the part used to be increased by stamping several "ribs". In 1/32 scale, 3 mm means approximately 0.1 mm, a thickness impossible to be achieved with mass production injection process, at least for a part of that complexity. Let alone include those ribs and other smaller details.
You may be thinking: "No problem... I'll order that photoetched part just released". I agree that PE details are really handy in many cases. But in some other cases PE parts are simply too "flat", they lack some three-dimensionality. In addition, you can't always find the PE set you need. Even if you do, there's another problem largely ignored: How many of us check the accuracy of the PE parts before using them? Not many, I guess. This is understandable since the PE manufacturer is supposed to be in charge of the research work, and it should be that way because the stuff is not cheap. My point is: a given PE set is designed to be used with a particular model, and it means that some "adjustments" are necessary to make everything fit well in the kit. Even worse, many details are faked as raised areas on the brass fret. Although this is perfectly acceptable for 1/48 and smaller scales, in 1/32 these flaws become more visible. The seat ribs I mentioned above is a good example: in a PE part they would look as stripes - not rounded indentations.
Fortunately we are 1/32ers, and so it is possible to scratchbuild many things that wouldn't in other scales. In this article I'll describe a very simple method to engrave details on brass sheets. We will apply the approach step by step in a P-40E seat, but the technique has many applications. I learned about the principles of the method some years ago, watching an artist burnishing details in very thin metal leaves for an ornament. Some months ago I bought some 0.1 mm brass sheets to learn photoetching and found an excuse to give it a try. It was not working for flat detail parts because each time you emboss a thin sheet it will bend heavily (as well as when you cut it with scissors). To recover its flatness, all you need to do is to apply the well known tip to straighten PE parts: roll a cylinder over the sheet, flip the sheet and do it again.
If you can live with the kit parts, stop reading now.
A Bit of Reverse Engineering
The first thing you need is a good line drawing of the developed seat. You can do it by hand, but with a CAD system it will be easier to make the necessary modifications. In addition, it saves a lot of work in future projects that use similar parts. If you are fortunate to have access to engineering drawings of the subject this is an easy task. If you don't, you will need to exercise some reverse engineering to obtain a drawing with reasonably correct dimensions. When in doubt, use your artistic license. Sometimes the dimensions of the kit part are correct, so you can use it as a starting point. When done, print, cut and assemble the seat as a paper model. Check carefully for possible mistakes or misalignments. Correct the drawing and repeat if necessary. Once you are satisfied with the shape, add all visible details to the drawing: reinforcement ribs, rivet lines, depressions, attachment points etc. Make a few copies of the drawing and set aside.
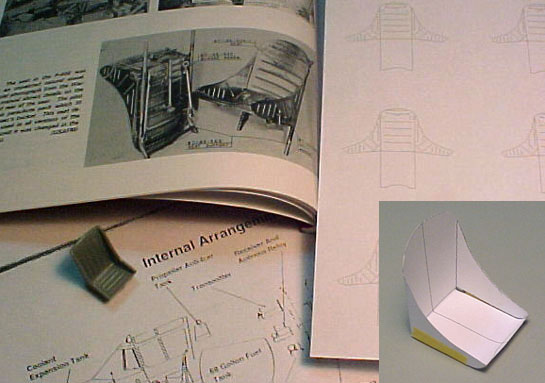
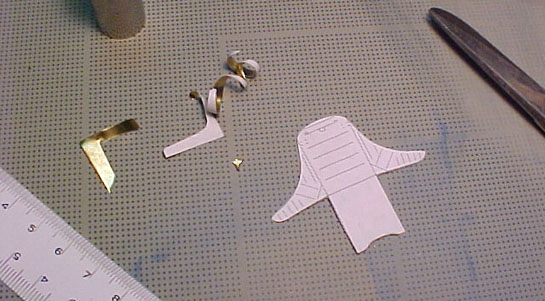
Preparing the line drawing. In the detail, the "paper model" of the seat, used for checking purposes.
Heavy Metal Time
Well, it is not any AC/DC... but heavier than plastic. Get some brass sheets of the correct thickness (0.1 mm, in our case). Note that you will find two major types of thin brass sheets: the hard one and the soft one. Use the soft one if possible, because the hard type is severely annealed and won't enable scribing so well as the soft. You can also normalize the hard brass by holding the sheet over a flame for a half minute or so and letting it cool at room temperature.

This is all you need to start
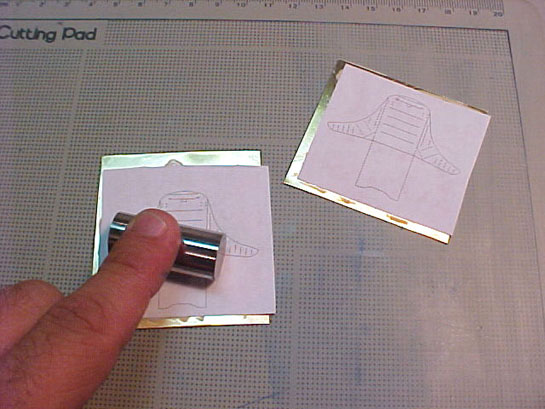
Cut a rectangle slightly larger than the seat drawing out of the brass sheet. I use ordinary scissors, as the sheet is very thin. You will notice that the sheet will bend heavily around the cut line. To solve this, find a 20 or 30 mm diameter steel cylinder. Be sure the cylinder is free of scratches or imperfections or they will be transferred to the sheet. Now roll the cylinder over the sheet, pressing it as it roll using your finger. Increase the pressure around the bent edges of the sheet. The sheet will buckle slightly. Flip the sheet and repeat the process. This should leave a very flat sheet.
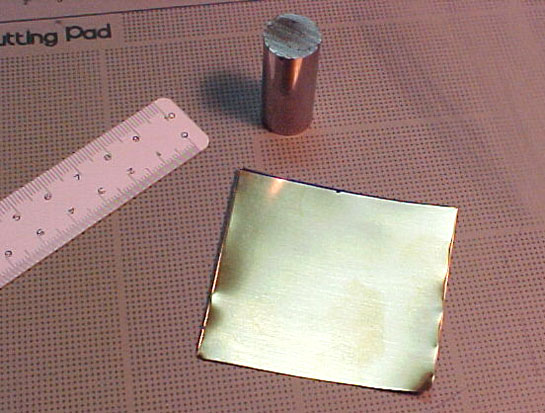
The brass sheet after cut.
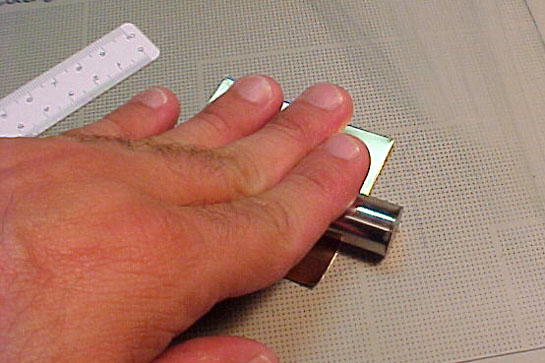
Roll, baby, roll...
Magic: the sheet is free of bents
How to Stay Away from Styrene for Half-an-Hour
Next you have to glue the seat drawing on the brass sheet. You can use diluted white glue, but I recommend a liquid contact glue. I use Microscale Foil Adhesive hand brushed. Let the glue dry and lay the drawing on it. Roll the cylinder to avoid air bubbles. Now trim the excess of brass around the seat to facilitate handling and the final trimming. The sheet will probably buckle again... roll the cylinder every time this occur.
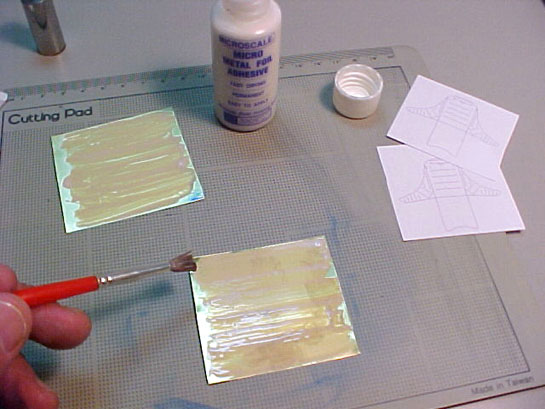
The adhesive foil applied over the brass sheet.
Gluing the drawing.
Trim roughly the excess of brass around the drawing
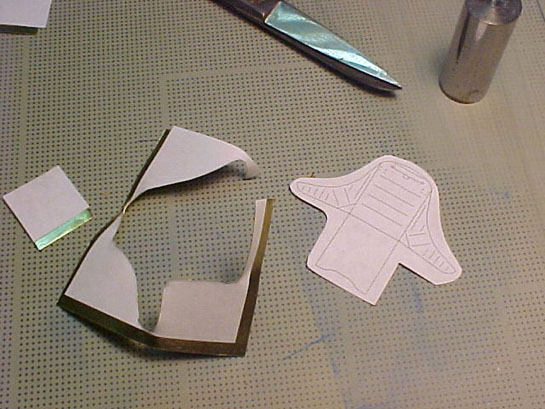
Because it would be very difficult to run any tool over the paper side (it wouldn't slip well), we use a simple trick. Using a compass needle or your favorite needle, mark a small point at the beginning and at the end of each rib line. This will leave a small "rivet" on the line ends. Double check to not forget any line because the paper will be removed soon. Next, use a small scissors to trim the brass. Try to follow the contour of the drawing the best as you can. Now the seat is virtually done, just like a photo-etched item. Finally remove the paper from the brass sheet. Another hint here: brush a coat of lighter fluid on the paper. Wait a few seconds until the paper absorb the fluid and the paper can be peeled away easily. Time to add the details...
These "rivets" mark the beginning and the end of each rib.
All the excess of brass is already trimmed.
Embossing the Details
The embossing technique actually starts now. Basically, embossing means to engrave the details onto the surface. Contrary to scribing, there's no removal of material. Instead, the material is pushed down in such a way that its "negative" appears on the back side (the reason why it can be done only with thin materials). Every time you emboss a detail, it causes high localized deformations on the area which make the sheet bend. The secret to straighten the sheet is to use the cylinder when you fell that the sheet has bent too much, and then resume embossing. More importantly, the cylinder compression reduces all the engravings to the same height, so you don't need to be perfectly consistent with all the details as they will be leveled down. It can't be done with plastics because most plastics can't be flattened once embossed.
Well, you will need at least a couple of "embosser" tools. I heard that there are craft tools specially designed to emboss metal plates, but you don't need them. Almost everything can be used as tools here, depending on what you are going to do. If you have to slide the tool (like the ribs of our seat), better to have a tool with rounded tip. For engraving ribs, I use some burnishing tools, those used to apply dry transfers. They have small spherical heads in three sizes: 0.5, 1.5 and 3.0 mm. However, one of my favorites is an empty "roller-ball" pen. I use an old compass needle mounted in a handle to make rivets. For smaller details, those mini-screwdriver sets provide valuable tools, too. You can make every sort of tools using many things you find at home. And of course you also need a ruler.
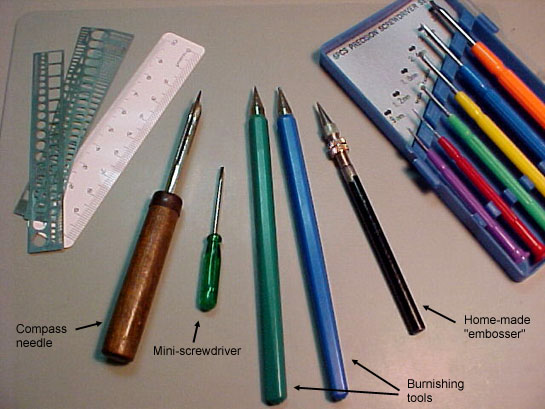
Some examples of tools I use for embossing
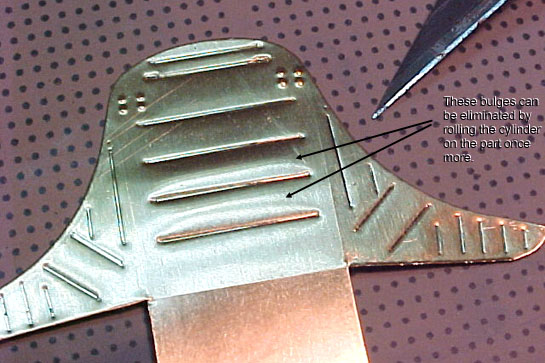
To make the ribs on our seat, just join the points marked earlier with a rounded tip tool. Using a ruler as a guide, make a light pass first, then increase the pressure and repeat two or three times more. In a 0.1 mm sheet, this should be enough to make a deep engraving. As I said before, you don't have to be perfect with all ribs as they will be leveled down by the cylinder. Believe me, it's easy. I scribed the entire seat in less than 10 minutes.
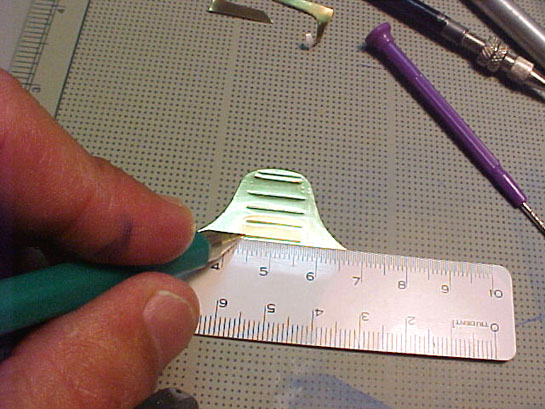
Embossing the ribs (I'm not left hand, and sure I should be holding the ruler with my other hand. But how the hell I would hold the camera?)
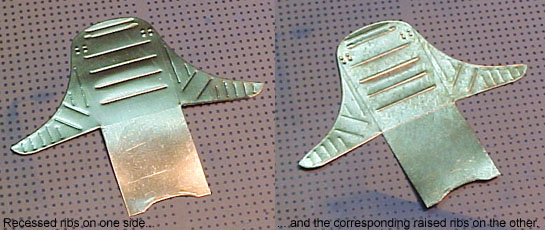
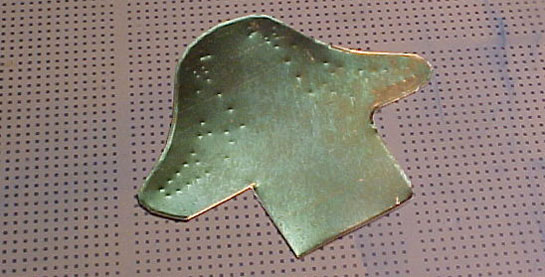
This is what you get after mere 10 min of work
A close look at our job
Folding
Not much to talk about here, if you have previous experience folding PE parts. I use a flat lip pliers and fold the part along the pliers edge using a small block of aluminum. Use moderate pressure to avoid damage to the embossed details in the clamped area. Always fold a bit more than necessary to account for some spring back (I mean, if you want 90 degrees, fold about 5 degrees more as the fold line will always return a bit). If you prefer, score the folding lines with a hobby knife first - it will make things easier. The picture below shows the result. Note that the seat back plate is wider on top. This is because it will be rounded later, so that the side walls will become parallel (take it into account during the drawing phase).
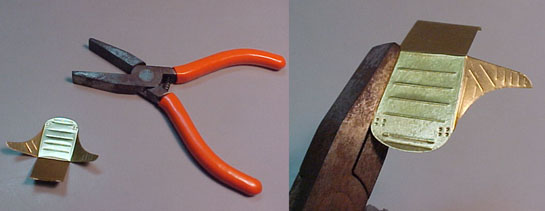
Folding the seat
Now it looks like a seat, huh?
I Forgot the Rivets...
Well, this step should go along with the ribs. I forgot to add the rivets lines. I had to unfold the seat to add them. No problem in doing it once, but if you fold/unfold repeatedly it may crack along the fold line.
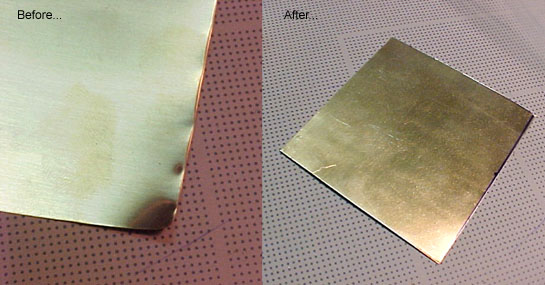
To add the rivets I use those saws that come with office tape holders. Their tooth are already very sharp and you can sharpen them even more with a file if necessary. The basic procedure is simply to press the saw along the rivet line. Try to distribute the pressure equally on the tooth. Once done, they will seem a bit exaggerated. Roll the cylinder again... and they will be just fine - very subtle. Then I folded the seat again and added the curvature of the back plate using the same cylinder on the inner side and my finger on the back side. Start making a very gentle curvature. Slowly roll the cylinder against your finger with the seat between. Keep on until the side walls of the seat are parallel. The joint lines were glued with Future Floor Wax: hold the joint in position and brush a good amount of Future. Let it dry and then remove the excess with a cotton dab moistened with denatured alcohol. The picture below compares the seat before and after adding the round back and the rivets. Note the color differences. That's oxidation...
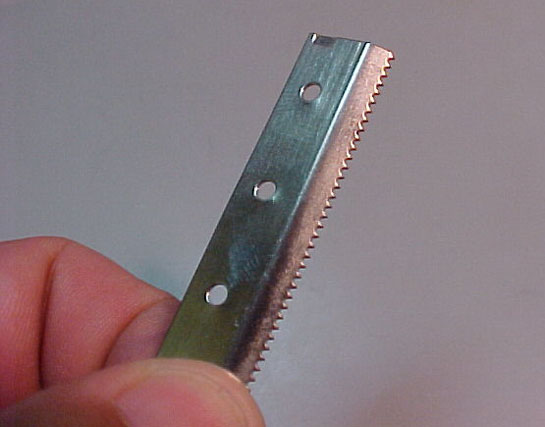
This is my "riveter"
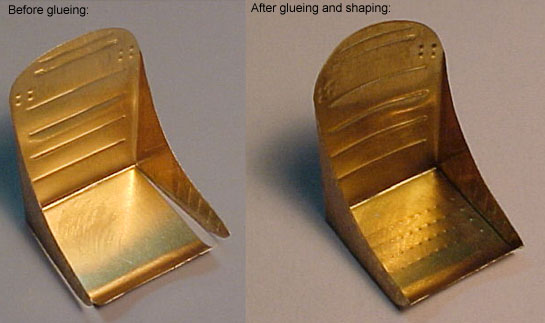
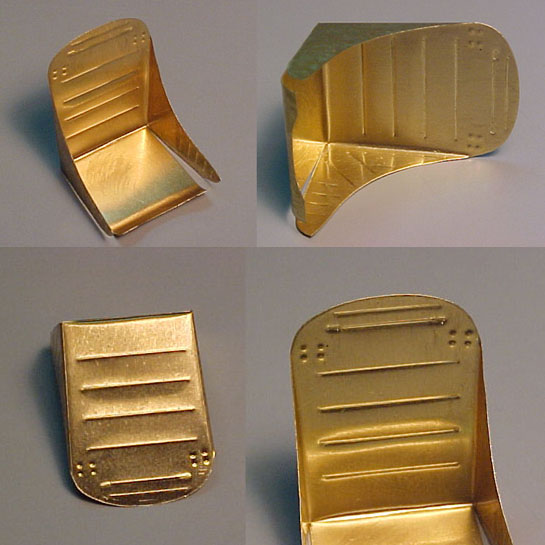
Before and after adding the missing details.
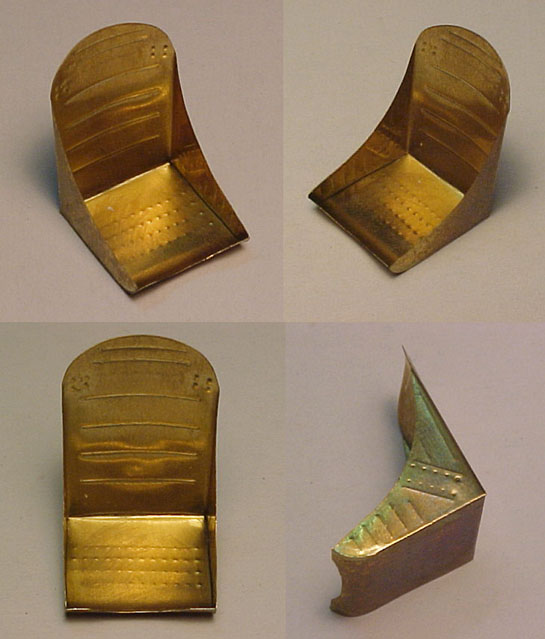
Now it looks like a seat, huh?
Smaller Details
Finally, we add a few more details manufactured with the same technique. The reinforcement plates onto which the seat struts are attached were made with aluminum foil. Just cut small rectangles of proper size and punch the rivets inside each corner. Once again, roll the cylinder to level down the raised marks. Be very gentle in this case because the aluminum is much softer than the brass. If you exaggerate, the rivets will simply disappear. Fix them with your favorite slow setting glue.
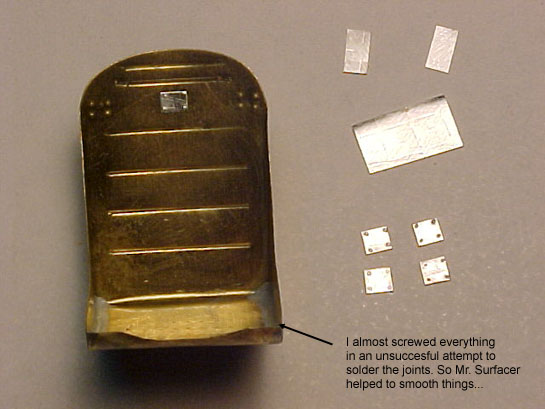
The back reinforcement plates already cut and ready to install.
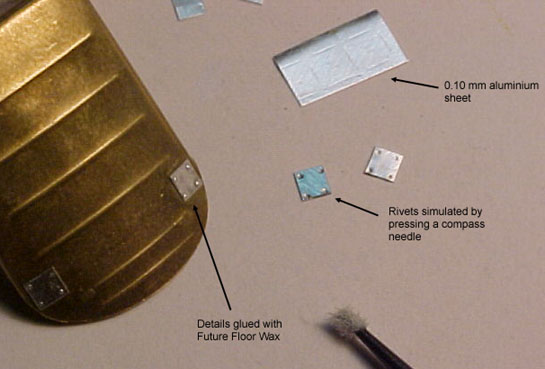
Gluing the attachment plates.

How it looks after installed.
FINAL COMMENTS
Today this is one of the most used techniques of my personal repertoire. If it sounds intimidating, let me tell you: try it! It is really easy and I bet you will get good results on your first trial. Believe you or not, the seat used in this article was obtained in my second attempt (the first one worked, too).
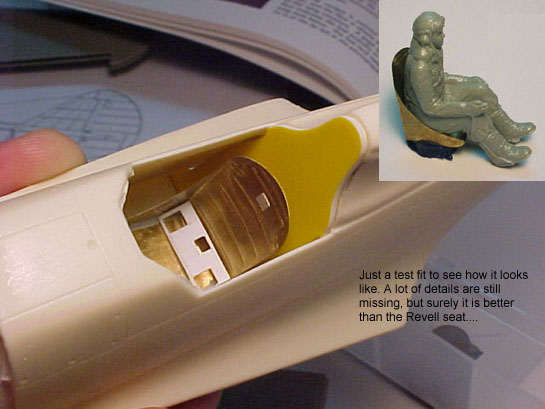
A test fit in the Scratchbuilders 1/32 P-40B conversion fuselage. In the detail, my chief test pilot for this project, "Jimmy Curtiss", in a test flight with the new seat.
The method has many other uses, but I found it particularly useful to make bolted/riveted plates. I even made a cockpit switch box embossing buttons and switches of several sizes. Let your creativity flow and I'm sure you will find many applications or variations of the technique. Give it a try.
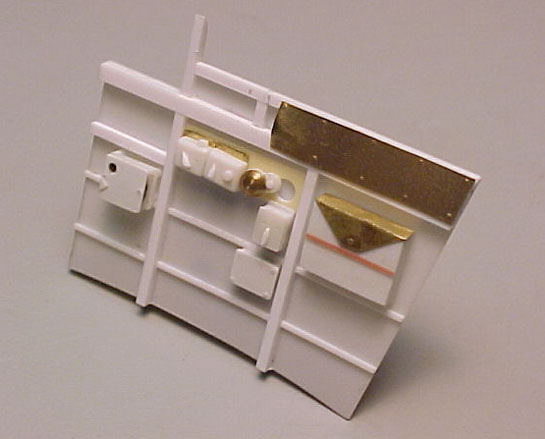
My scratchbuild 1/32 P-40B right sidewall showing some details added with the embossing technique.
© Rogerio "Rato" Marczak 2002
This article was published on Friday, October 30 2015; Last modified on Friday, October 30 2015