
The F/RF-4E in the Hellenic Air Force Service - Part 4
By Dr Menelaos Skourtopoulos

Introduction
This is the fourth and I think the last (for the moment!) part of the story about the F/RF-4E service in the Hellenic Air Force from the mid '70s until today. As I wrote in the former parts Greece received between 1974 and 1978 58 new F-4Es with following serials:
- 72-1500-72-1535
- 74-1618-74-1619
- 77-1743-77-1760
- 77-0357-77-0358
Four Sqs. equipped with the F/RF-4Es: The 337 MPK (All weather Sq.) "Fantasma" (Phantom) based today in Larissa AB (110 Combat Wing), the 338 MDB (Fighter Bomber Sq.) "Aris" (Mars) and the 339 MPK (All weather Sq.) "Aias" (Ajax) based today in Andravida AB (117 Combat Wing) and the 348 MTA (Tactical Rec. Sq.) "Matia" (Eyes) based also in Larissa AB (110 Combat Wing).
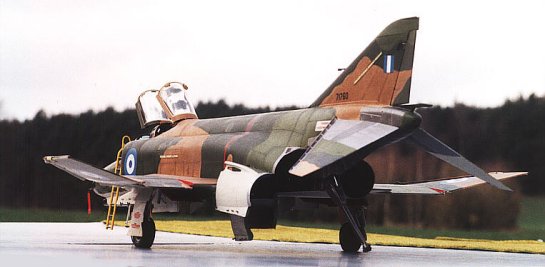
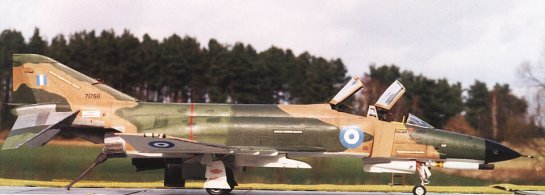
The F-4Es were delivered in the well known USAF SEA camouflage scheme (two greens FS 34079/ 34102, a tan 30219 and a light grey FS 36622 with big light blue Greek roundels (these are not officially in use today, and they have been replaced with dark blue and smaller ones today). The second batch of the delivery (18 aircraft) included TISEO-equipped aircraft.
In 1991 30 more used F-4Es came from the US ANG. These aircraft were from blocks No. 36, 37, 38, 39, 40 and 41, and represented the most advanced form of the "E" model at the time and were equipped with the NWDS (Navigation & Weapons Delivery System), that enhance the air to ground capability, and smokeless engines. They all delivered in the Hill Gray scheme. Today they are all now painted in the ghost scheme (see part 2).
The Model Situation
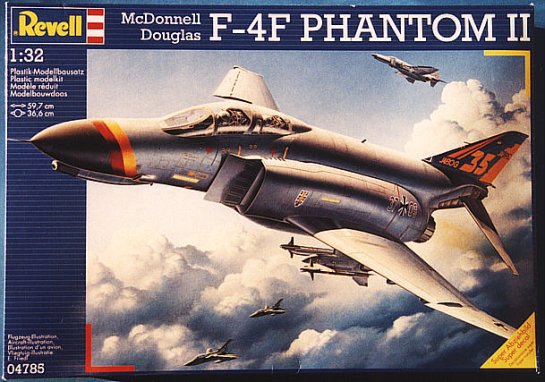
For the F-4E I used once more the Revell kits and exactly the F-4F because the F-4E is hard to find in Europe (and specially in Germany!). On the other hand the F-4F kit offers very good seats but not so good instrument panels as the F-4E kit and has not the slatted stabilators. So I had to order them again together with the right fin of the " F-4E Revell-USA" kit from the States because it is just very difficult to make them from scratch (many thanks to Revell/Monogram guys!).
One more problem is the wrong radome of the F-4E/F kit, so I had to rework it (the first time from that kit) to make it looking right. Otherwise the kit is very good and offers almost everything to make a superb model out of it. Tamiya is one more company that offers newly the F-4E (the early version with no slatted wings). In this article I'll try to make some notes about the problems and the goodies of that kit.
Converting the Revell F-4F Phantom II
As I wrote before the kit has its problems:
1. The F-4F has no slated stabilators and I had to order them from Revell/Monogram (thanks guys!)
2. The upper part of the fin (part no. 208) is not correct and I had to rework it, or order it from Revell-Monogram (in the F-4E kit you'll find the right one!).
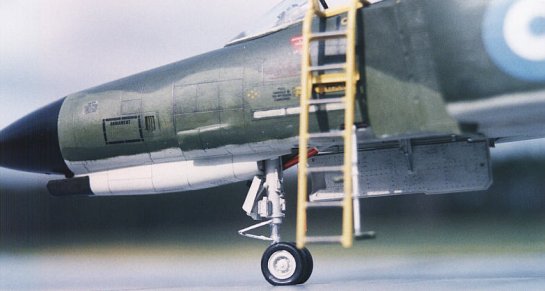
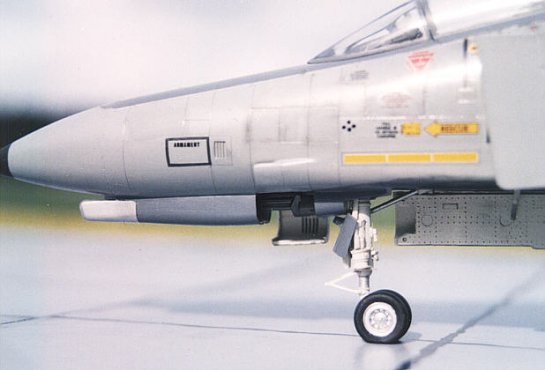
3. I had to build the nose gear leg from scratch, because it is out of scale. (see part 1 and part 2 for further information). You have to cut of 0,5cm of the main gear legs, because the Model seats too "high" in its main gear. I had to drill a hole in the middle of each main wheel to make it looking better; otherwise the main gear legs are done very nice from Revell.
4. Once again the back cockpit is too deep and I had to rework it. I had to cut it away from the front and back wall, and glue it again 0.5cm higher. If you don't change it, you'll have to put the seat much higher and it doesn't look right ... otherwise the situation in the cockpits is OK.
5. The cockpit detail sets of Eduard (032-24 and 032-32) were used to show the high degree of details, that you see on the Phantom in that region. I also added some cables in its back to simulate the typical F-4 ... cable chaos there.
6. I had to rework the radome to make it looking better.
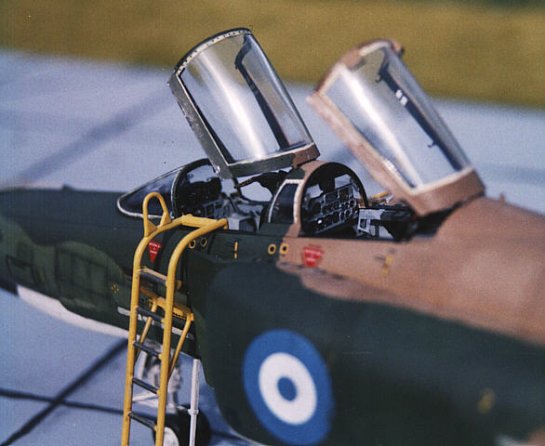
7. I also had to make some work inside the canopies. I used sheet styrene and putty to represent the structure of the front and the back canopies and the Eduard sets to represent the canopy rails.
8. I had to open the bleed air doors under the fuselage between the centerline tank (do it before you glue the fuselage halves with the wing) and glue them in the open position.
It seems to be a lot of work, but it's worth it. I think you have a reasonable price with that kit (and not an astronomical one with the Tamiya kit) and it pays for it...
The nozzles of the J-79-17 engines are partially good, and if you want a perfect result, you have to add some more details inside them. That means more extra kits and more money and ....oh well, I thought, I could live with them! The only thing I worked here was to make the afterburner deeper using plastic styrene tubes.
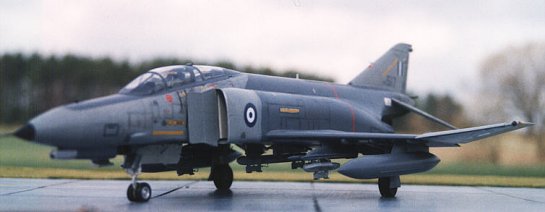
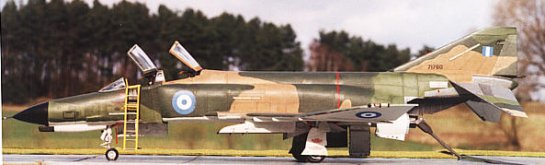
The SEA F-4E
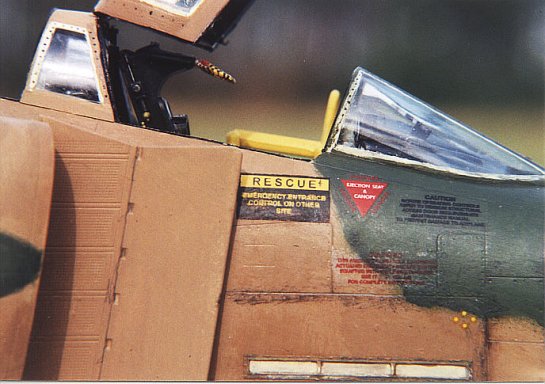
For the cockpit I used the good seats of my broken Tamiya F-4D. Tamiya gives no harnesses on them and I just left away the parachute and survival pack, a common picture by Phantoms undergoing some extensive service. I put also two outer mirrors on the top of the RIOs canopy formed from a resin part, found in the spare box.. I used the small telescopic ladder from Tamiyas F-4D too.
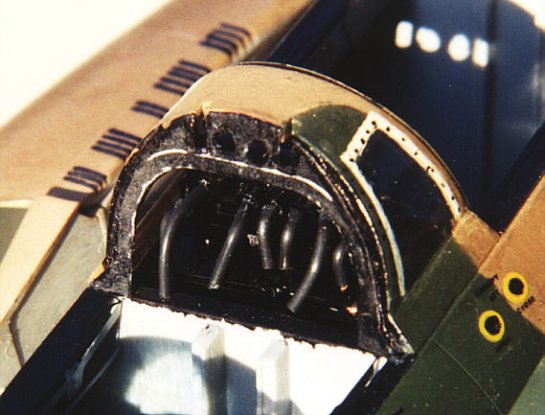
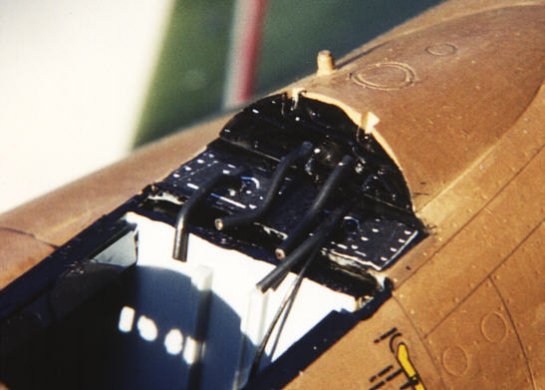
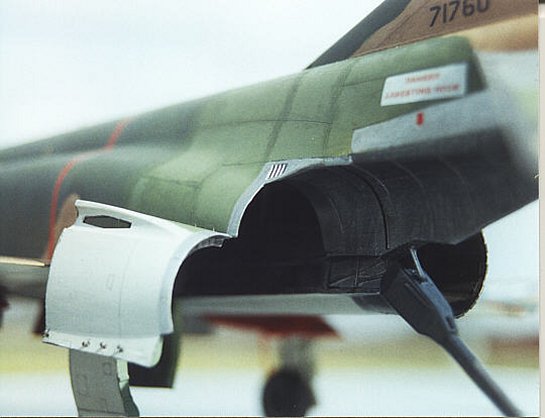
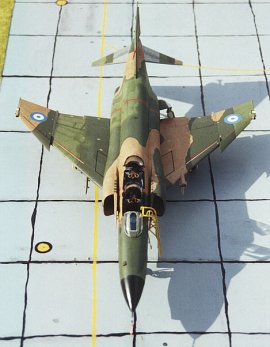
This time, I wanted to show some of the internal life of the Phantom. I decided to open the left engine doors to show a Phantom undergoing maintenance.
To take such a decision, requires the appropriate photo material and I was lucky to have some good pics of that region inside the F-4.
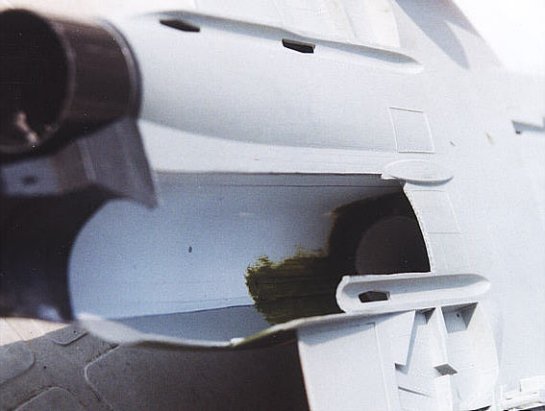
To show the engine bay I have to start working in that region from the very first moment as I put the two fuselage halves together.
I had to cut the left turbine fan away from part No. 40. In the front of that part I glue the nice airway found also in the Tamiya F-4D. Then with big amounts of 1 mm sheet styrene (Evergreen) I formed the engine bay wall (you have to glue the fuselage halves together with part No. 40 to have more stability. Then I glue many strips of plastic sheet one by one to represent the wall detail structure, following the pictures I had as a template. I had to cut also the panels from the underside of the fuselage (part No. 58). Do it before you glue it with the fuselage! Through that action I got 3 engine access doors. The first one begins from the fuselage and goes under to the middle of the belly. You have to cut the fuselage part of that door before you glue the fuselage halves together. I used some plastic styrene to make some details on those doors.
Next I wanted to rework the somehow wrong radome of the F-4F (or E). I put some putty inside the front of the radome and after it was dried, I began (using a DREMEL) forming the nose. I used as a template the good 1:72 drawings (scaled up to 1:32) from the Detail & Scale book of the F-4E.
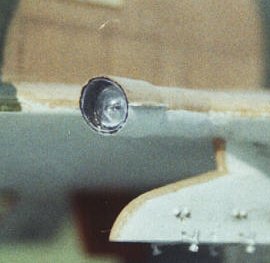
The second batch of the HAF-F-4Es had the TISEO camera on the left wing. As you see I made that camera from scratch. I used two tubes with different diameter. The lens came from the spare box (it's a landing light, don't ask me from witch kit!). I cut out a transparent piece of plastic to make the front glass.
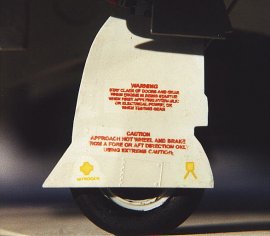
F-4s undergoing service procedures, having often their tail hook down for safety reasons. I used the Tamiya tail hook cause it's the better one. The actuator mechanism made from stretched plastic. I didn't use any external stores by that Phantom.
Painting & Decals
The first Hellenic Phantoms arrived in the standard standard US SEA camo. scheme. They carried also the old big light blue and white roundels in six positions.
The model shows a well-weathered Phantom. (they changed the colors to the agean blue after 1995!). Today the 71760 serves as the prototype for the Peace Icarus II program (see part 2).
I painted the model with brush, you know me by now…..no spray guns! Many of the decals are self made (made with a PC and printed on clear decal). The national insignia is from Plastimodelismo (Greek company, but no longer available..). Some REMOVE BEFORE FLIGHT added some more realism...
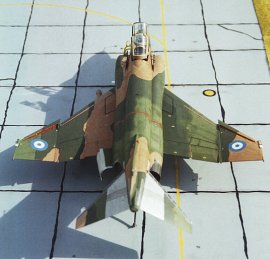
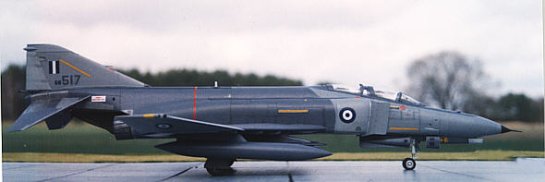
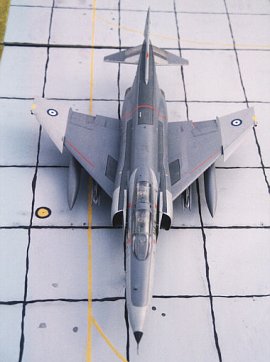
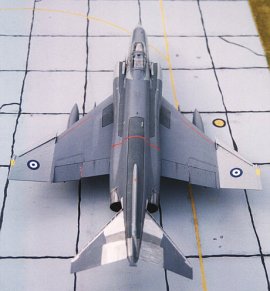
The Hill Gray II F-4E
This is my very first Phantom I made in 1:32 scale many years ago…I must admit, I made some mistakes here and there (e.g. in the cockpit, so I closed the canopies to hide them!). But all in all I think It's a nice looking model so I thought:…why not? Come on, take some pics of it… and here they are! I used the TERs and a MER left over from my broken Tamiya F-4D.
Painting and Decals
The used F-4s (all from the US ANG) came to Greece in the well know Hill Gray II scheme (two grays 36118 and 36270). After some years of operation the aircraft were painted with the ghost scheme (see part 2). The big "517" was actually black and I painted it over with the darker gray (36118). Again no spray gun to paint the model ! Some of the decals were made by drawing and printing them on clear decal sheet. The Greek roundels are made in Greece from Plastimodellismo. They are now smaller on the Greek F-4s for low visibility reasons.
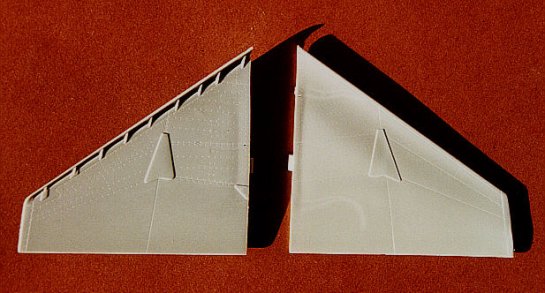
Comparing the Revell with the Tamiya F-4E
I'll try to make a compare between those two kits because I'd like to show, that the expensive Tamiya kit (ca. 190 Euro in Germany) had its problems too.
- The many "3D-Panels" that (I don't know why) they suppose to show battle damage (I've never saw a Phantom with such an amount of damage..) must removed from the entire fuselage.
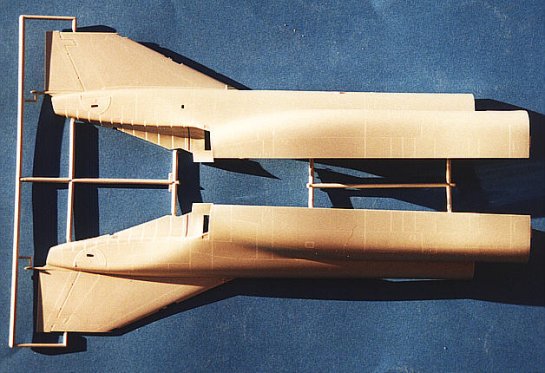
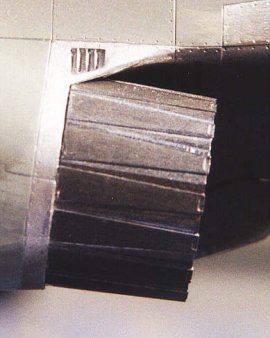
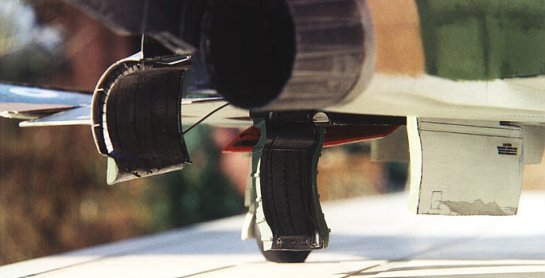
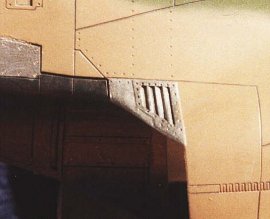
- The vent air intakes over the J-79 nozzle are wrong. These are the vents found on the F-B/C/D (short nozzle F-4s). That vent on the Revell Phantom is more accurate but not perfect too (see at the pic). (note:Tamiya Nozzle vents on left, Revell's on the right)
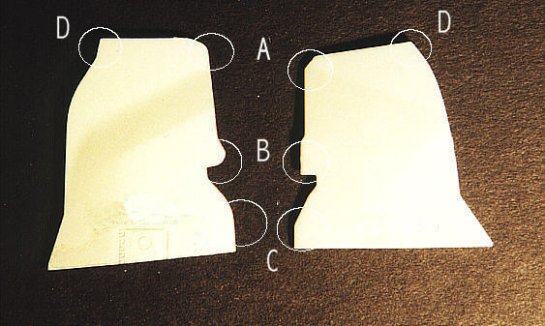
- The main gear door in the Tamiya kit is wrong. This is the NAVY-style door and you have to change it. Revell made here also a better job. Take a look at the pic to see the differences and you see what do you have to cut away! Only at the point "C" is Tamiya better; At the points A, B, D is Revell the winner.
I don't want to criticize the Tamiya Phantom. All in all it's the better kit, with a fantastic cockpit, nice landing gear and wheels and many more, but sorry guys I have to pay too much money to buy your kit…(that is also true for the Trumpeter A-10, but that's another story…).
Conclusions
It took me 6 kits and some aftermarket sets for the cockpits to complete that series, but we're not at the end! Did you notice above, this is part 4. The part 5 has some surprises for you... so guys, just stay tuned!
- Ptisi & Diastima Vol 168/ 178/ 185
- Modelling Magazine Vol 72/ 73
- F-4 Phantom (Kostas Dimitropoulos) (Costandinidis Publications)
- Machitika Aeroskafi Polemikis Aeroporias (Combat Aircraft of the (Hellenic) Air Force) (in Greek) published from the Model magazine "Modelling"
- F-4 Phantom II in detail and scale (Part 2, 1, 3) (Bert Kinzey)
Part 1 | Part 2 | Part 3 | Part 4
© 2006 Dr Menelaos Skourtopoulos
This article was published on Wednesday, July 20 2011; Last modified on Saturday, May 14 2016